I’m starting this one with a disclaimer. This is by no means a traditional Enchilada sauce, nor is it anything close any crap you’ll find made by nay of the fake Tex-Mex companies that call themselves Mexican food producers. This is recipe I came up with after traveling around Mexico and sampling a ridiculous amount of food. When I came back to the US, I developed this sauce to use not just for Enchiladas, but for steaks, chicken, pulled pork, and the soon to be published “Mexican Lasagna”. You’ll notice there’s not a whole lot of pictures, mostly because, well…it’s that easy. This will make 1 quart:
3 oz. dried pasilla or guajillo chiles (your choice, guajillo chiles are generally milder)
Straight up, doesn’t get any easier than this. Crack open your chiles and shake out the seeds and pull the stems.
Drop these into a pot with your chicken stock, garlic, cumin and chile powder and steep them on a low heat until they’ve reconstituted. I usually do about 15-20 minutes.
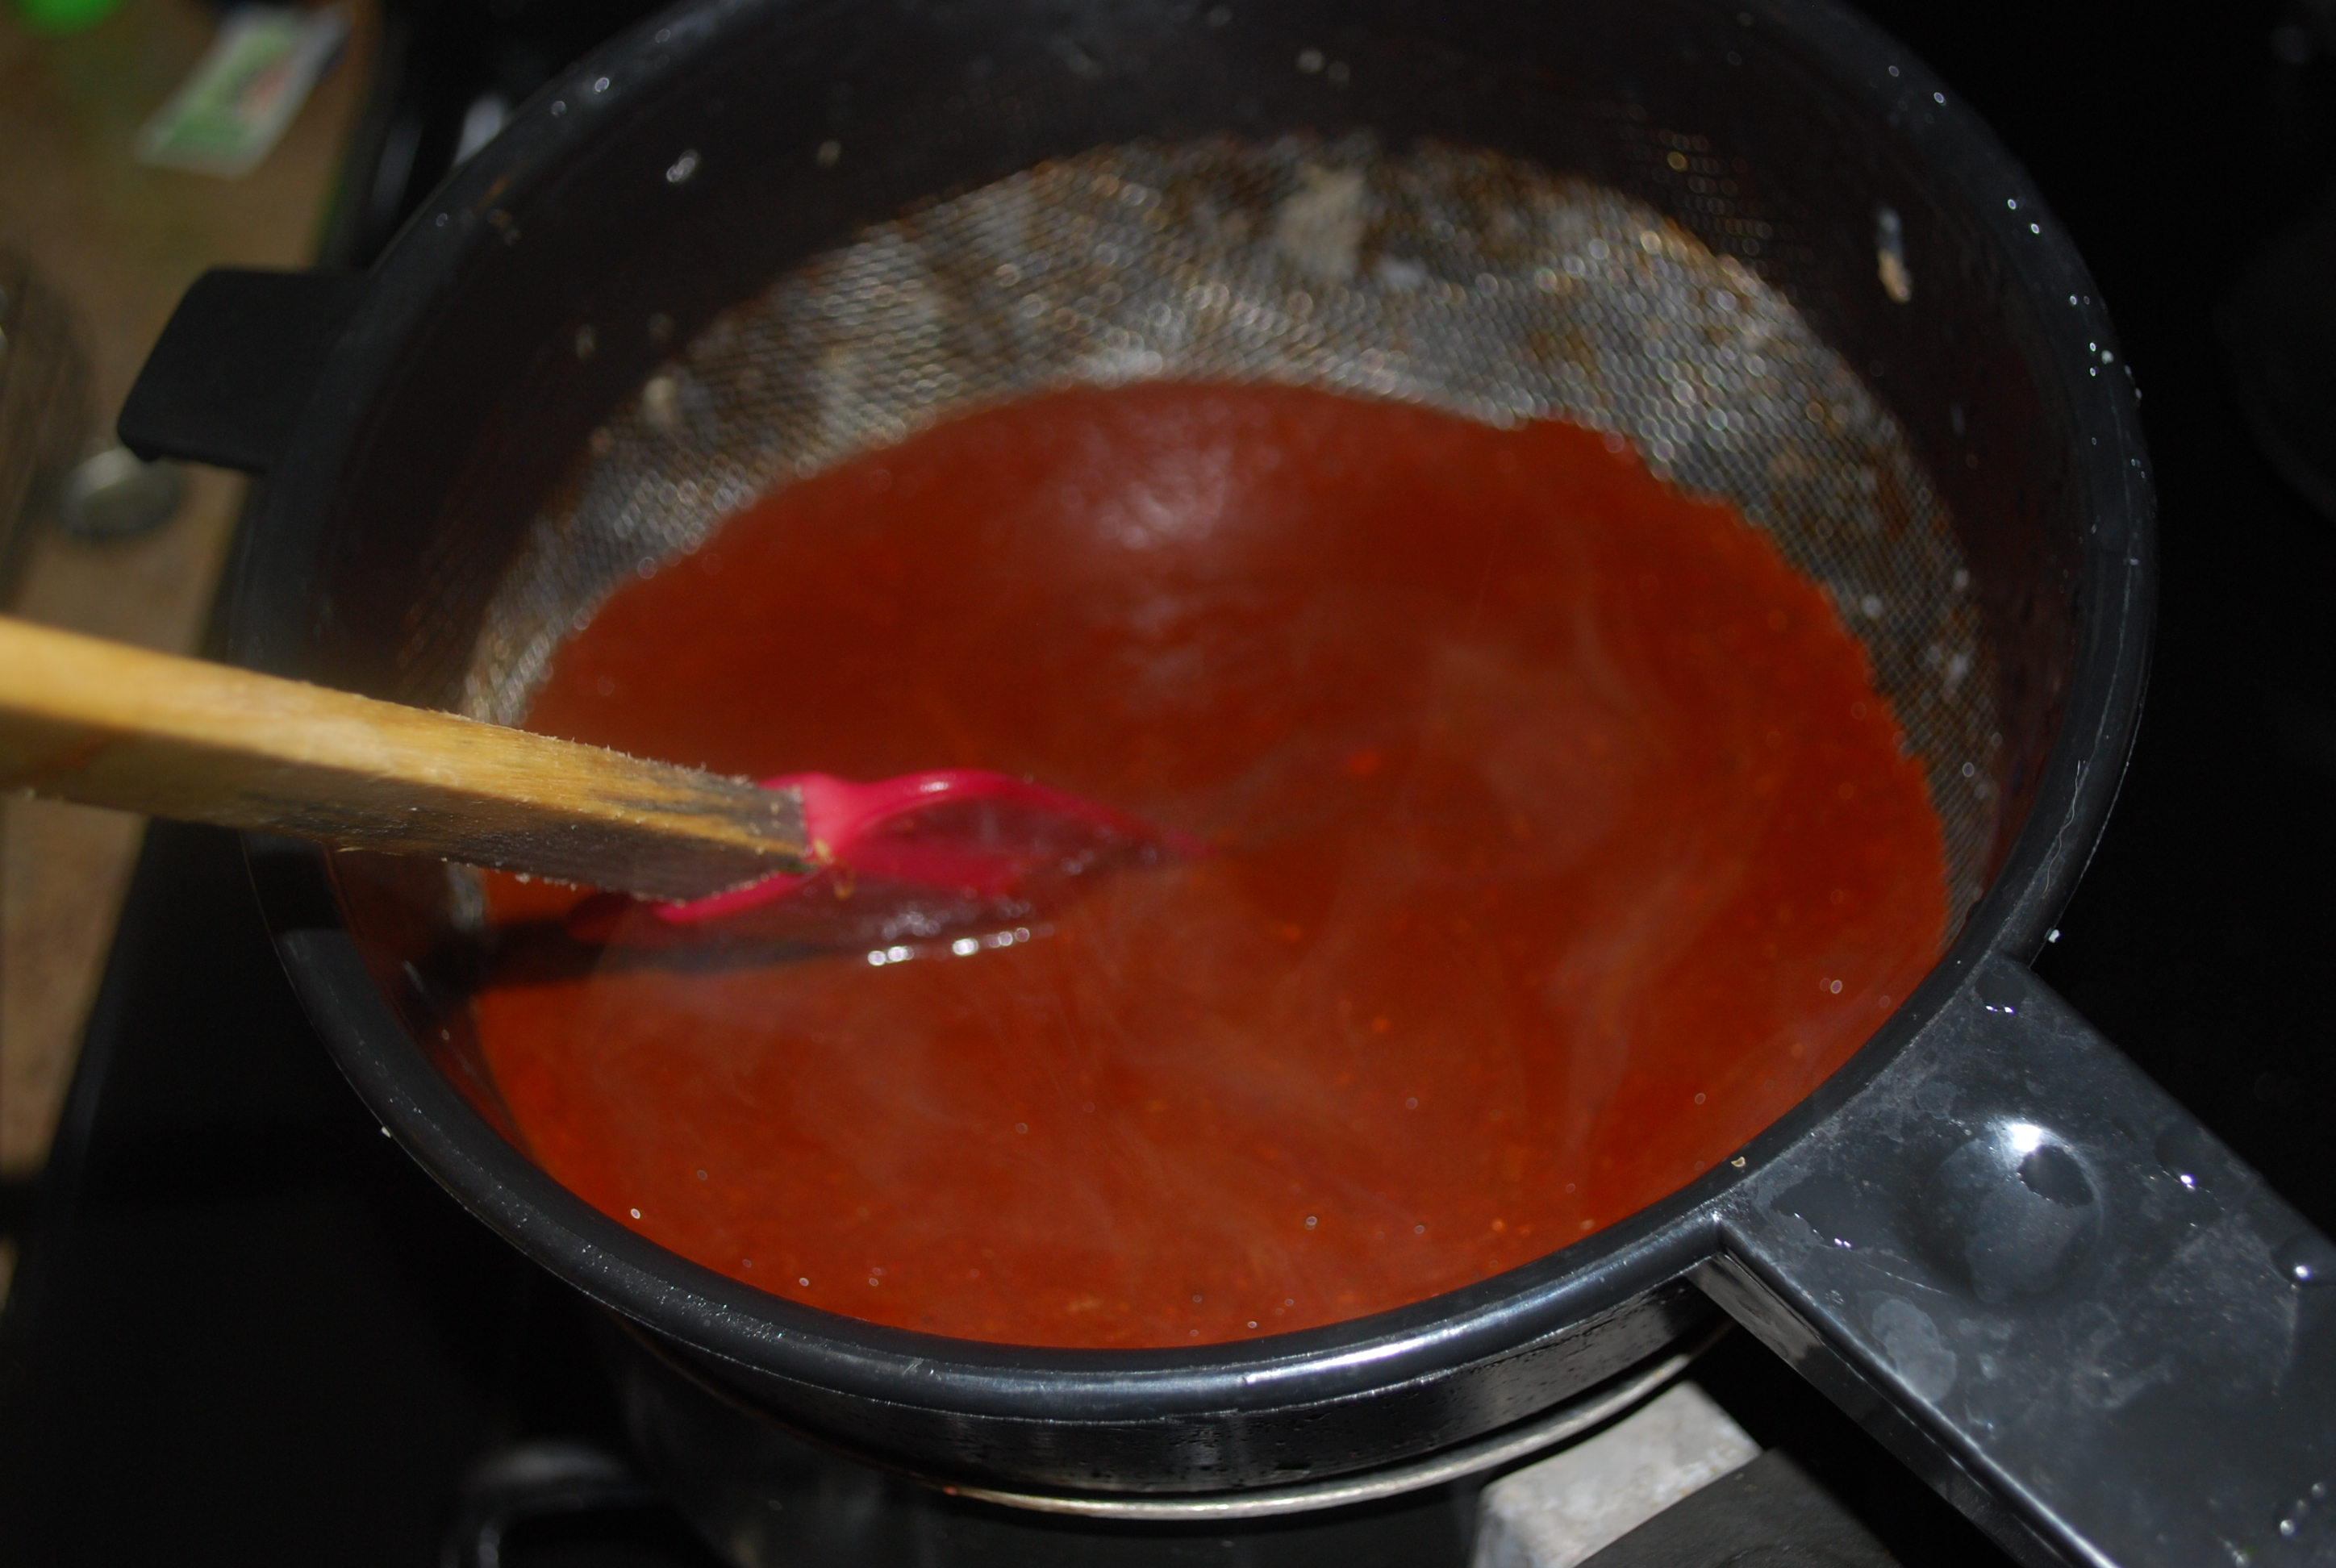
Add you tomato sauce and bring to a low simmer.
Transfer everything to a blender and let ‘er rip for about 1 minutes on high. When You’re done your going to pass it through a strainer like this to get any extra seeds or skin out:
Keep it smooth, bro
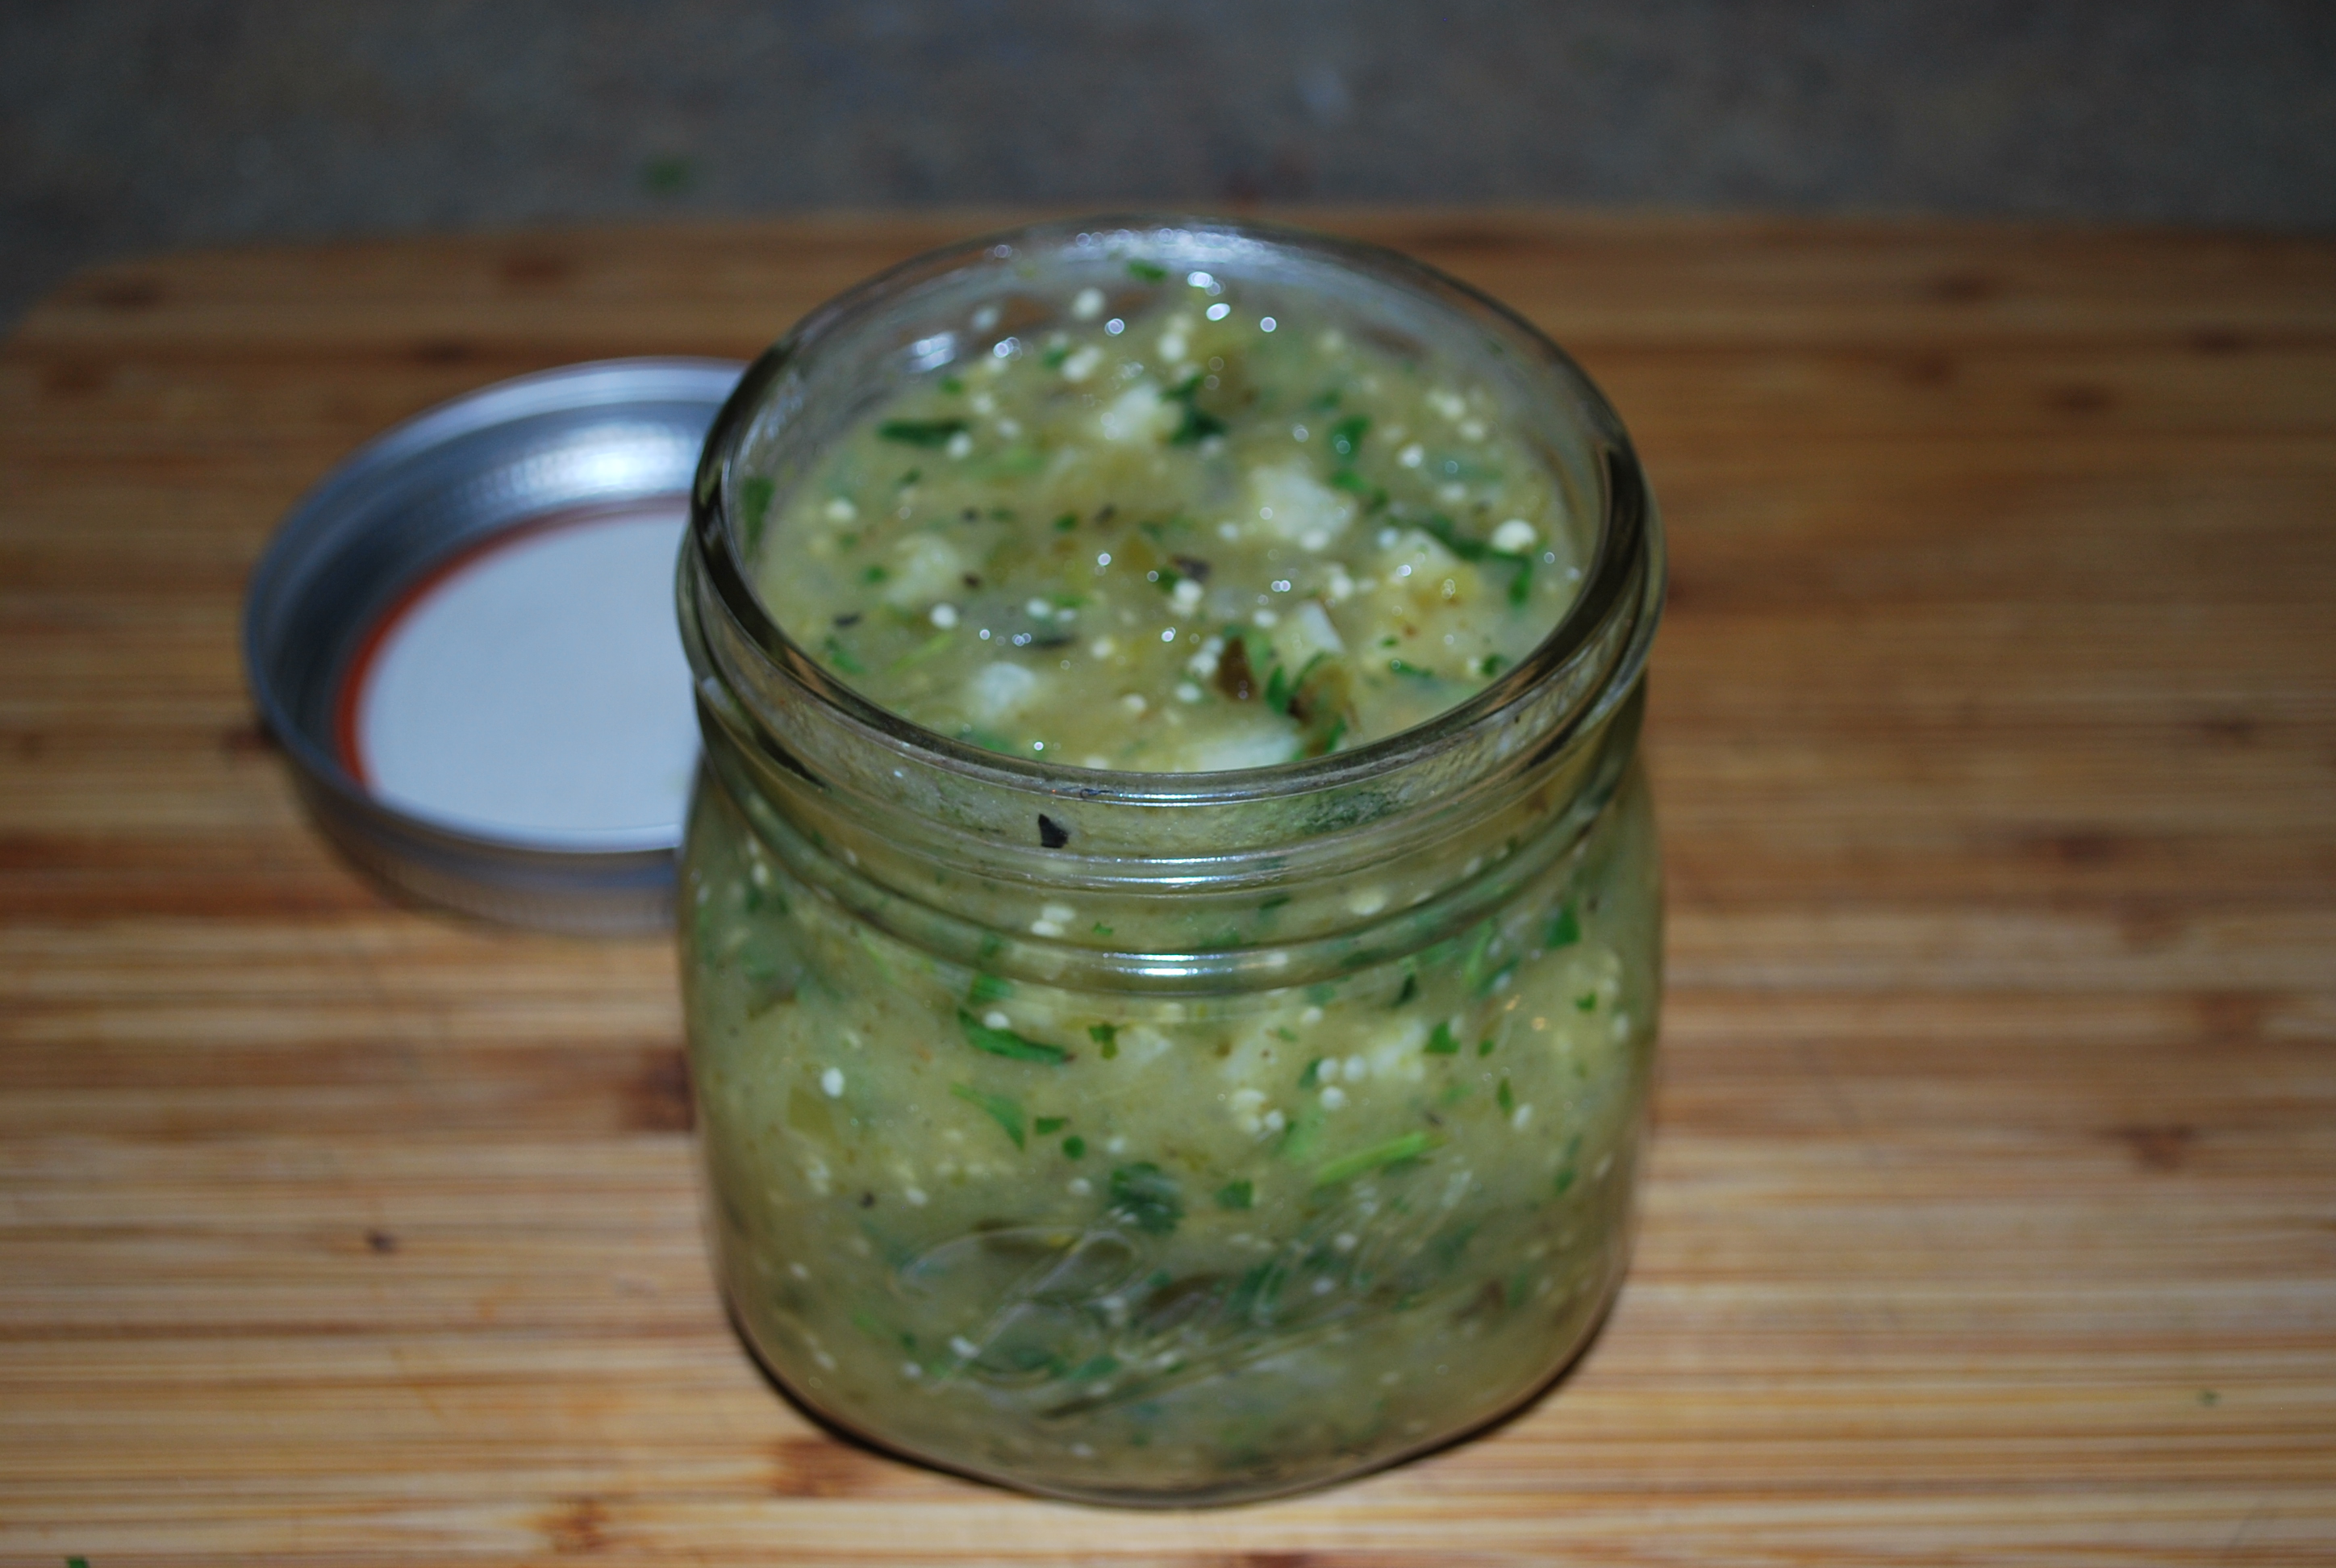
I like to hold this in a jar or tupperware container until I’m ready to use it. Like I said before it’s very versatile and you can pretty much add it to anything, or use it as a sauce for meats. I like to throw a bit into salsa for an extra kick, or even use it as a starter for making my own chile pepper ketchup (let me know if you want that recipe too).
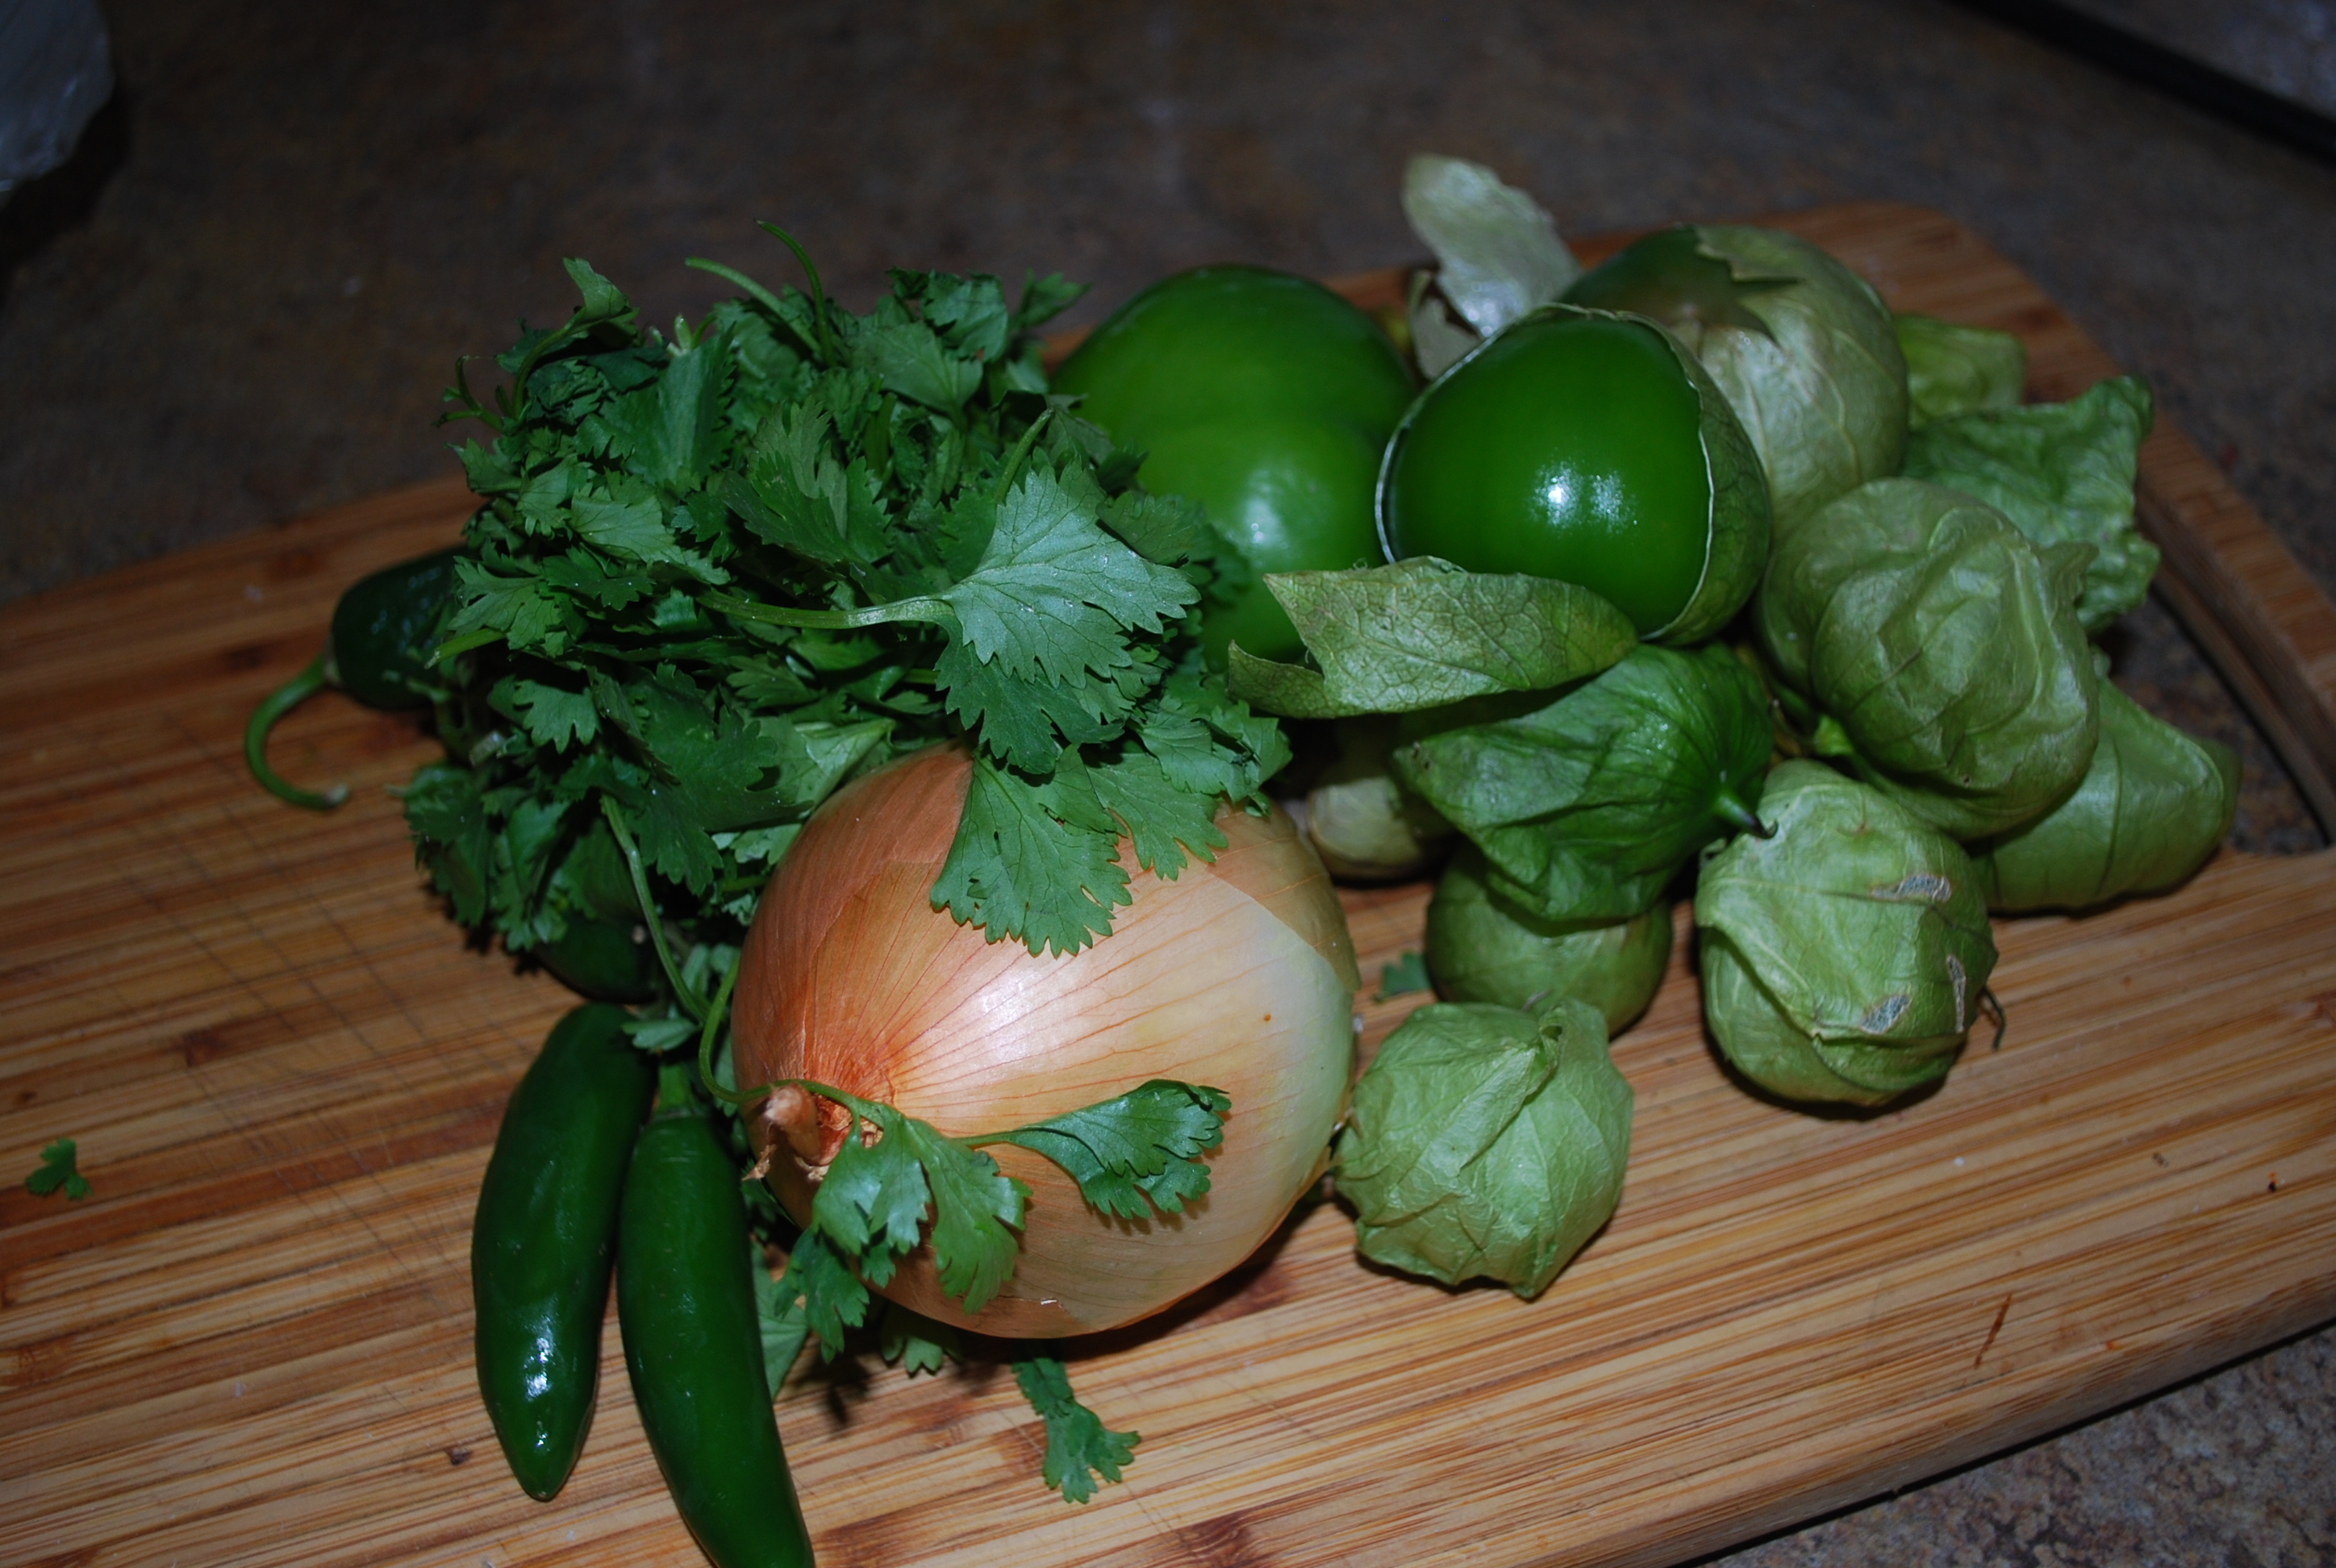
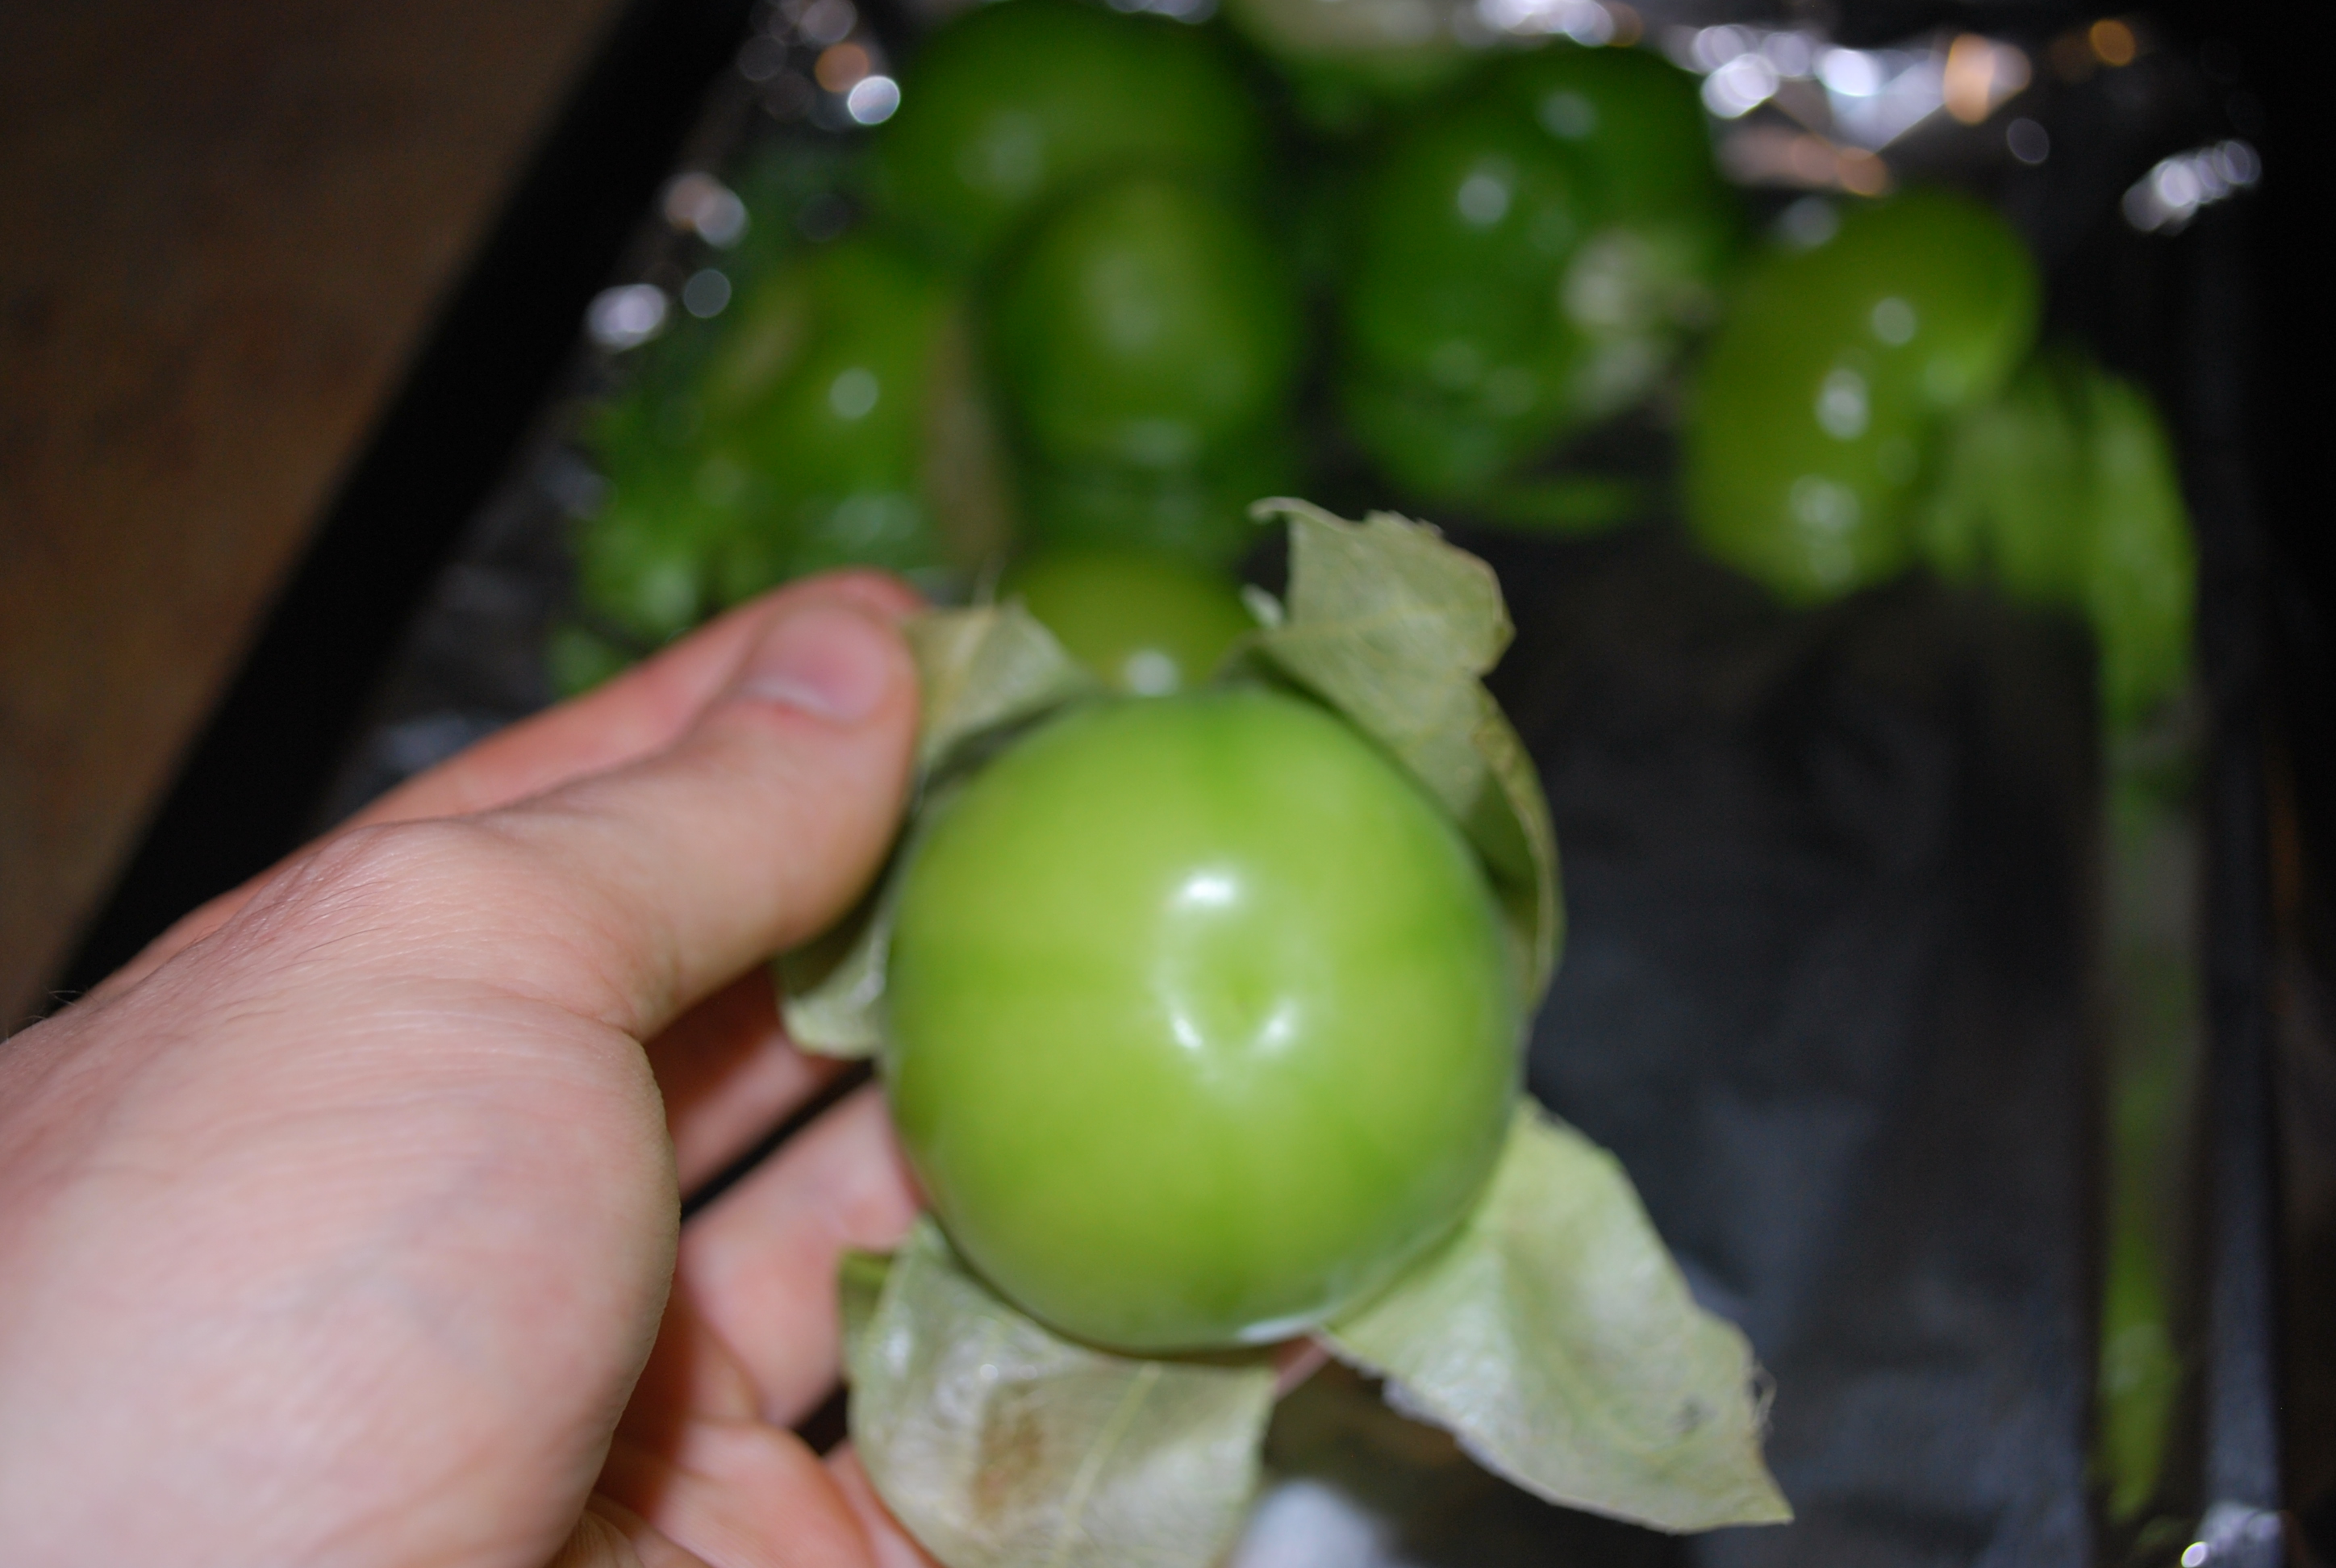
You’ve all seen that vegetable hanging out in the produce section, you have no idea what it is, but all of the Latinos in the store are picking it up and no one else. It kinda looks like a turnip, but it’s not. It’s harder and kinda cucumber-sh. Well that’s a Jicama. It’s mild flavored and very refreshing. A lot of times, it’s eaten raw with some kind of creamy dipping sauce and that’s about it. Well, not today. I was lucky enough to get some jalapenos and tomatillos from a local farmer, and decided to whip this up using those same ingredients. This will give you 1 1/2 quarts.
1 1/2 c. small diced Jicama 2 tbsp lime juice 1/4 c olive oil 1 1/2 lbs. tomatillos 3 cloves whole garlic 1 medium white onion cut into quarters 1 bunch cilantro, rough chopped water as neede Salt and pepper to taste 3 jalapeno peppers (Optional)
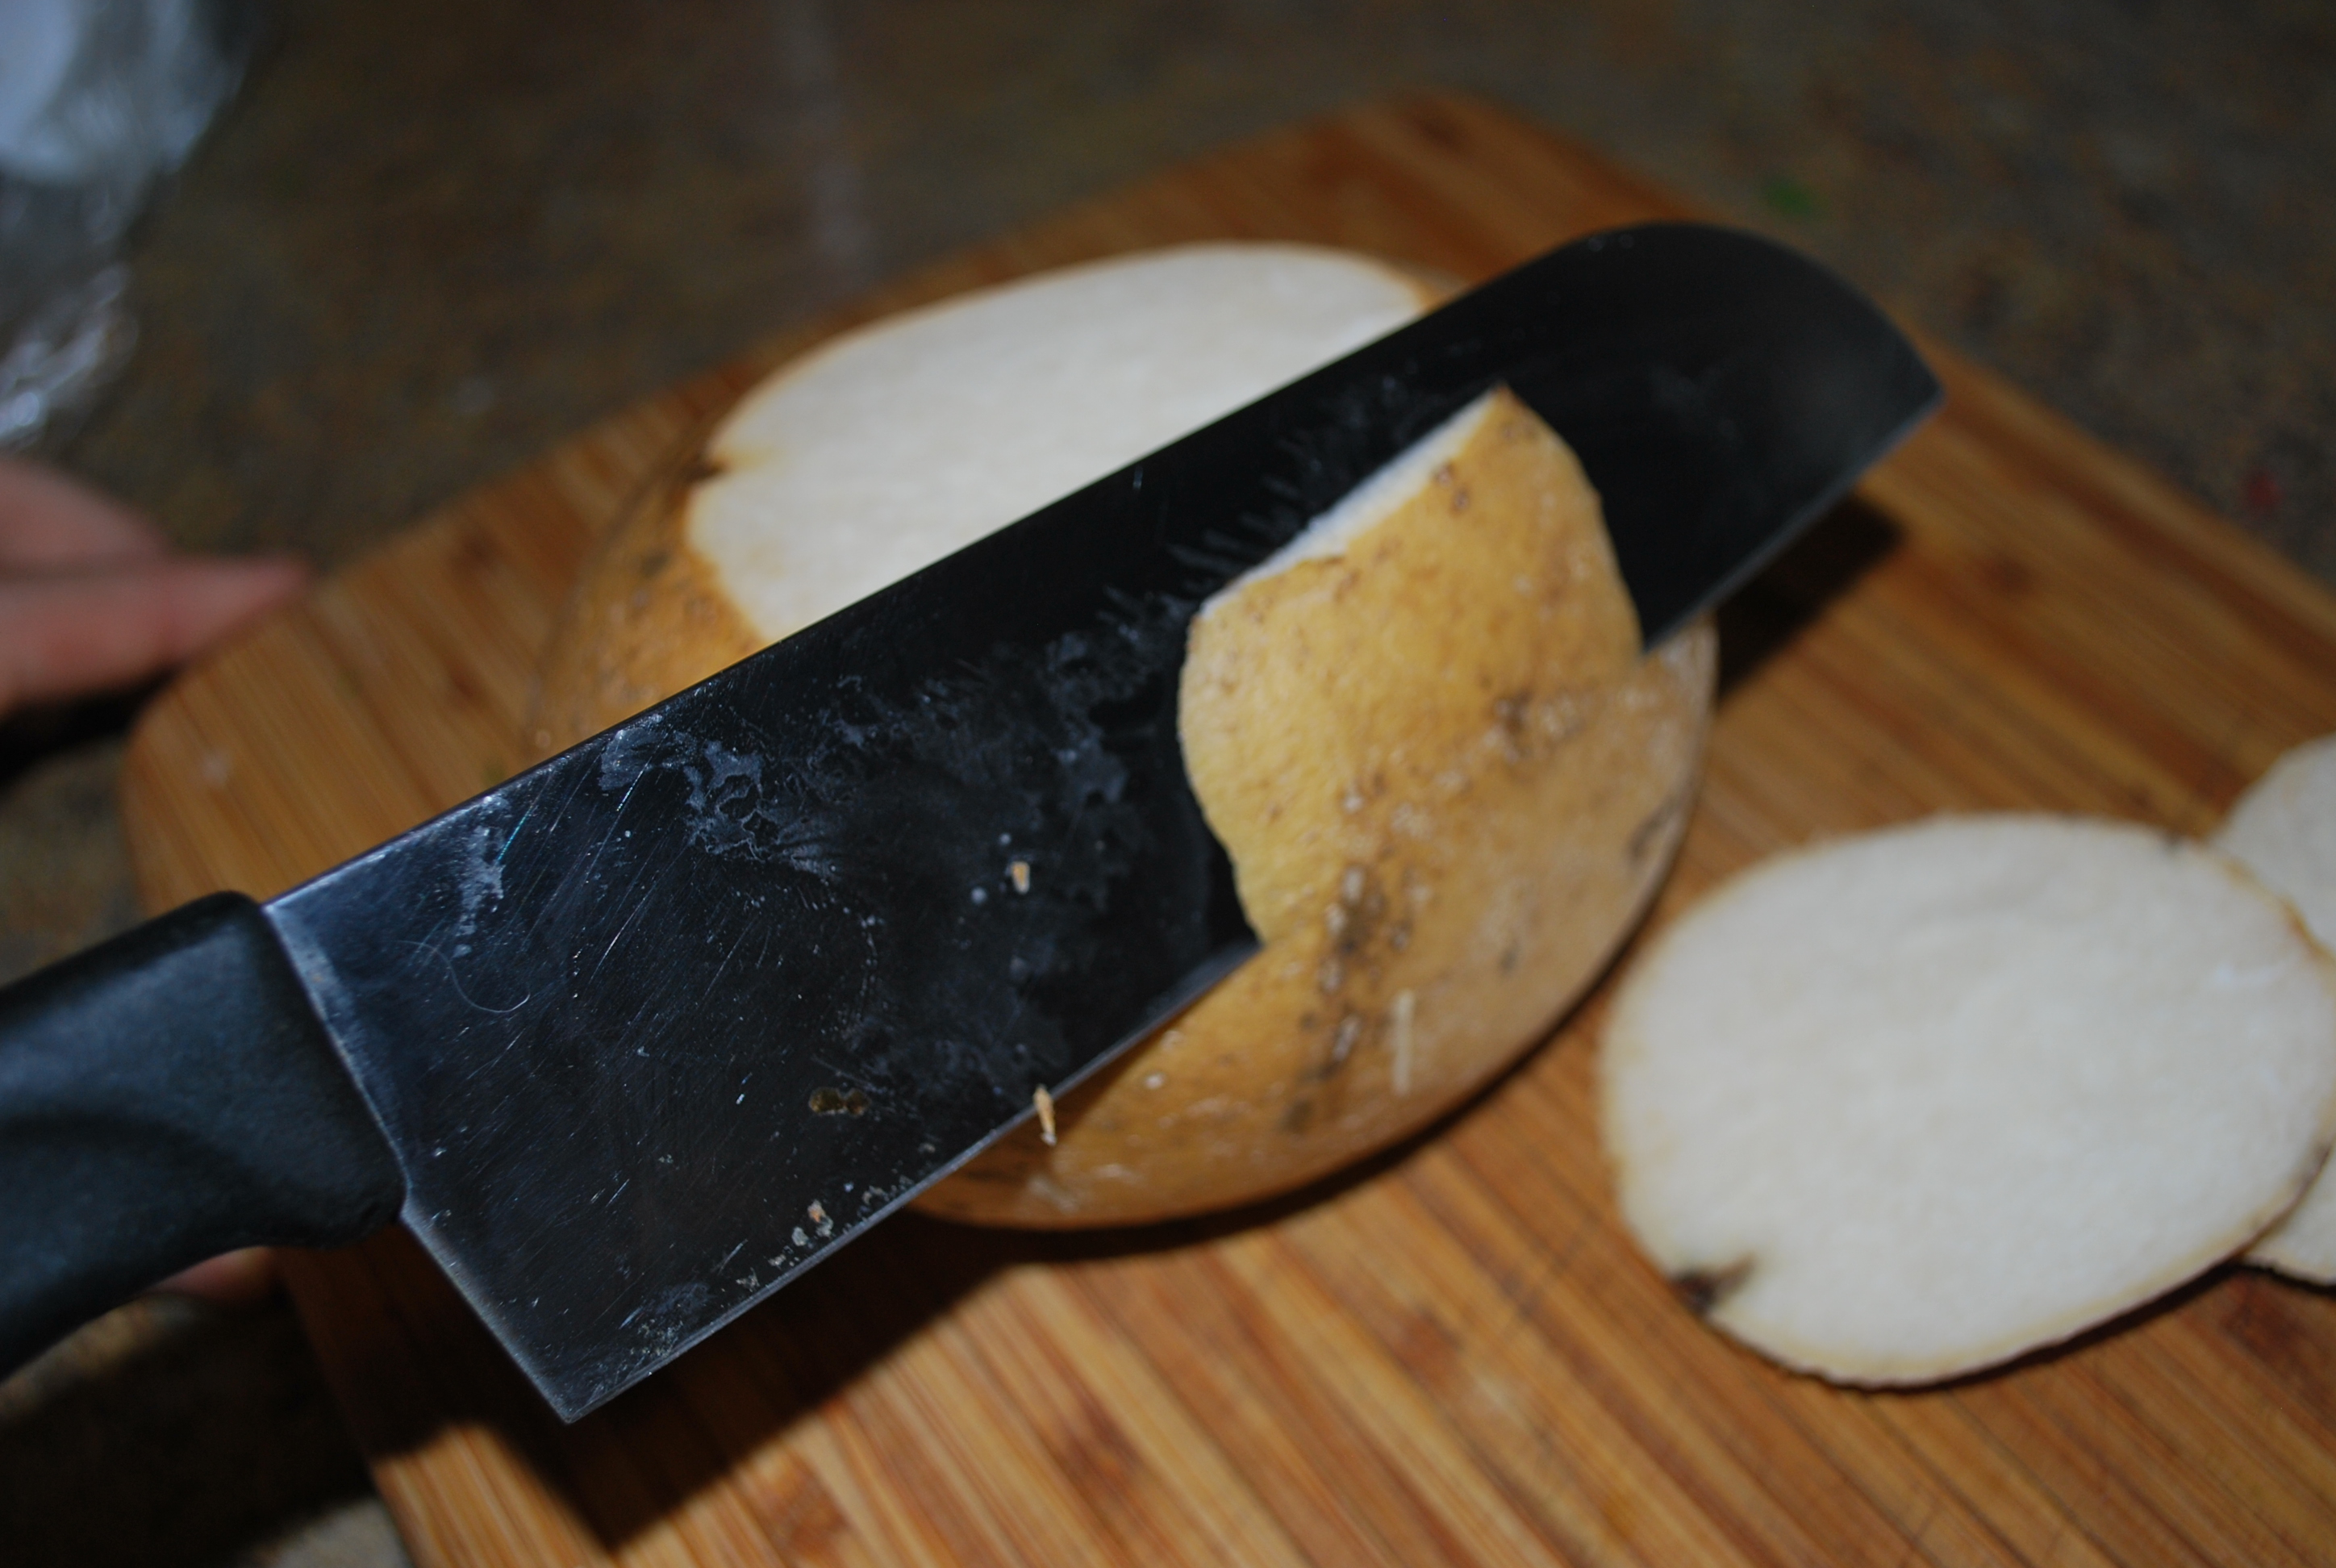
If you’re not sure how to peel the jicama, just think of it like a turnip. Just use your knife like this:
Peeling the jicama
Now turn on your broiler and start peeling your tomatillos:
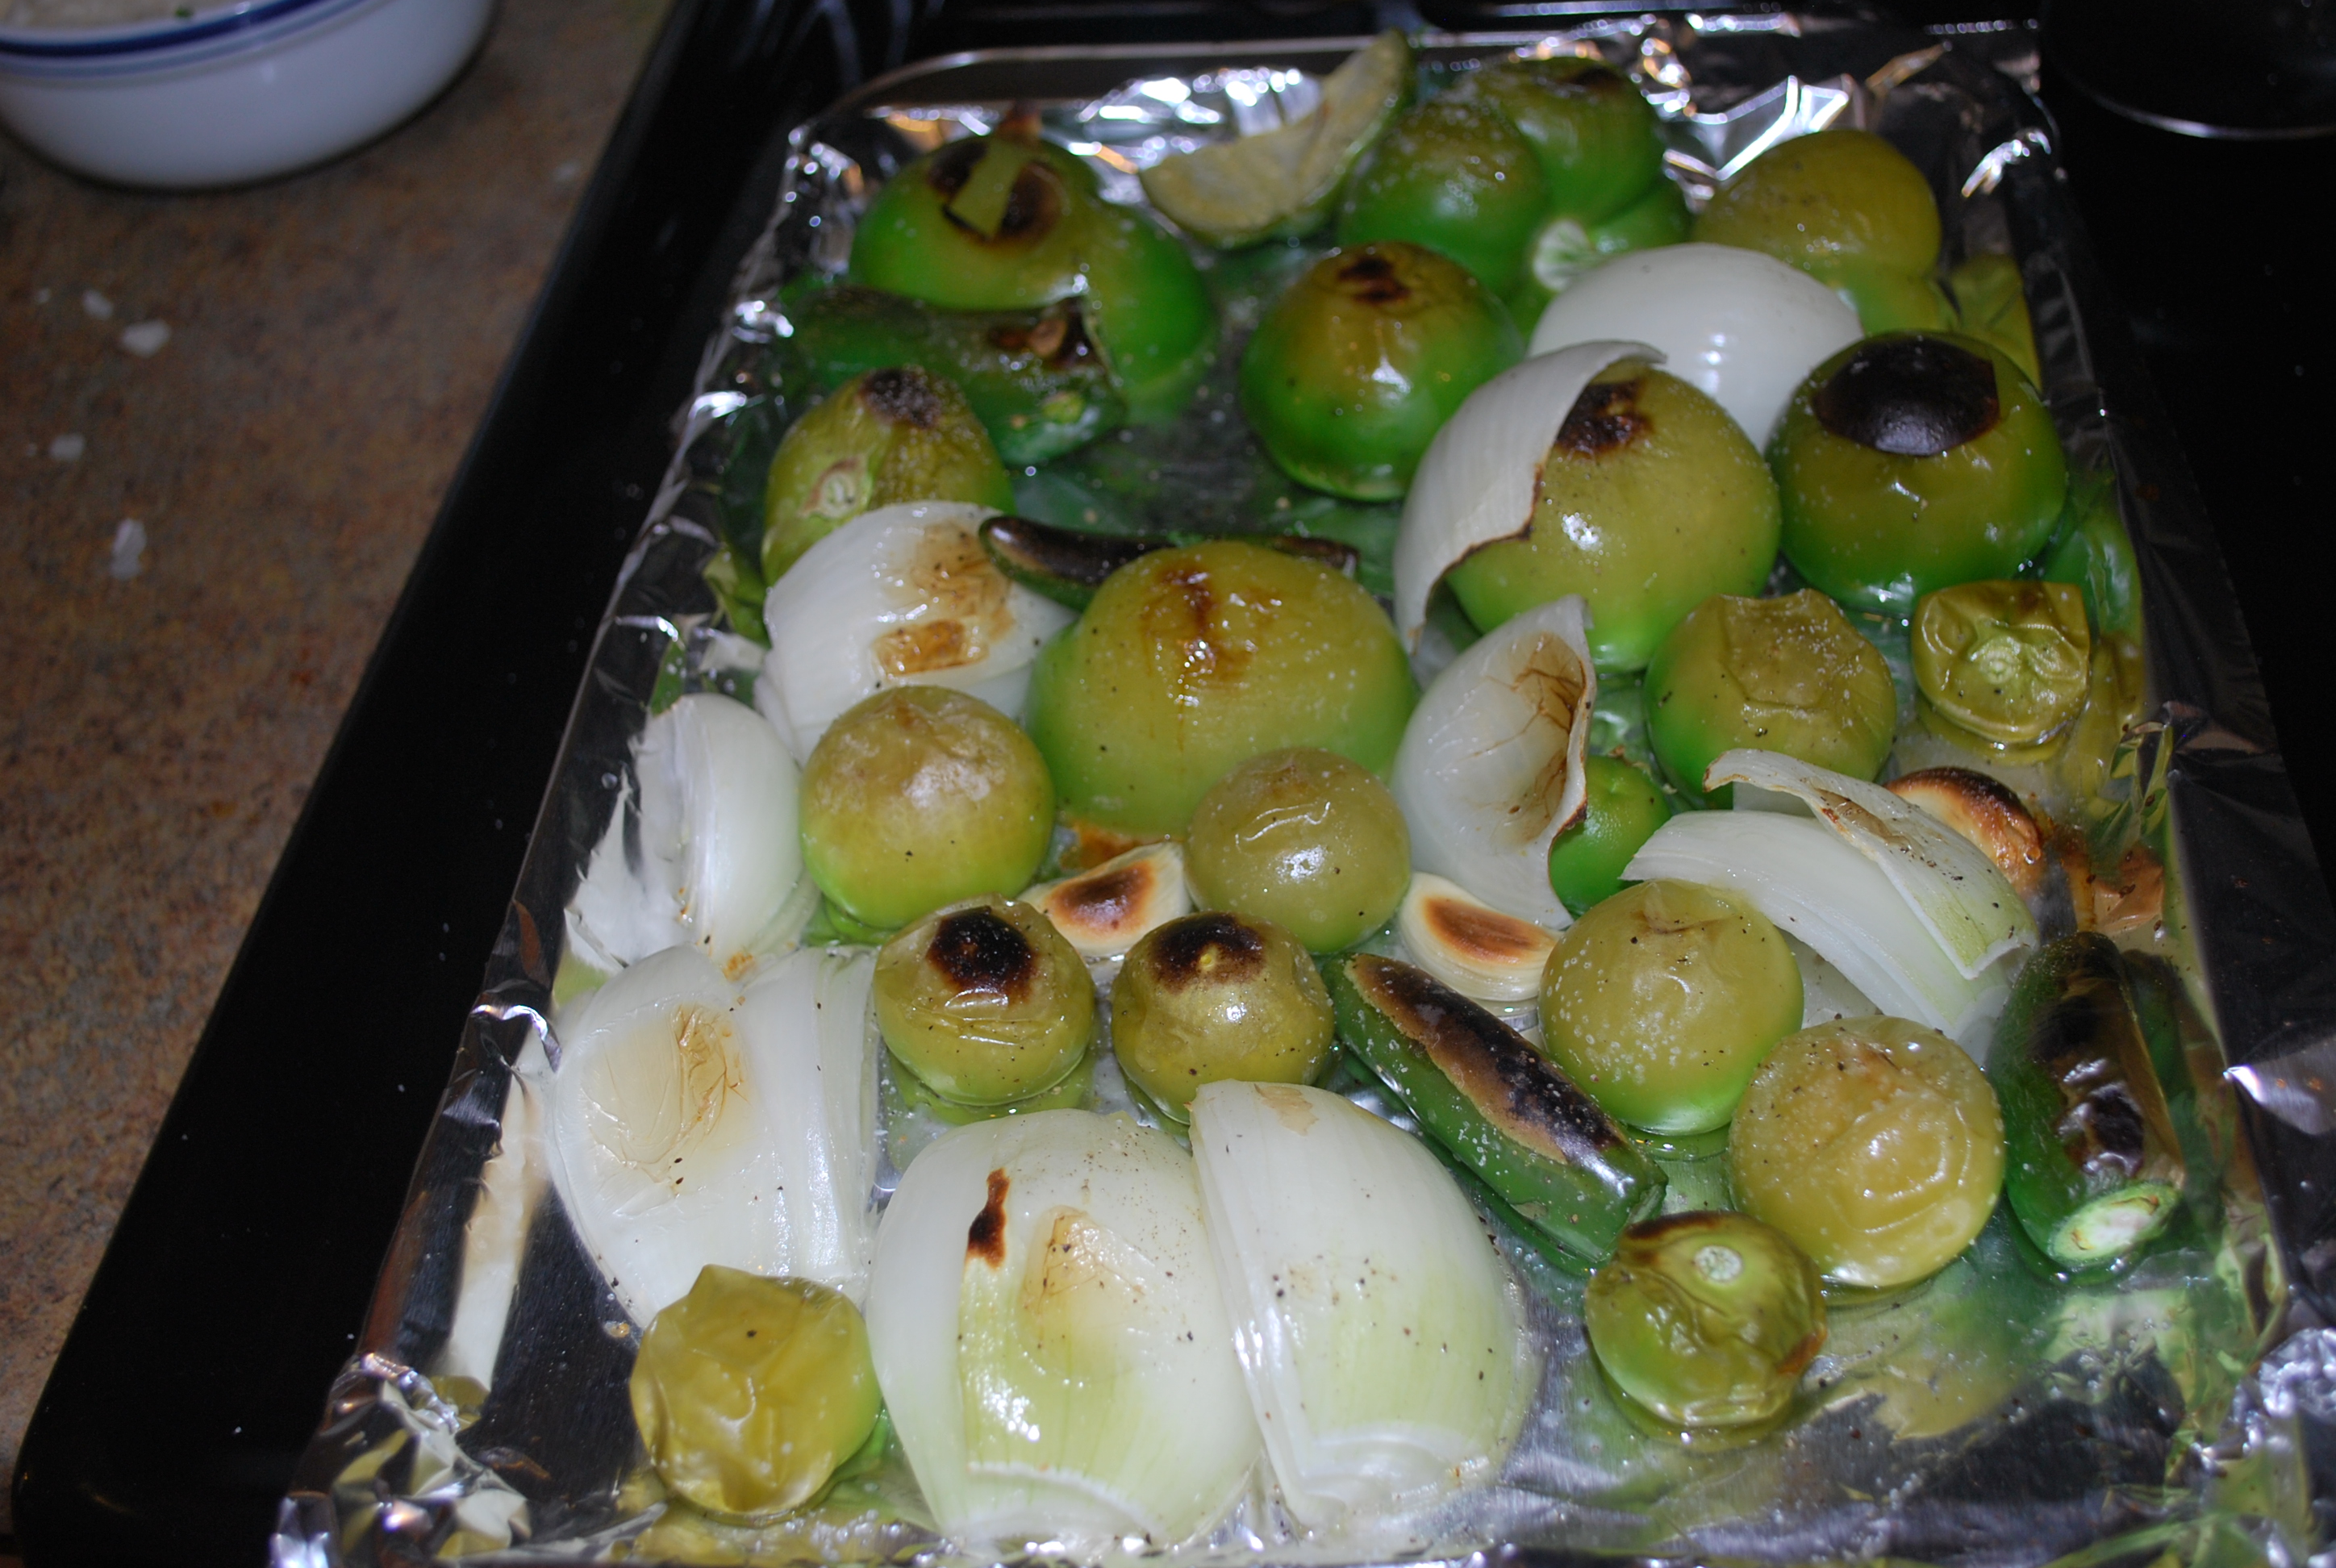
Lay out the onions, garlic, peppers and tomatillos on a sheet tray and brush them with oil and season them with salt and pepper. Pop the under the broiler until they look like this:
Now here’s the fun part. Grab your blender while everything is still hot. Drop the vegetables and cilantro into the blender and pulse about 6- 7 times. Just enough to break up the ingredients, it’s not supposed to be smooth.
Drop the mixture into a bowl and add your lime juice, olive oil and jicama. Season it again if you like and if it’s but too thick for you, add some water. I like it thick so I really only added a couple splashes.
So now what do you eat this with besides chips? Well Anything. It makes topping for Carne Asada, chicken, Pork chops, eggs, and even chilaquiles. The jicama adds a refreshing, crunchy element that brightens up anything. of course, htis being near the end of summer, I like to can it an keepsoem around for parties.
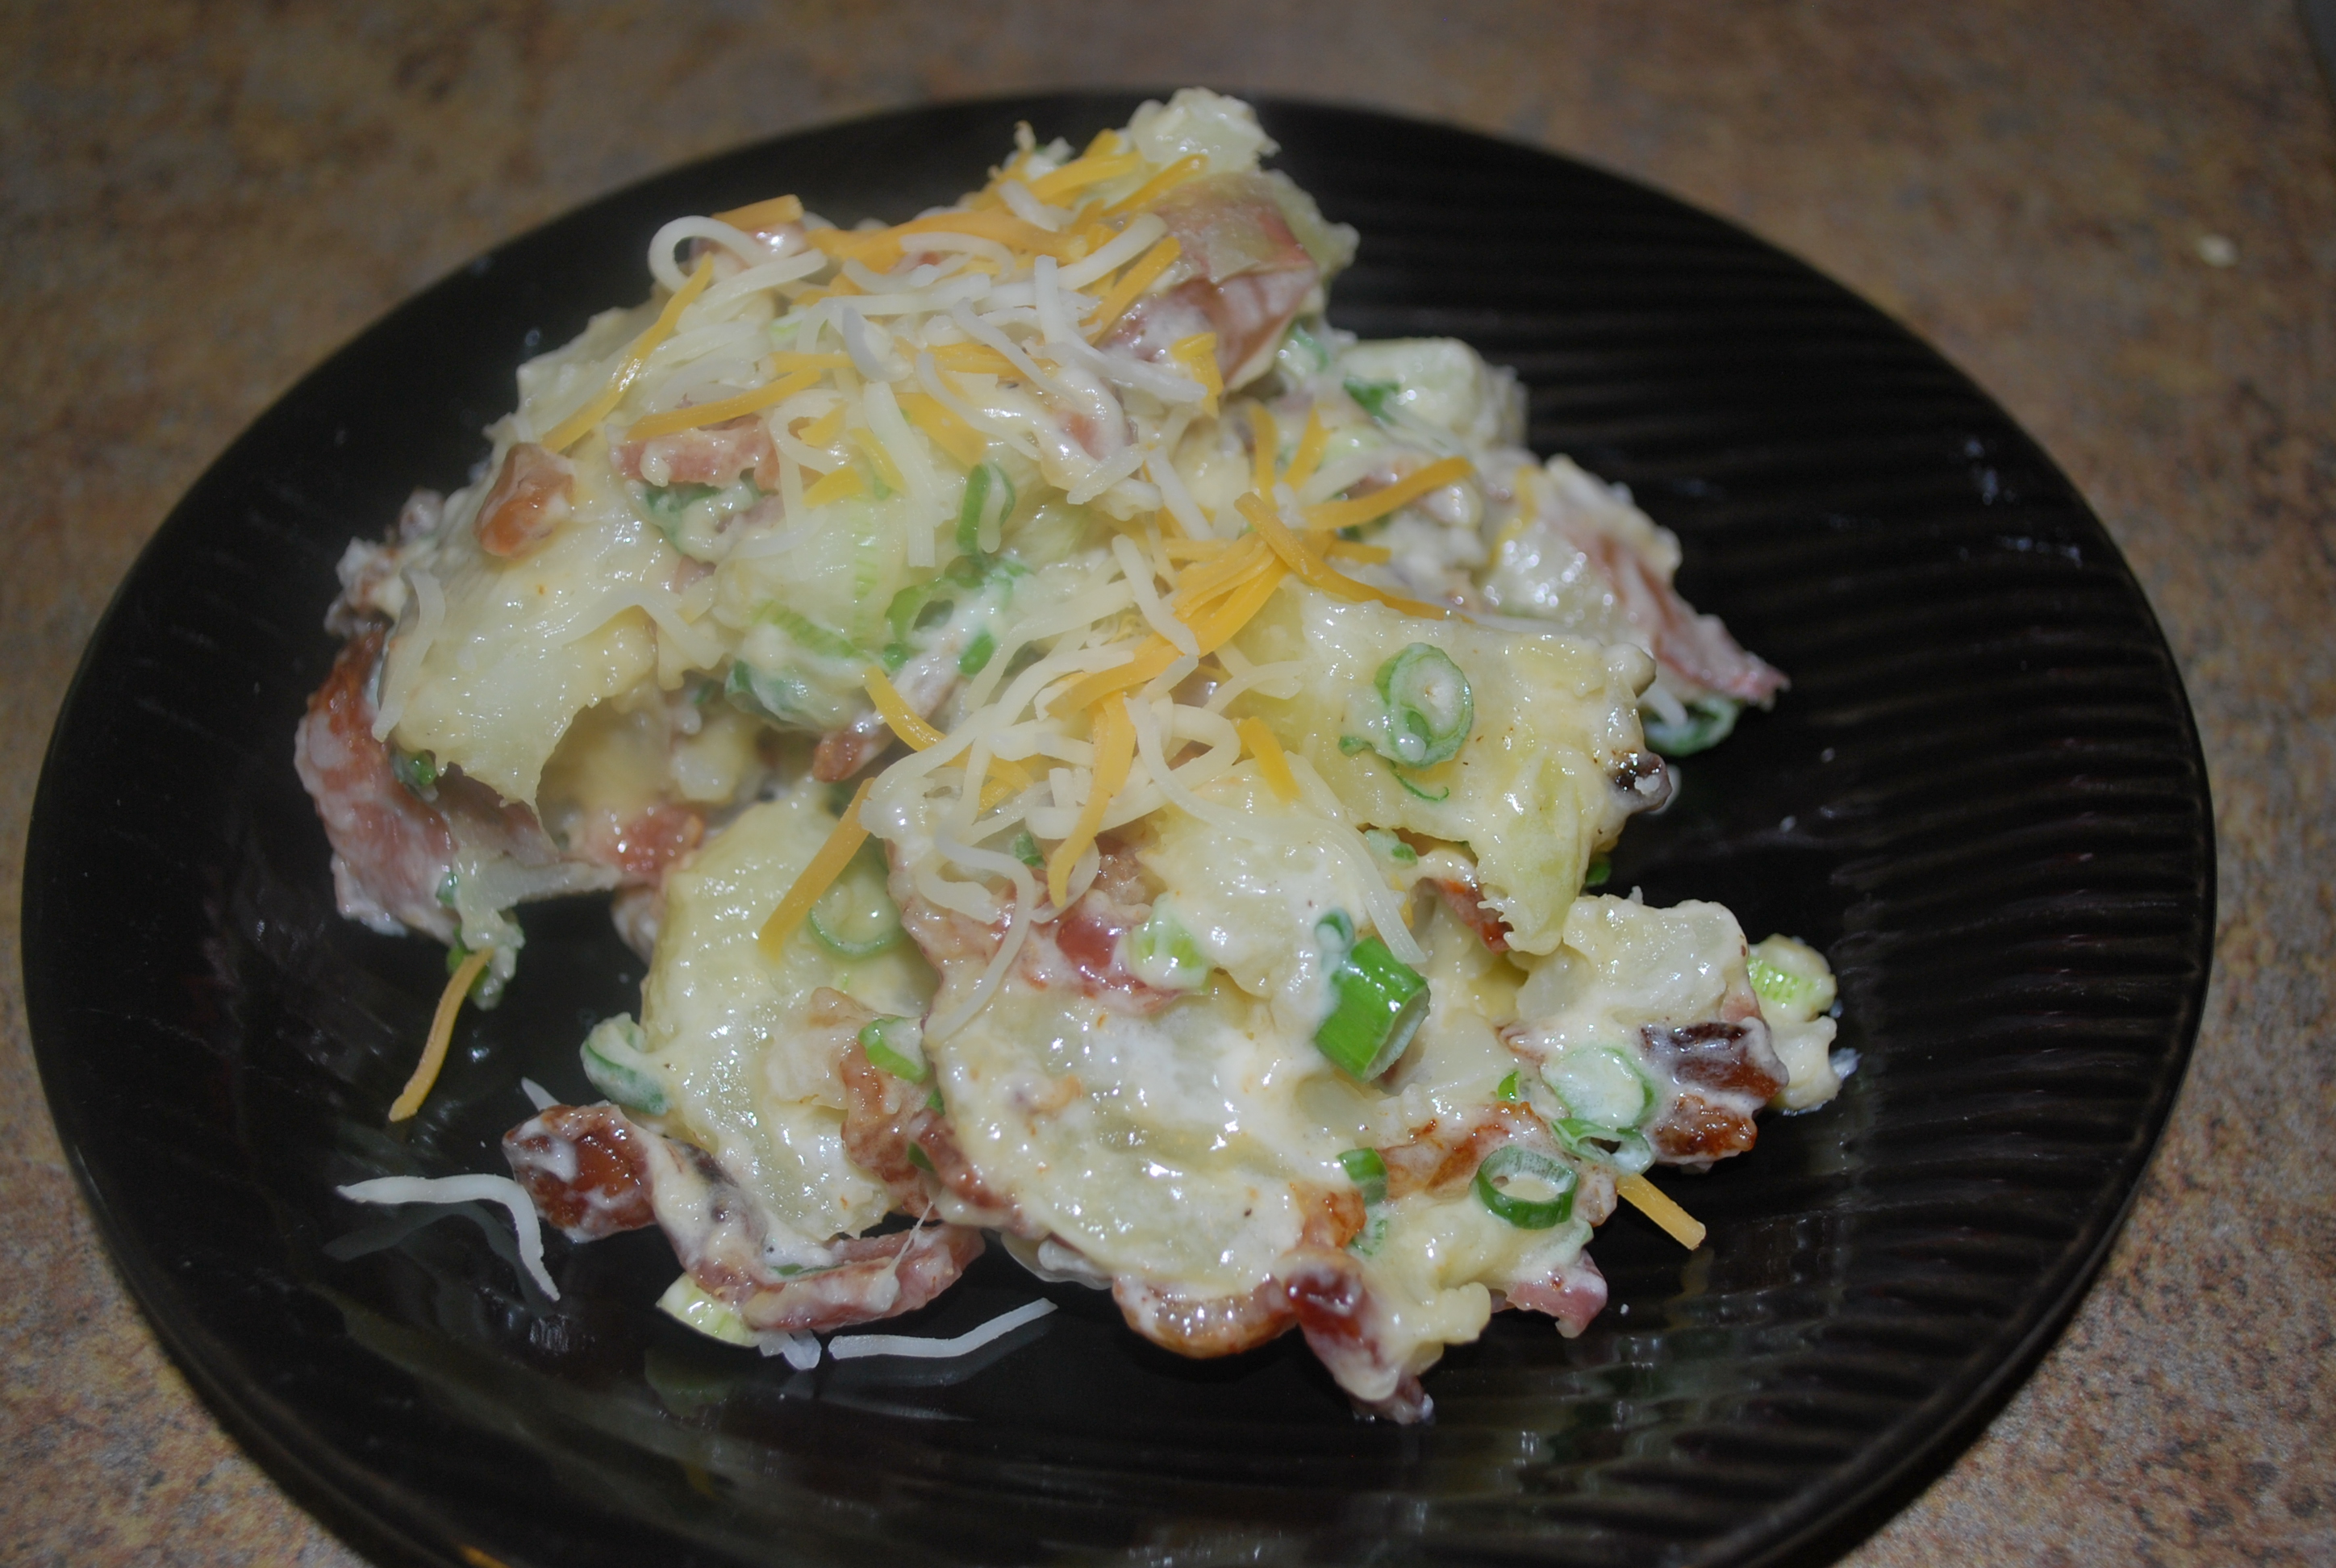
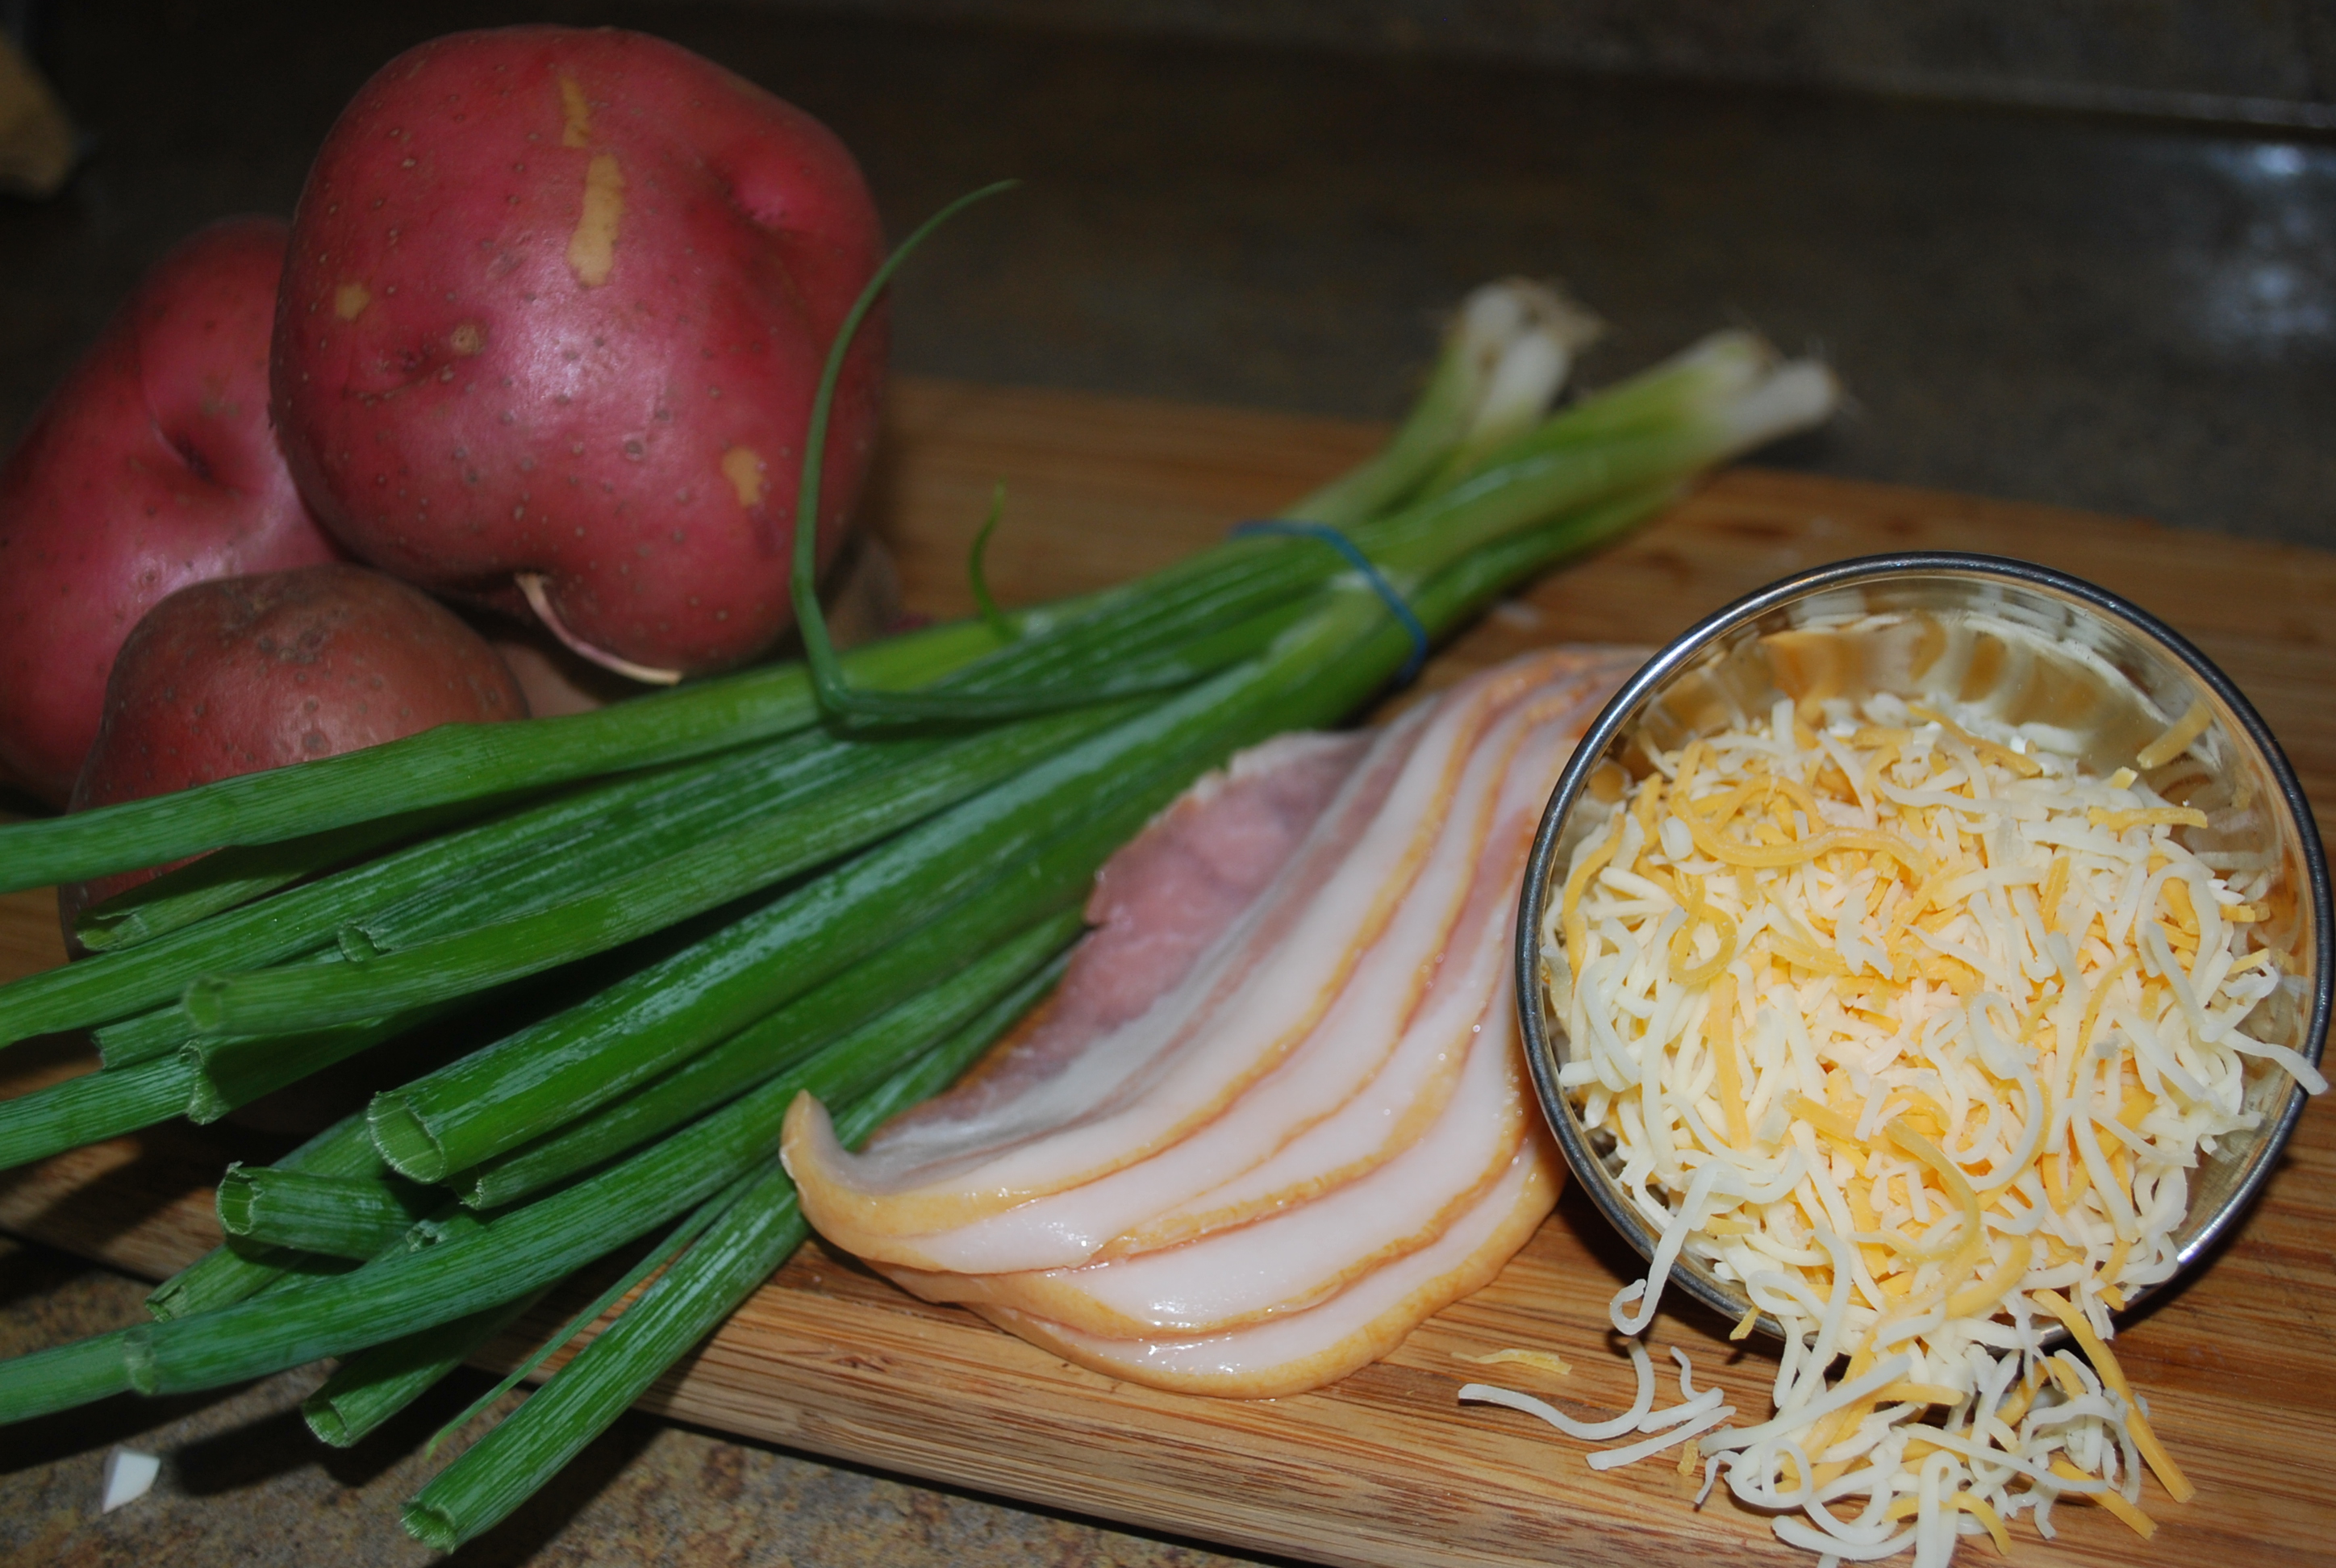
You’ve heard of a loaded potato right? I like them just for everything else that comes with it, forget about the potato. The bacon, sour cream, cheese, and chive are the good stuff. This is a little summertime recipe I like to throw together for cookouts that everyone loves. It’s basically a cold loaded baked potato, but with some twists. This will make about 2 quarts.
Potatao Salad of Awesome
2 lbs. red potatoes
4 scallions
1/4 c. shredded pepper jack cheese
1/4 c. shredded cheddar cheese
1/2 lb Applewood smoked bacon
1 tbsp sour cream
1 tbsp mayonnaise
1/4 c ranch dressing
1 tbsp chopped fresh dill
Pre-Asweome
BACON TIME!!!!! Fire up your oven to 400 and slide that bacon on in there. I like to do bacon in the over, because it get a better crisp and render than in a pan. Flip it about 8-10 minutes in, then let it finish. Let it cool and drain off the grease. Give it a quick rough chop when it cools enough to handle.
Now, split your potatoes and slice them about 1/4 inch thick. Just barely cover them with cold water and drop about 1 tsp of salt in to the water. Boil thee potatoes for about 20 minutes. We want these mashed potato soft.
Let the potatoes cool for just about 1 minute then add your cheese and our cream. Stir these in quickly so some of the cheese melts. Let the potatoes finish cooling
Add your bacon, scallions, mayo, ranch , and dill and mix well. We do want to potato to crumble a bit, so it’ going to be a bit smoother on the palate than a traditional red potato salad.
Adding the cheese and our cream to the hot taters.
Quick and easy…and it has bacon. You can’t go wrong there. So how do you play with it? Change out the potatoes for one, switch out your cheese if you like too. I like to add some blue cheese to this when I’m in the right mood. You can even take out the bacon and replace it with something like Chorizo Sausage or Tasso Ham. I’ll be doing some more variations soon.
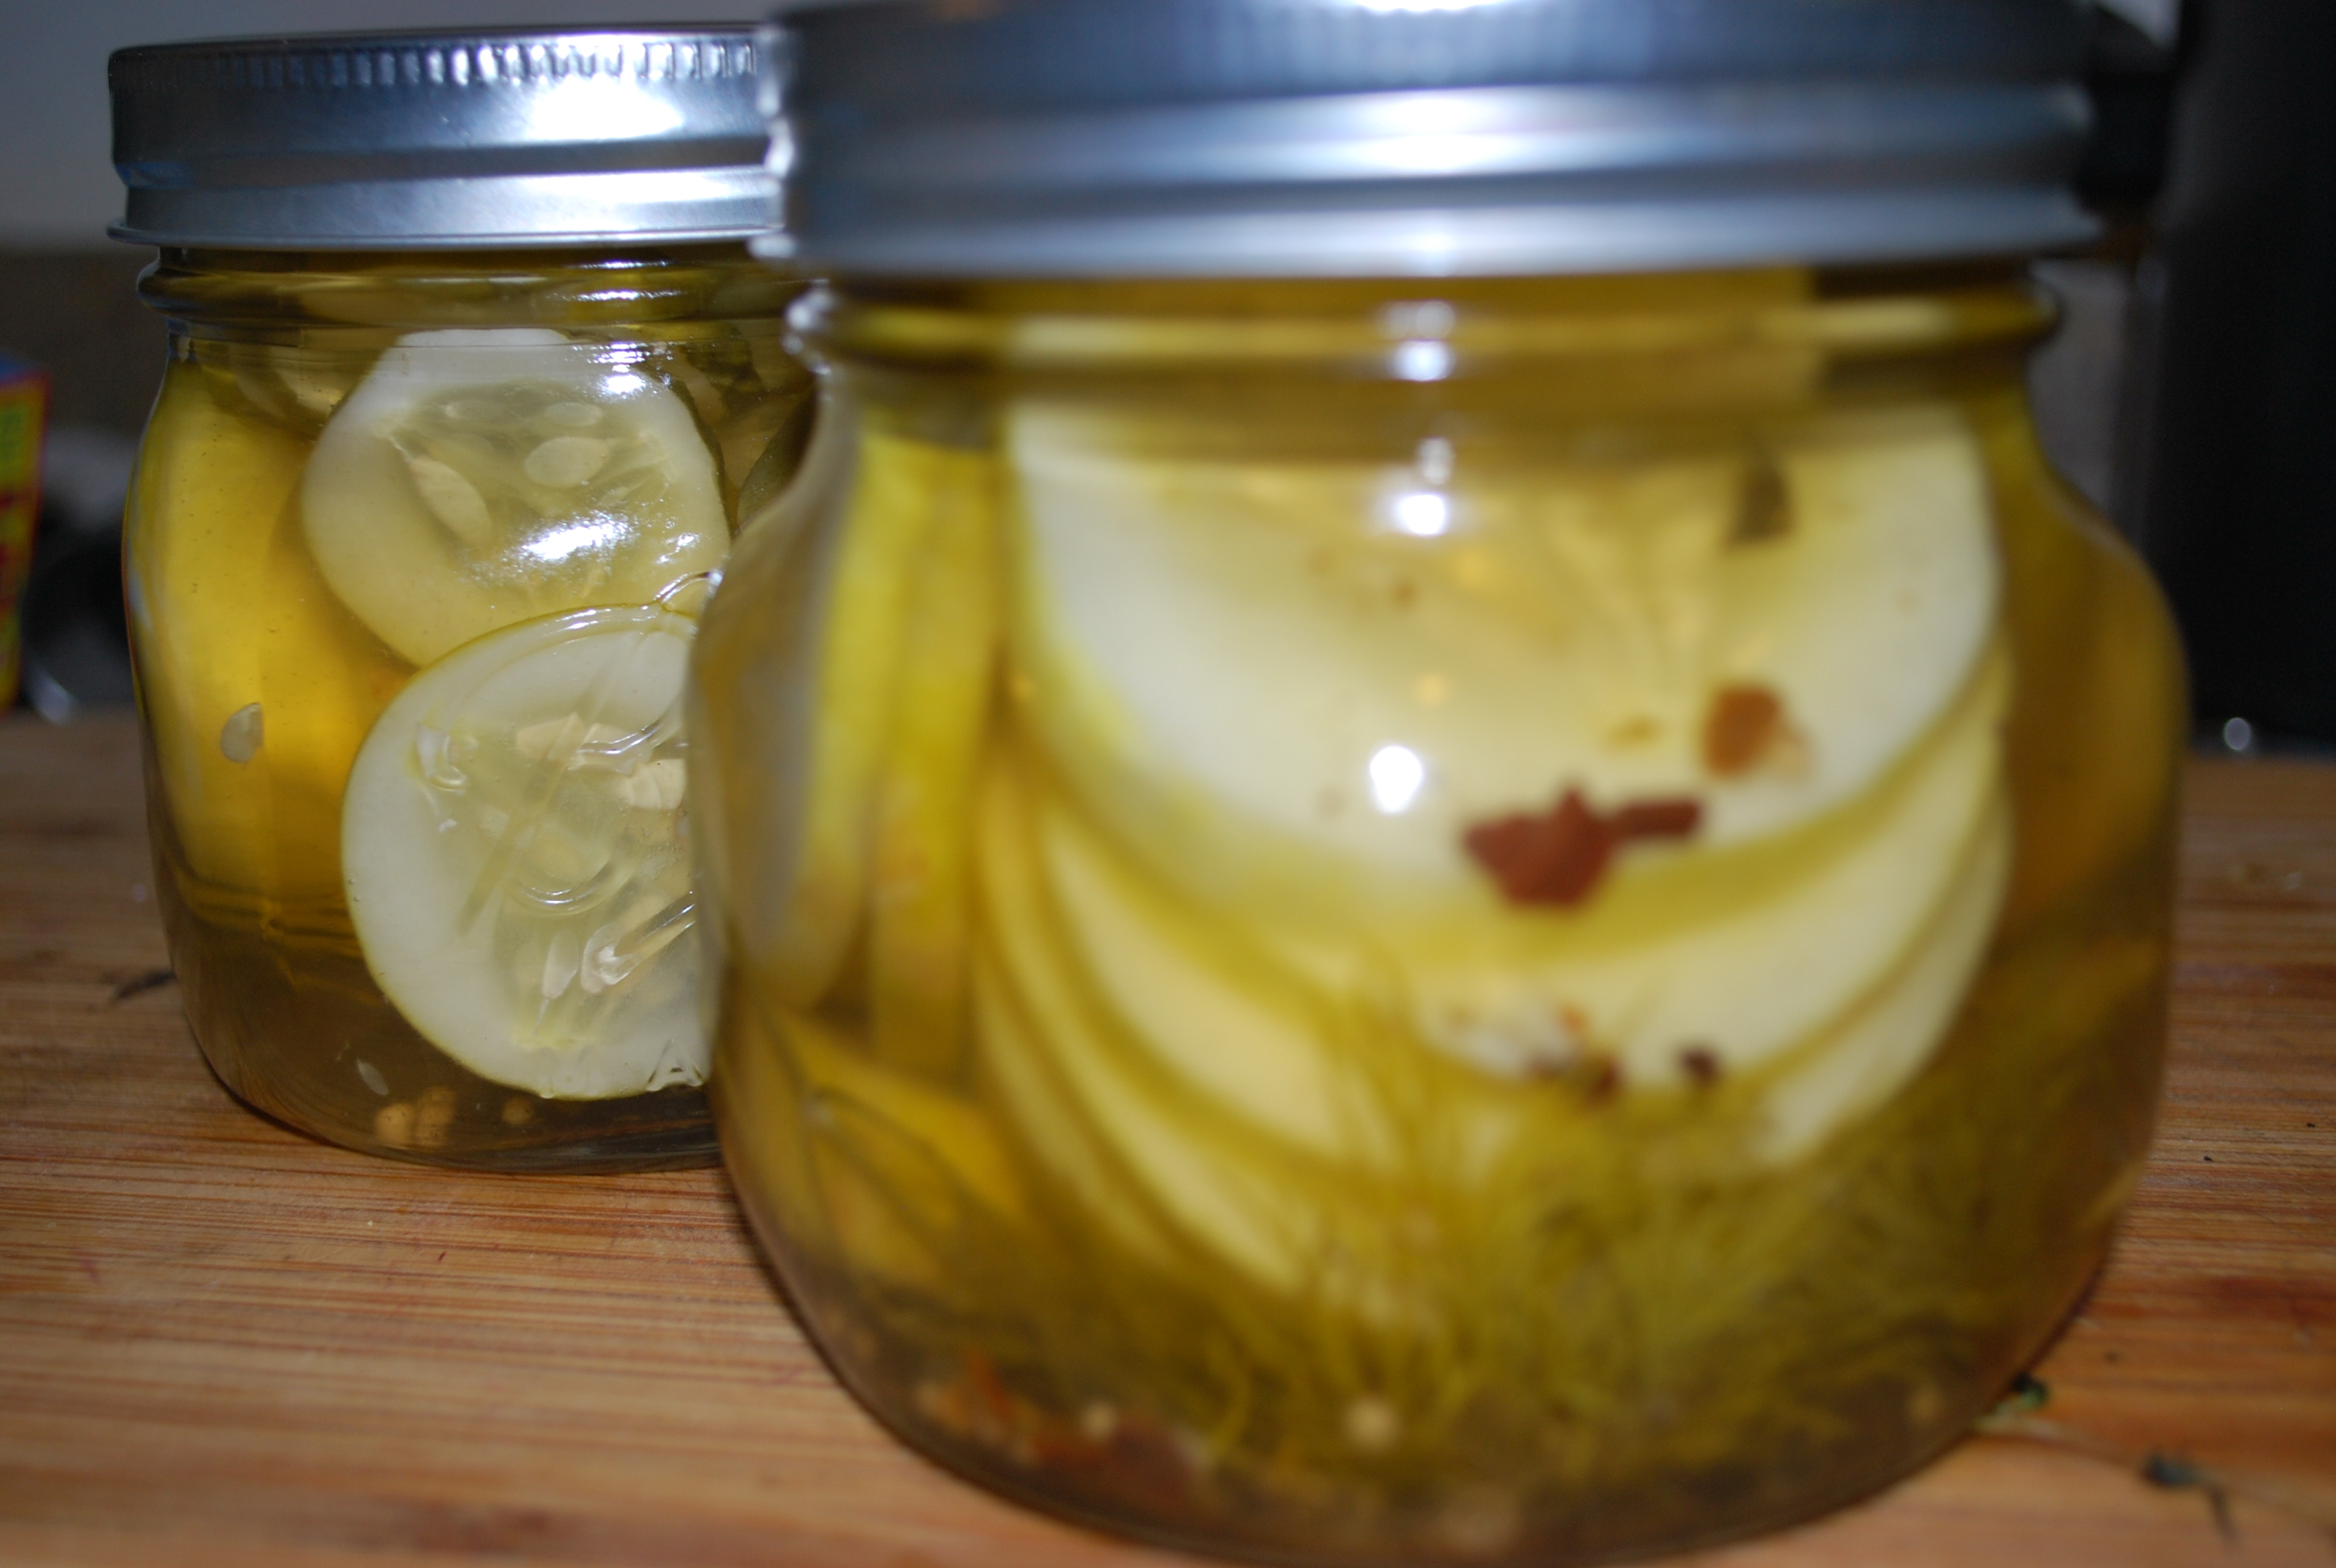
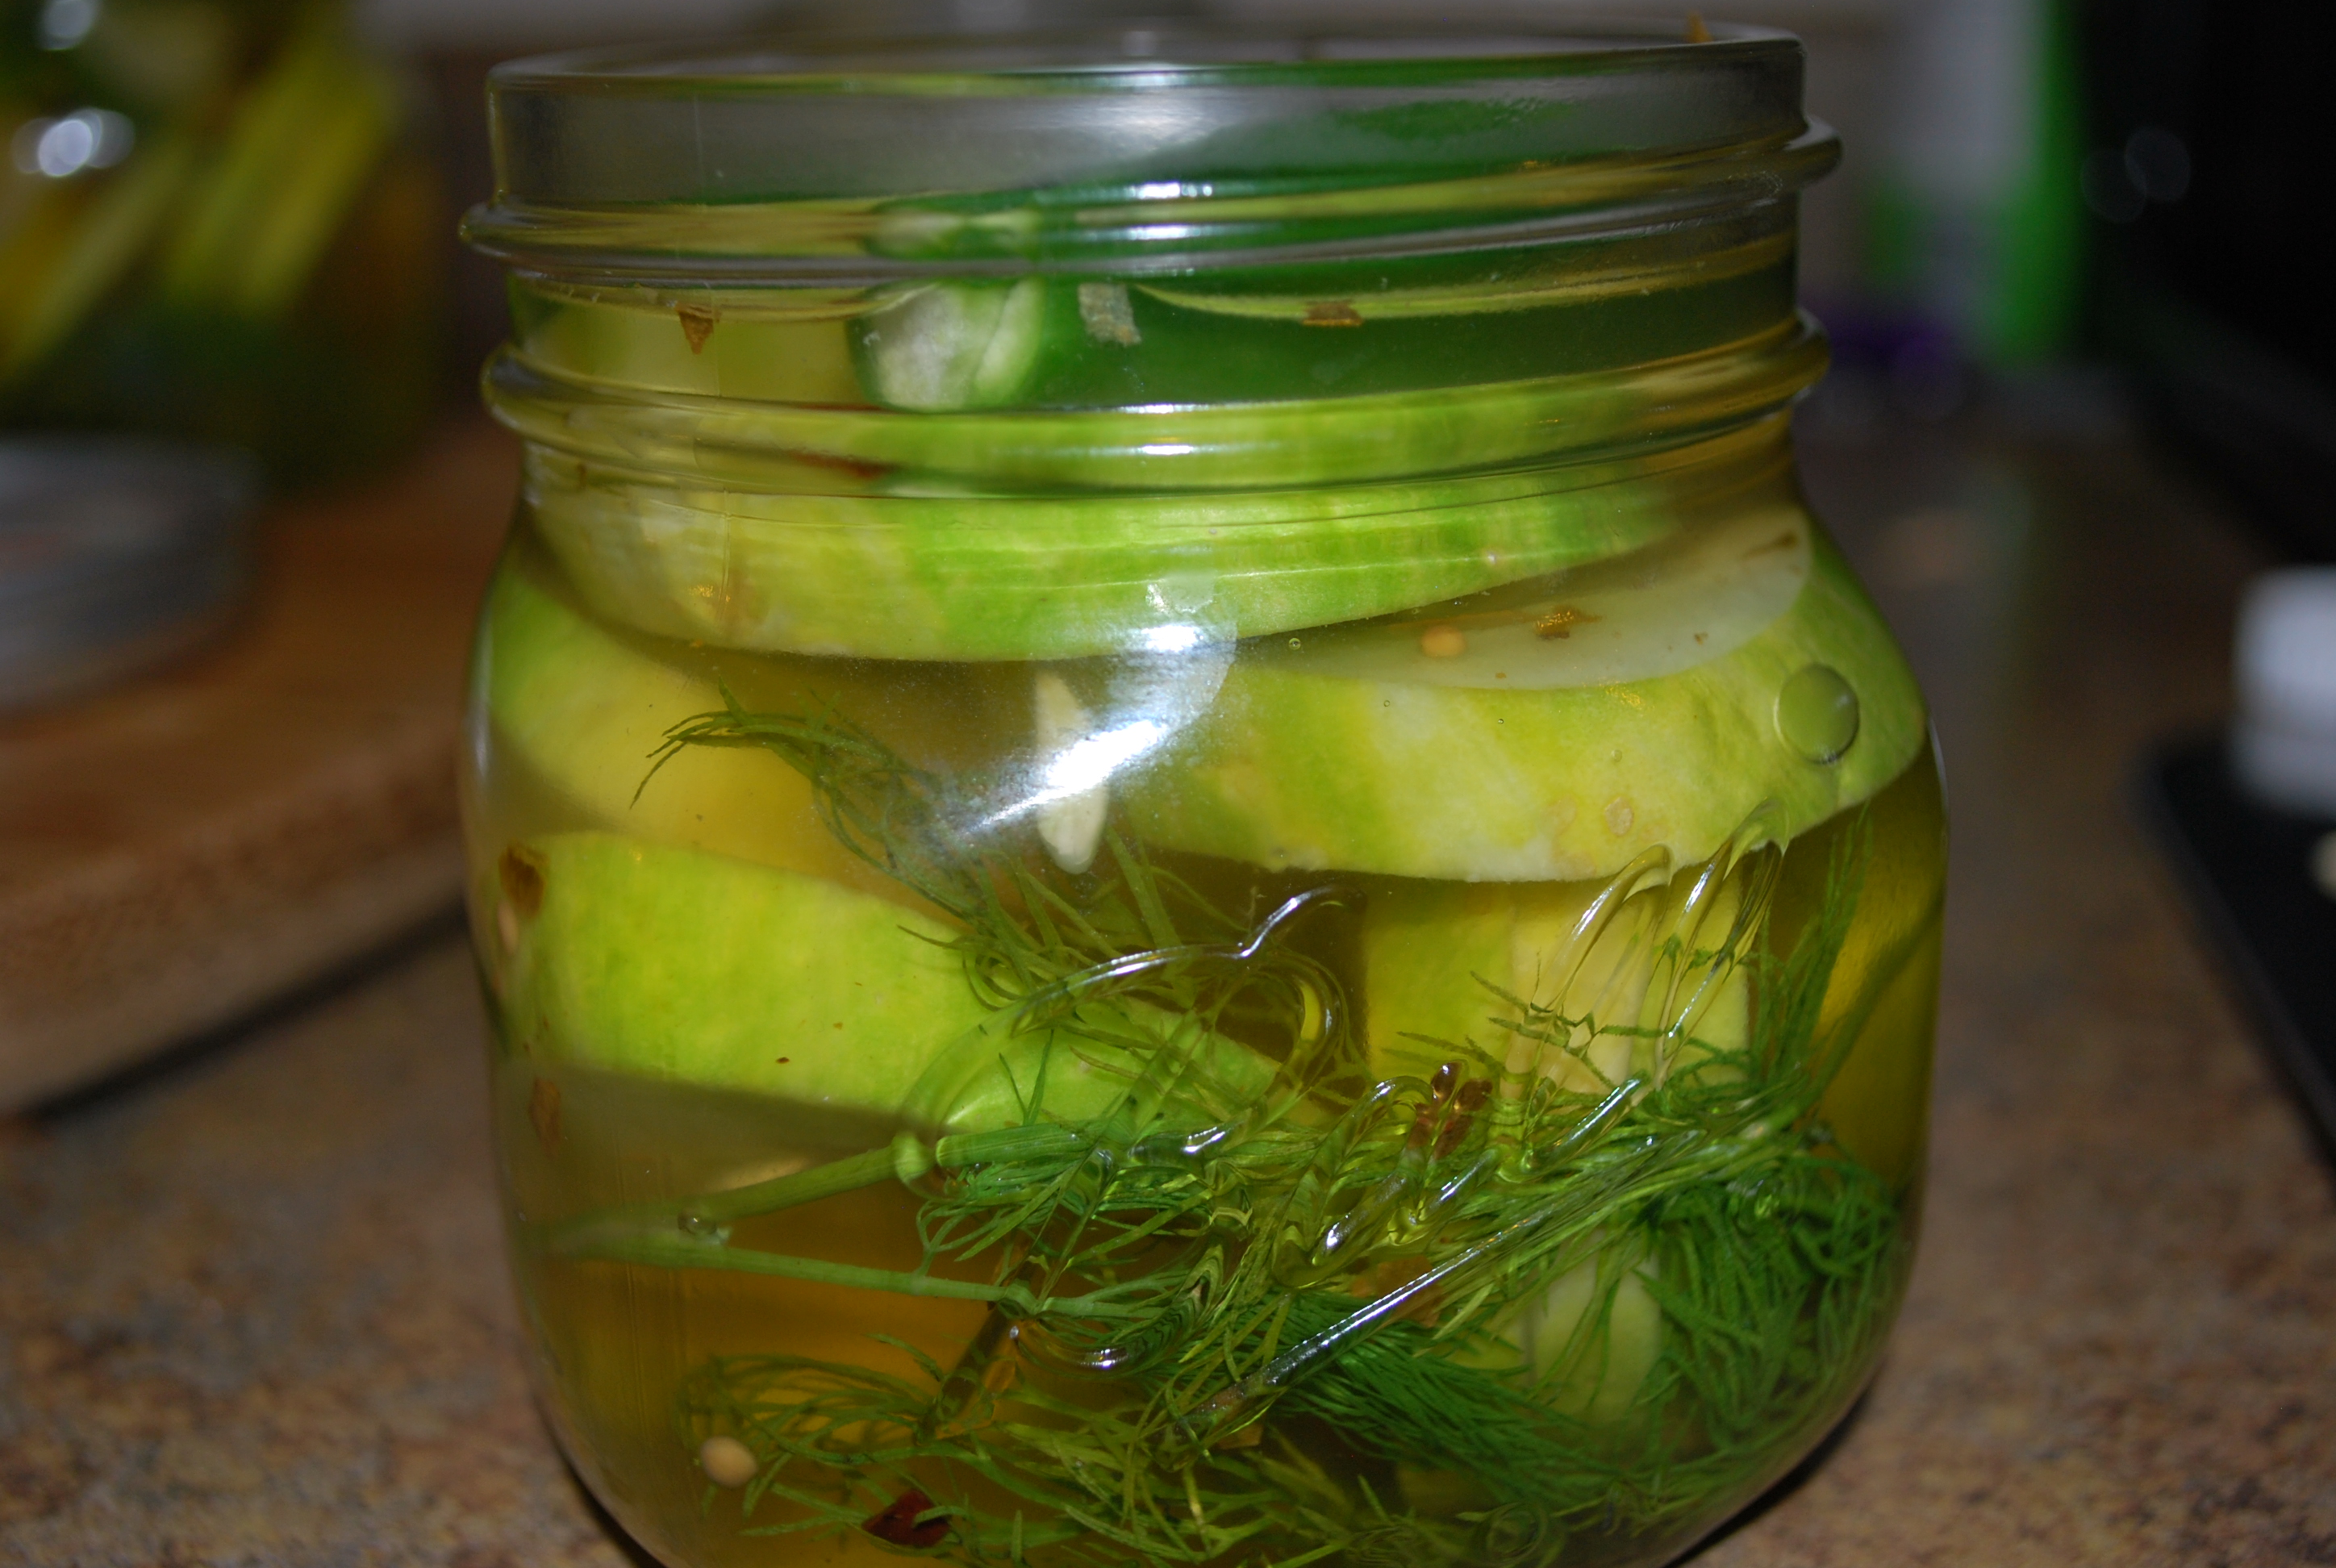
A good friend of mine got some cucumbers from a local farmer and decided they were a bit too bitter for her. So I was the lucky recipient of some free cukes. When I got them. I got excited, because I’ve had a lot of you ask about canning, which we’re going to learn how to do…WHEN WE MAKE PICKLES!!!! Seriously , how cool is it to serve your own pickles at a BBQ. I love the idea of telling Vlasic and Heinz “Nah, I got this covered”. This recipes is similar to my grandfathers pickled eggplant, with a few changes. The gist of this is to get you preserving your own food, naturally. This recipe made 4, 1 pint jars of pickles.
2 lbs. pickling cucumbers
1 whole head garlic, peeled
1 tbsp pickling spice
2 1/2 cup cider vinegar
2 1/2 cup water
Pickling salt (Not the chemical stuff. You can find it at hardware stores, if it’s not at your grocer)
1 bunch dill
1/2 bunch lemon-thyme
12 Serrano peppers (Optional)
Pickles…the beginning…
This step happens the day before. We need to purge some water form thee cukes, If we don’t they’ll get real soggy. Scrub and rinse the cukes well. While they’re still whole, lay down some salt on a sheet tray and stick the soon to be pickles on it. Cover them with some more salt. Rotate them every 6 hour or so.
The next day, rinse the cucumbers off and dry them very well. Now slice them about 1/3 inch thick. (You can cut pears or keep them whole, I just like slices). Put these off to the side for a bit.
Take your garlic cloves, and give them a light smash with the flat end of your knife. Drop them in the pot your going to use for heat up your vinegar and water.
Add the vinegar, water, pickling spice, and 2 tbsp of sea salt, kosher salt, or pickling salt to the mix. Leave this off-heat until your ready to heat it up.
NOW…..it’ time to get the jar ready. this is a SUPER important step, but it’s easy. Wash, rune and scrub the jars. Then drop then in a pot of cold water, and bring that pot to a boil. Let them boil for 10 minutes. We’re using the boiling water to sterilize the jars. If you need to do this in two round, let the water cool a bit, before you do the next set, so they don’t shatter. Drain and dry the jars. Oh, I like to do this with the lids too.
Turn on your pot of vinegar and water, and start placing cucumber slices and the herbs in the jar. Jam them in there if you need to, jut don’t go all the way up. Add your peppers here too if you want them. (Really you can use any pepper you want, if you like it spicy). Be sure to leave the head room (where the jar get very narrow) empty.
When your liquid comes to a boil, cut the heat and let the liquid steep for literally jut a minute. We don’t want it to cool too much.
Cover the cumbers in the jar with the liquid, and throw the cap on.
Take your jars, and put them back in the pot of water. Bring the pot to a boil and let that boil for 10-15 minutes. This will process the pickles and let them last longer. You can skip this step is you don’t plan on keeping them around very long.
Put your jar right into the fridge. Don’t stick them in ice water, you’ll break the glass. (Trust me I’ve seen people do it). Let these sit for 2-3 days, then they’re ready to eat.
Just filled, before the canning.
Do you really need serving suggestions for pickles? Really??? Fine. Blue cheese, burgers, BBQ, roasted pork, dogs, and cold salads. Add a bit of sugar, chop them up and you’ve got a wicked relish. If you want to change this up a bit, don’t be afraid to change the herbs, or the vinegar. I also like to do eggplant and zucchini in balsamic vinegar with some grilled onions. (Yup in the jar). The end of summer is coming, so don’t be afraid to can your own fresh vegetable, and tell the big canned food companies to shove it.
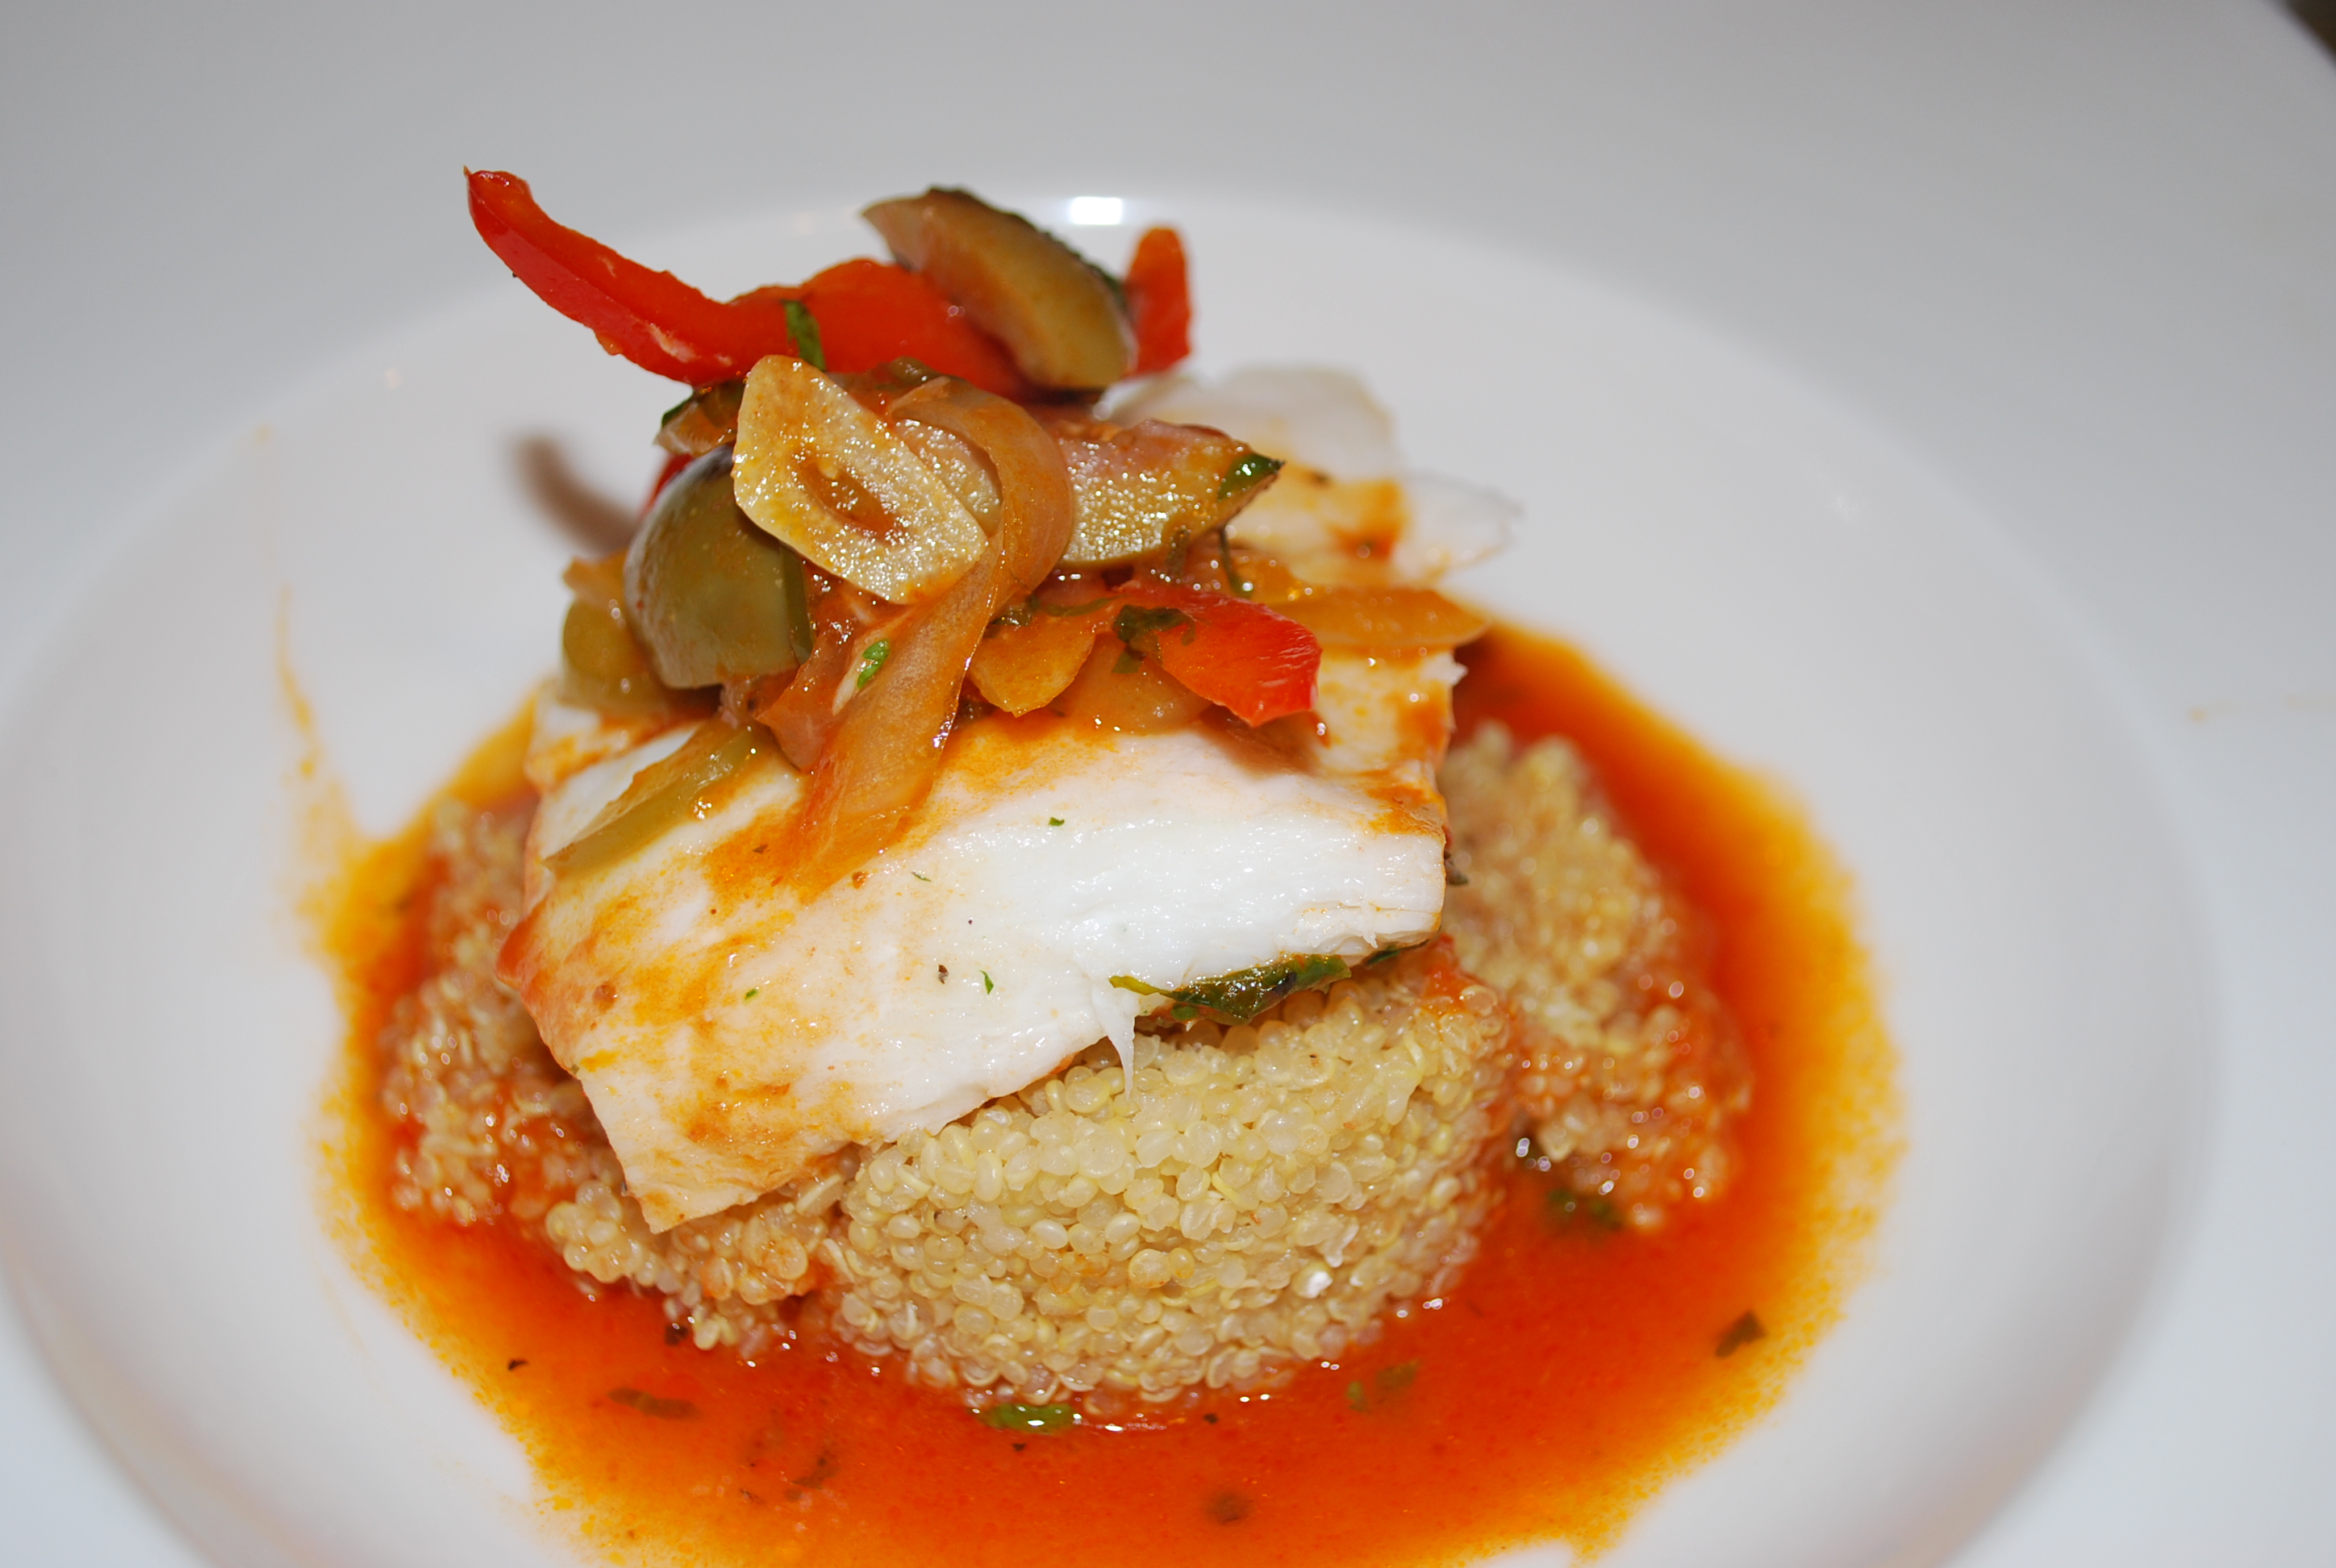
Chances are, if you’ve been to culinary school, you know this one. It’s very simple, some sauteed onions and peppers, some olives, a little wine and tomato, really nothing super fancy. But i have YET to have it made for me properly, the way it’s actually made in Veracruz, Mexico. While I can’t do it over an open flame in side the lab (well I can but my assistants would get scared an quit, I mean really it’s just a flamethrower….), I can get you close to it. the key to this dish is really remembering to under season (yes I said under season) it and get GOOD green olives, not the garbage you get packed in salty chemicals, but the really good Spanish olives with herbs packed in oil. You can’t slack on this dish. This makes about four portions.
Yes yes, you too can have fancy plates/
1 c. vidalia onion, julienne (you know strips)
1/2 cup each, julienne read and green pepper
2 cloves garlic sliced
2 tbsp tomato paste
16 green olives, packed in oil (quartered)
1 whole tomato, diced
1/2 c. white wine
1/2 c. tomato juice
4 each 6 oz snapper filets (or whatever size you want) take the skin off
2 tbsp chopped cilantro
1 tbsp chopped oregano (or marjoram, whichever)
Set a saute pan on medium heat. Add about 1 tbsp of olive oil, and about 1 tbsp of the oi from the green olives. Let it come to a slight smoke.
Add your vegetables, all at once. Toss or stir them right away. You just want a quick sweat.
Add you tomato paste and toss again.
Now add the wine and your herbs and let this reduce by half.
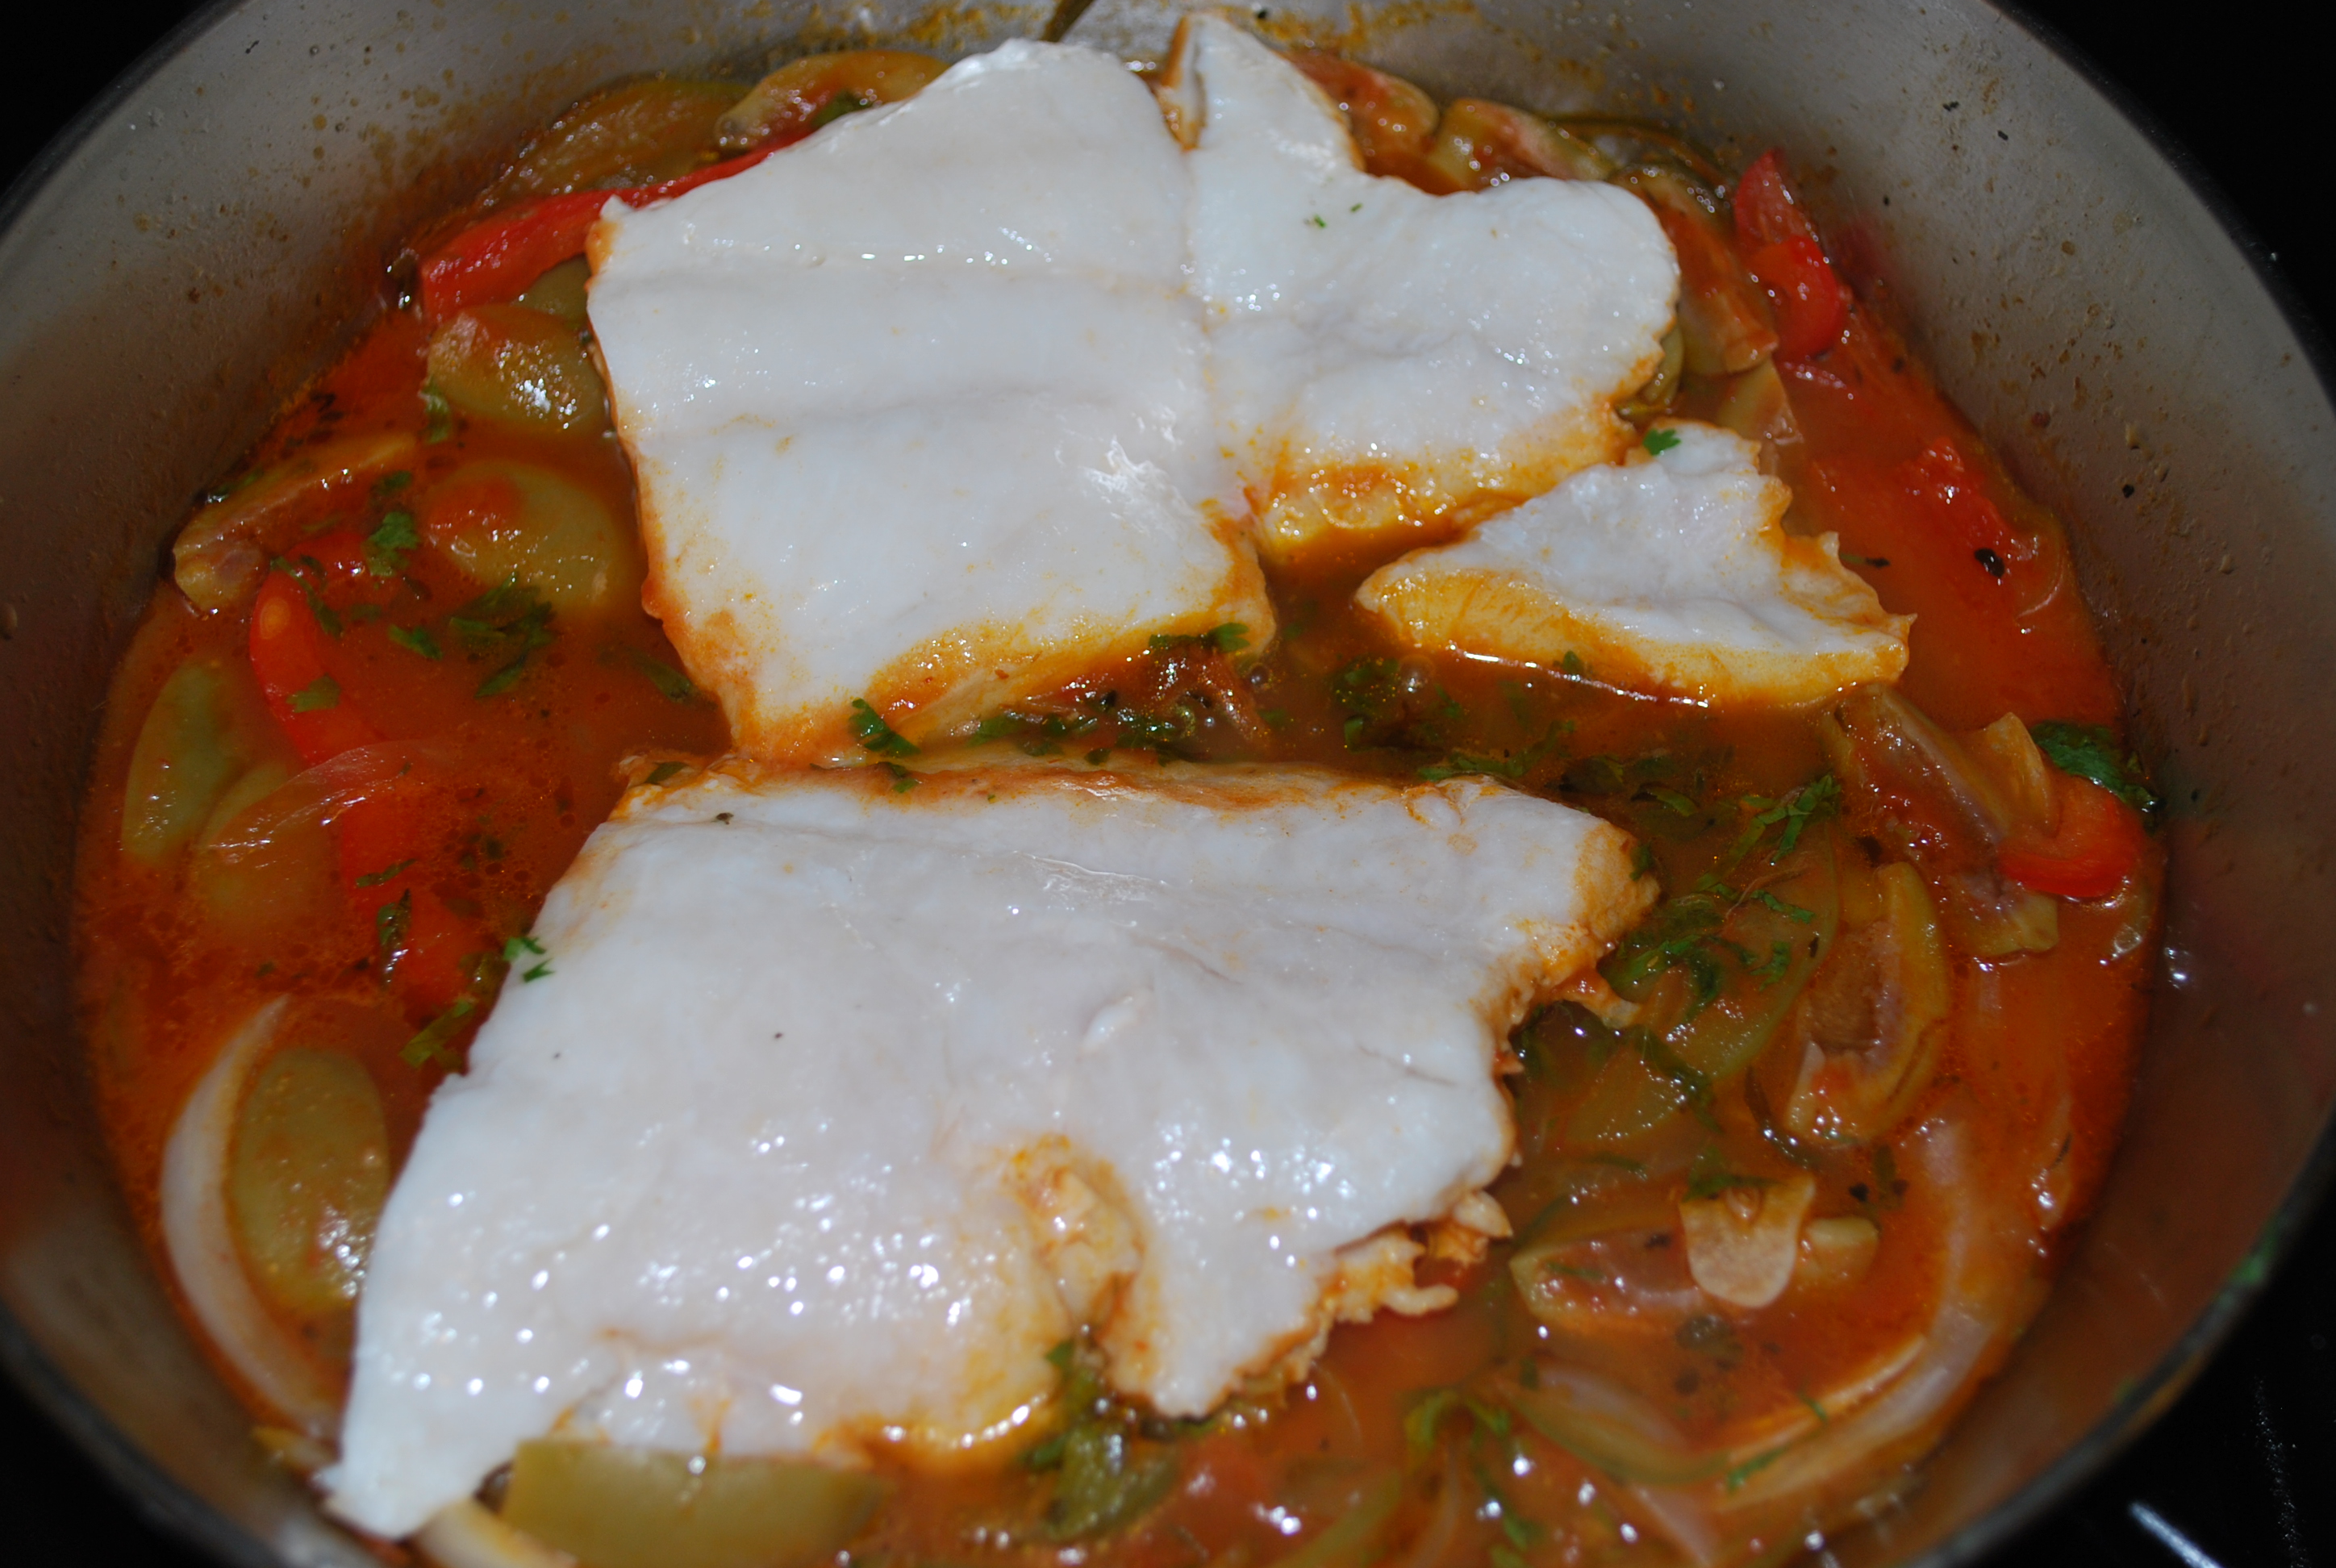
Lower the heat to low and add your fish and cover.
Simmer the fish until it’s done, this can be anywhere from 5-15 minutes depending on how thick the cuts are. The rule of thumb is 10 minutes per inch.
It’s fish…IN A PAN!!!!
I like to server this over quinoa or some other funky grain, but the traditional accompaniment for this dish is rice. Black beans and pinto beans go well with this too. You can also use pretty much and firm white fish you like. Using something like sole is a little too delicate for this, but sub in anything you like. I like to add a coupe of jalapenos or Serrano chiles to this too for some heat. Play with it a such as you like, just be careful not to season it too much. there’s going to be a lot of salt coming out of those good olives. Don’t forget to leave a comment.
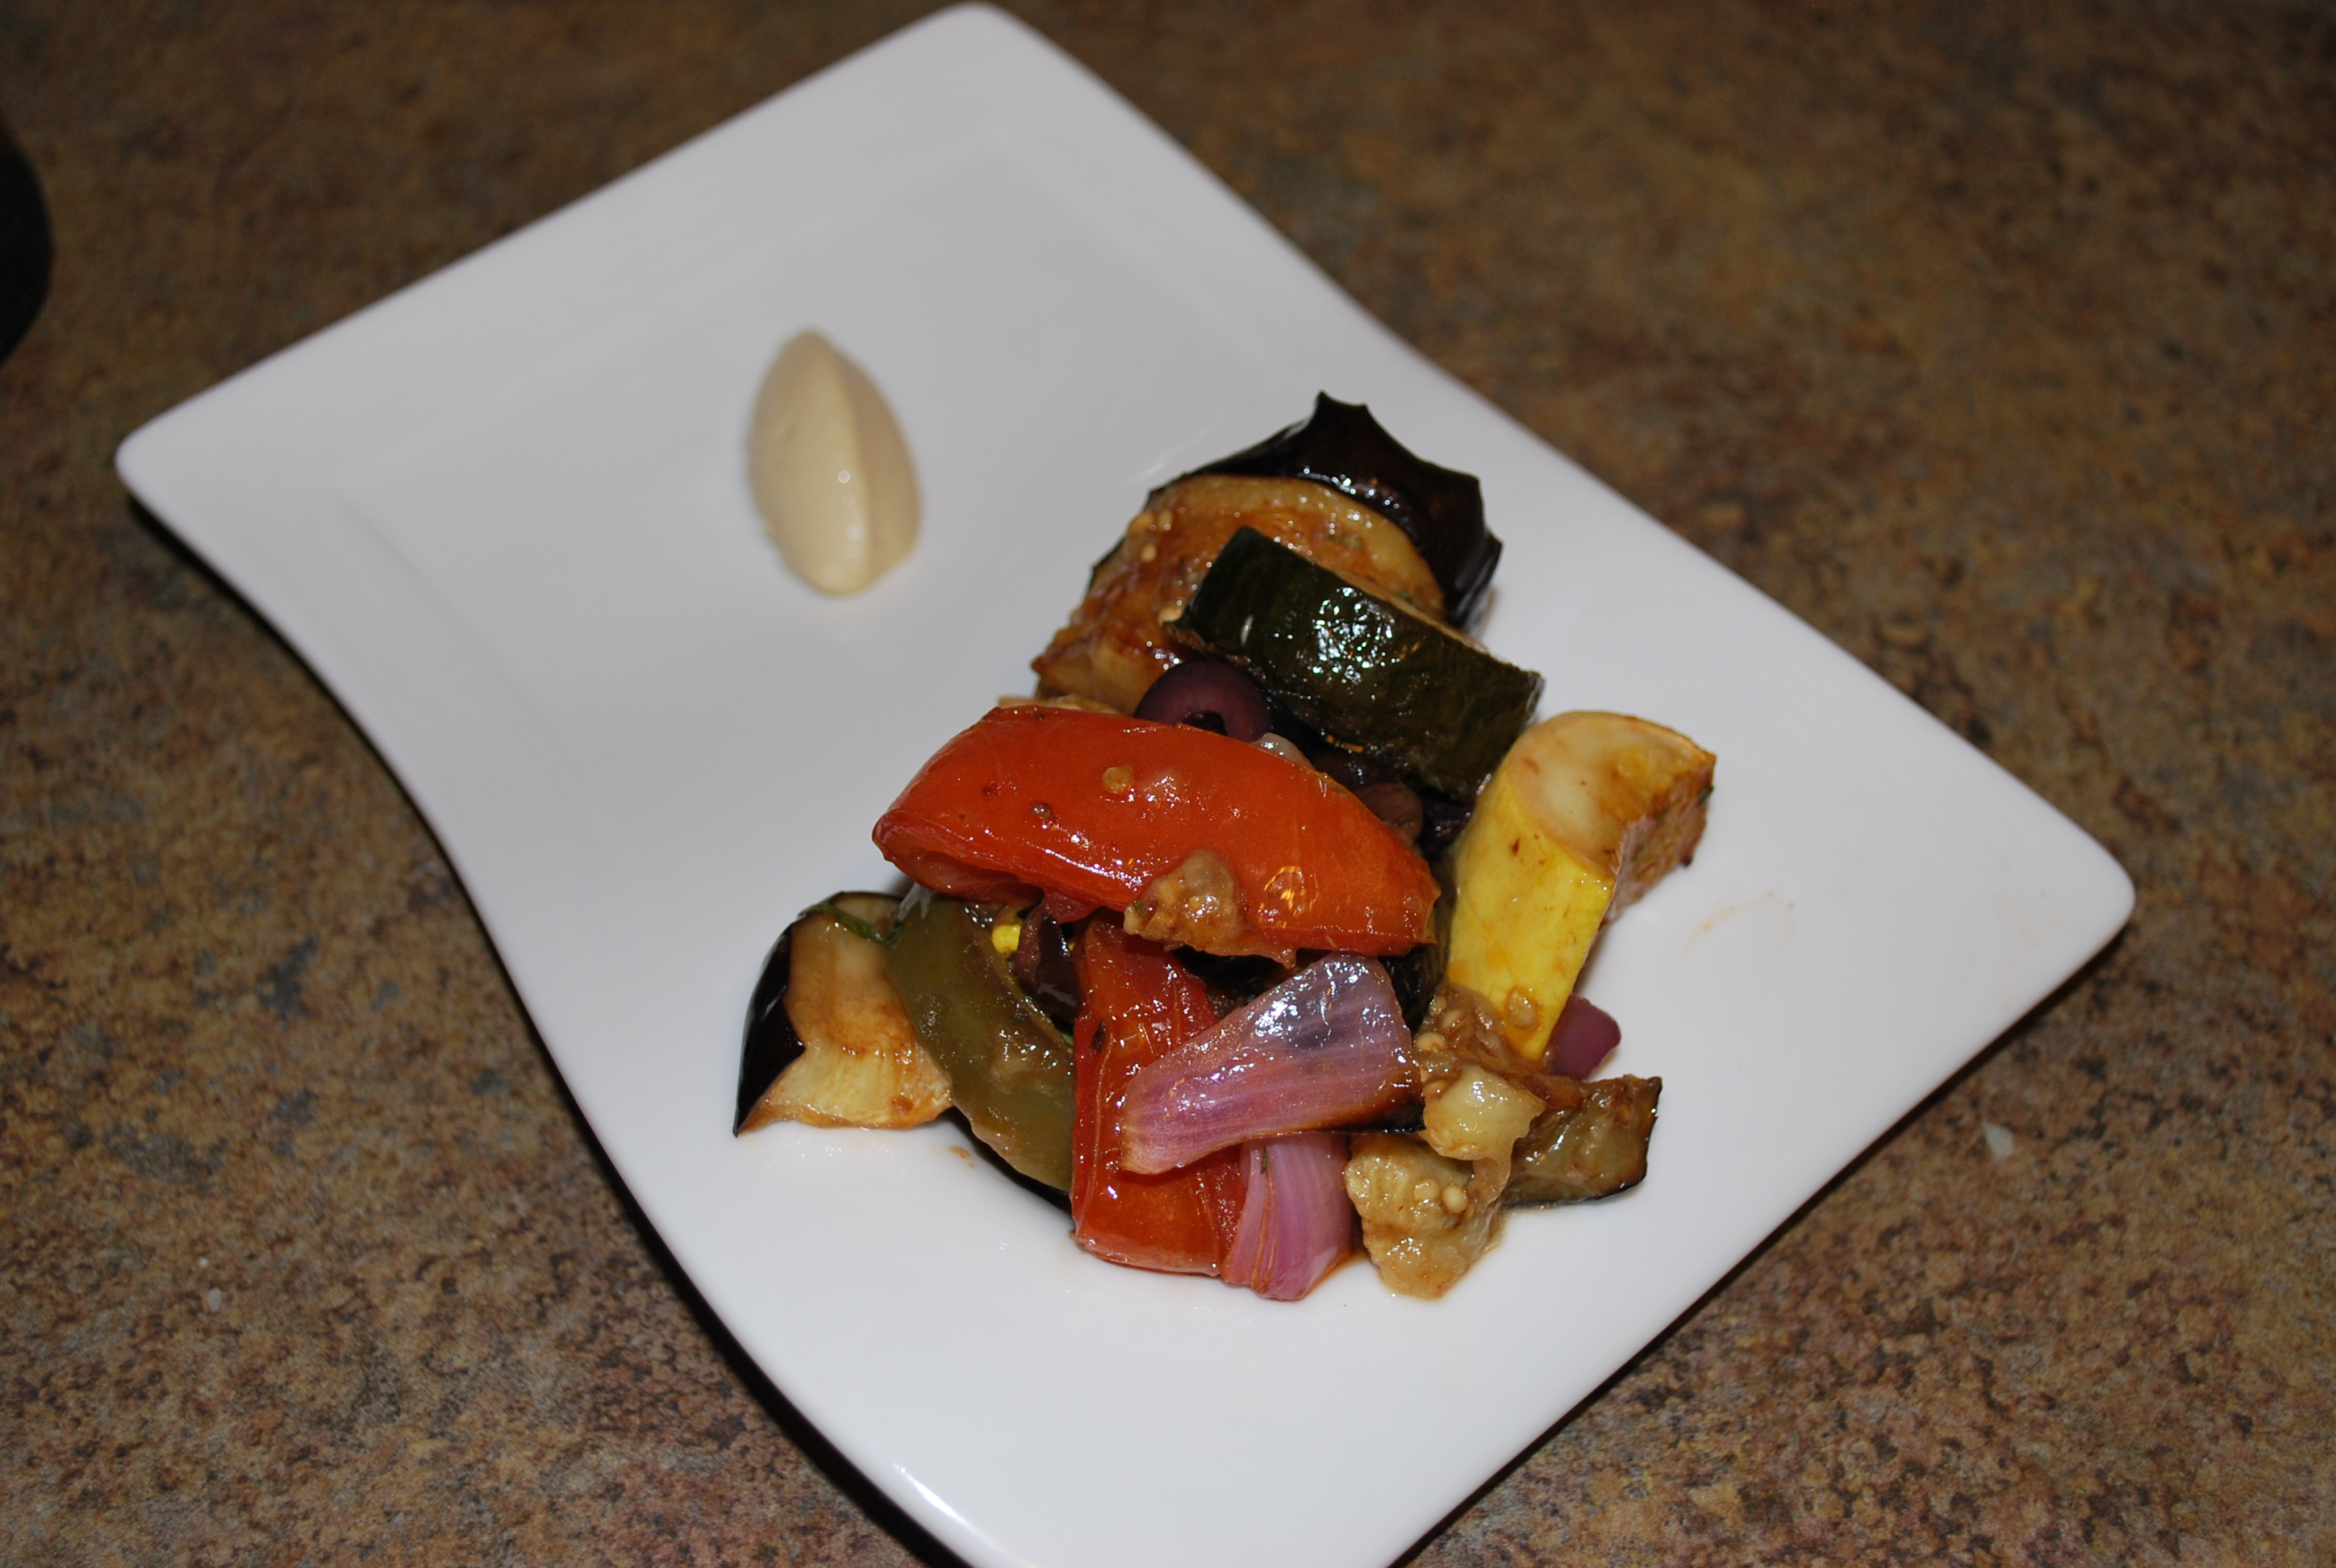
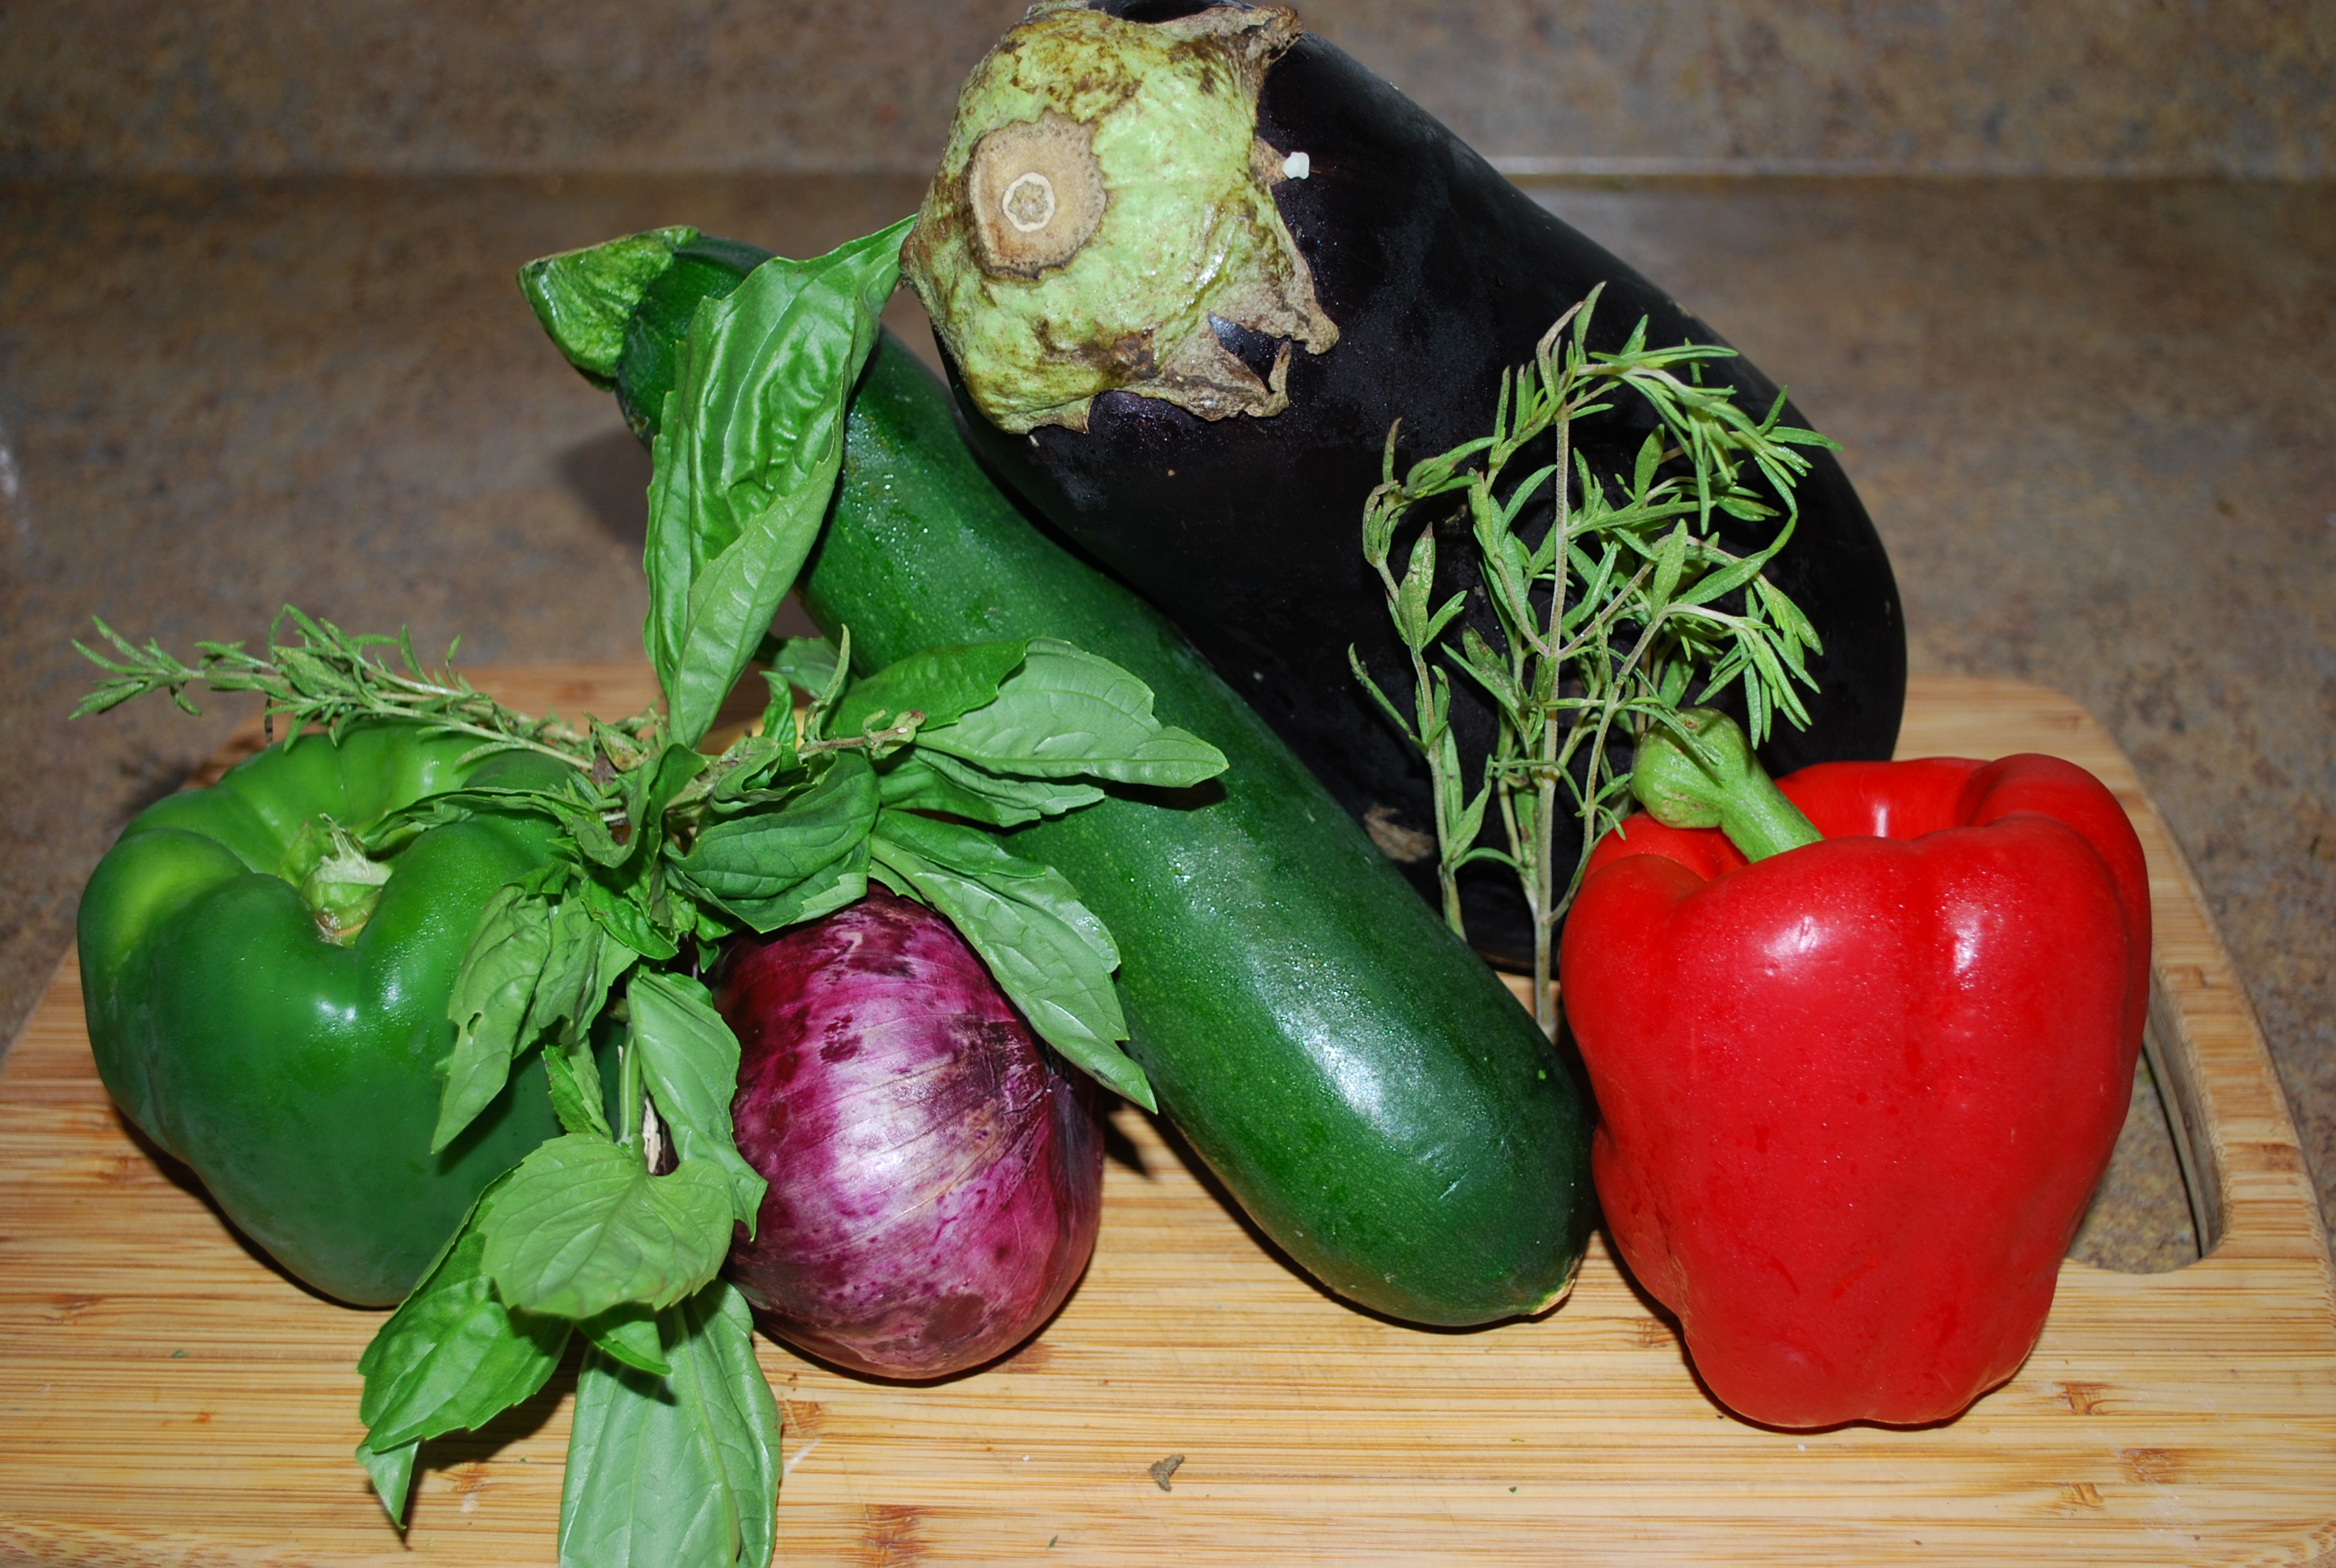
I feel kinda bad for the eggplant. It’s not really a well liked vegetable, it just kinda sits there all unassuming in the grocery store, just knowing no one’s going to buy it. Just kinda there. Don’t’ worry big round purple buddy, I’m here for you. I’ve got a recipe that’ll get people buying you. It’s a simple salad you can server warm or cold, or even can and preserve. This is another recipe I learned from that gentleman in Auburn, AL from Ariccia, Italy who served the ridiculously delicious porchetta (yes I know that recipe is coming too). While it’s not traditional caponata, he used the equipment he had (a BIG oven) and vegetables from the University farm to make it, so you know it was good. This recipe will make ALOT (like a few days worth) so I like to do it for parties then can some myself and save it for later.
2 lb eggplant, split and sliced about 1/2 inch thick 1/2 # each zucchini and yellow squash, cut the saem aas the eggplant 2 large tomatoes cut into wedges 1 small red onion medium dice (you guessed it, 1/2 inch) 1 small green pepper, medium diced 1/2 c. kalamata olives, sliced 1/4 c. capers, drained 1/4 c fresh chopped basil 1 tbsp chopped fresh tarragon 1 tbsp fresh chopped thyme 2 cloves garlic, crushed 1 tbsp fresh chopped oregano (or marjoram) 1/4 c balsamic vinegar 2 tbsp. tomato past 1/2 c. olive oil
Straight from the farm
Two words, oven….on. 400 degress.
In a large bowl, whisk together the herbs, garlic, tomato paste, and vinegar until they’re smooth. Slowly whisk in the oil. If it breaks, it’s no big deal.
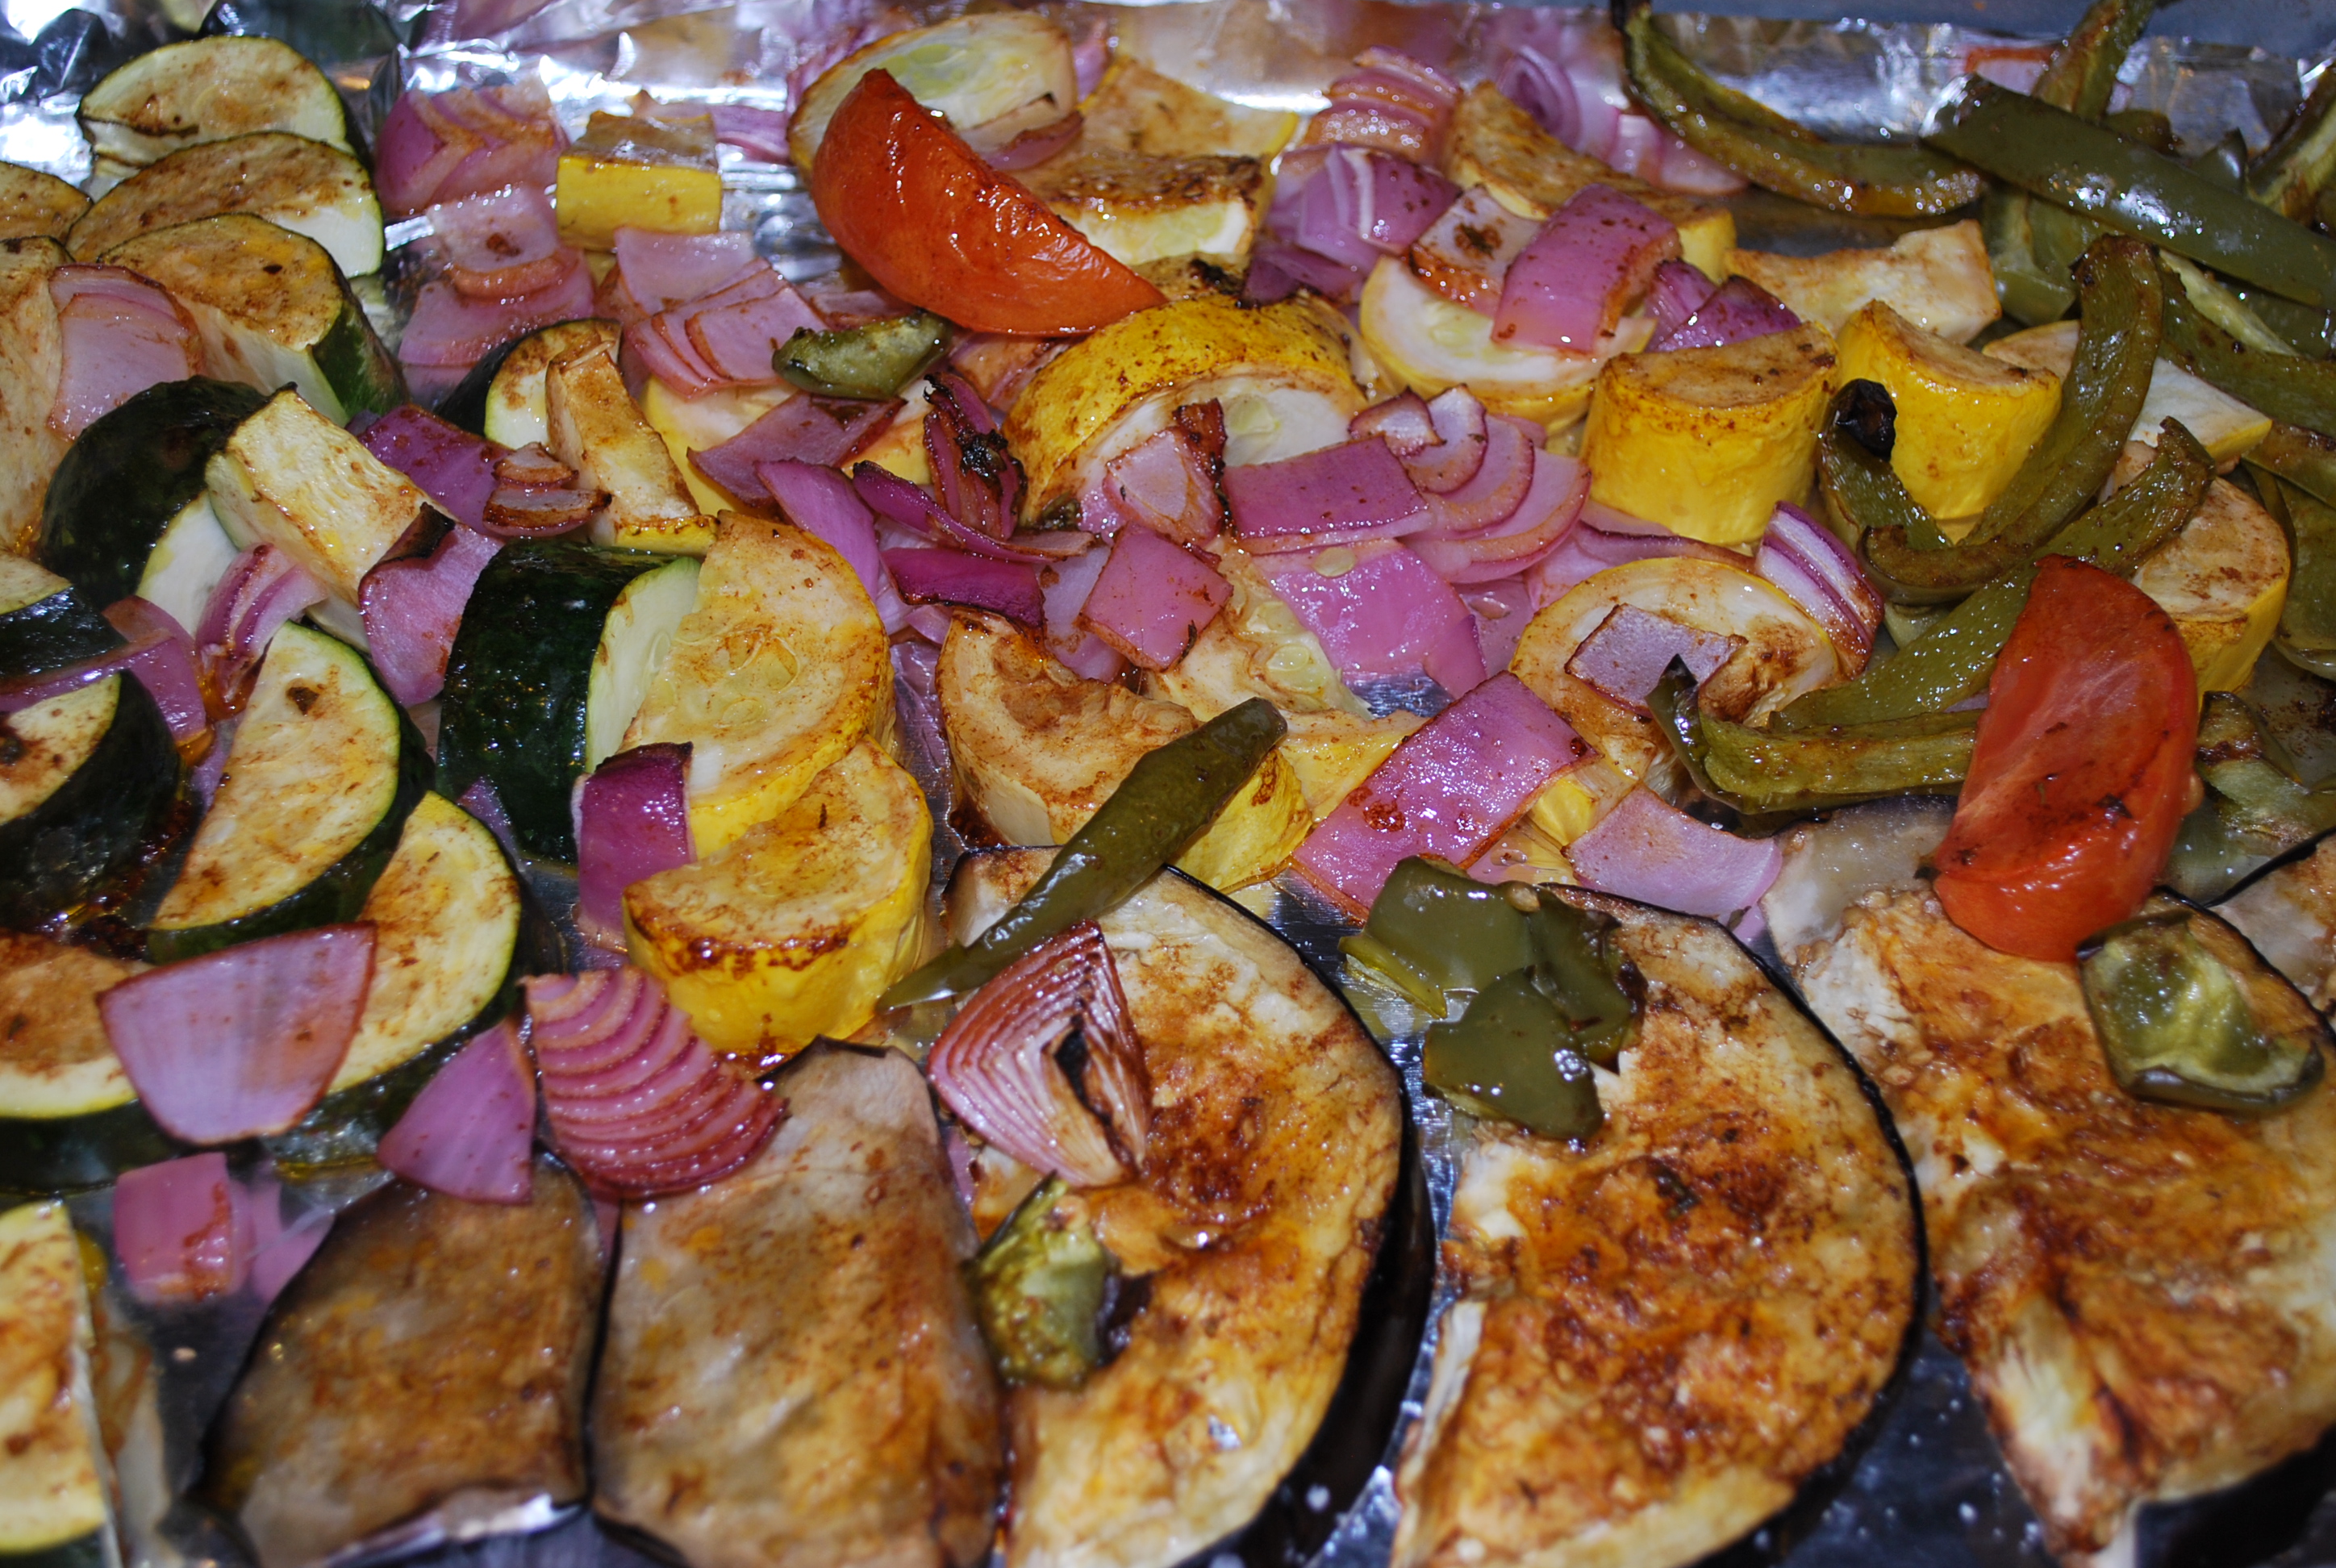
Lay out your vegetables on a sheet tray, then brush them with some of this dressing we just made. There’s going to be some left over for us to tie everything together with later.
Roast your vegetable for about 20-30 minutes. Brush them about half way through with more of the dressing. Once they come out, let them cool for about 10 minutes.
Now it’s time to mix everything together. Vegetable, dressing olive and capers.
Fresh roasted, SON!!!! Recognize!!!
You can serve this right away while it’s fresh or you can let it site overnight. I like to mix arrugula, mizuna or any other bitter green with it. this also goes great with some cured meats, and nice cheeses Italian or Spanish. OOOOHHHHH!!!! Don’t forget the crusty artisan bread.
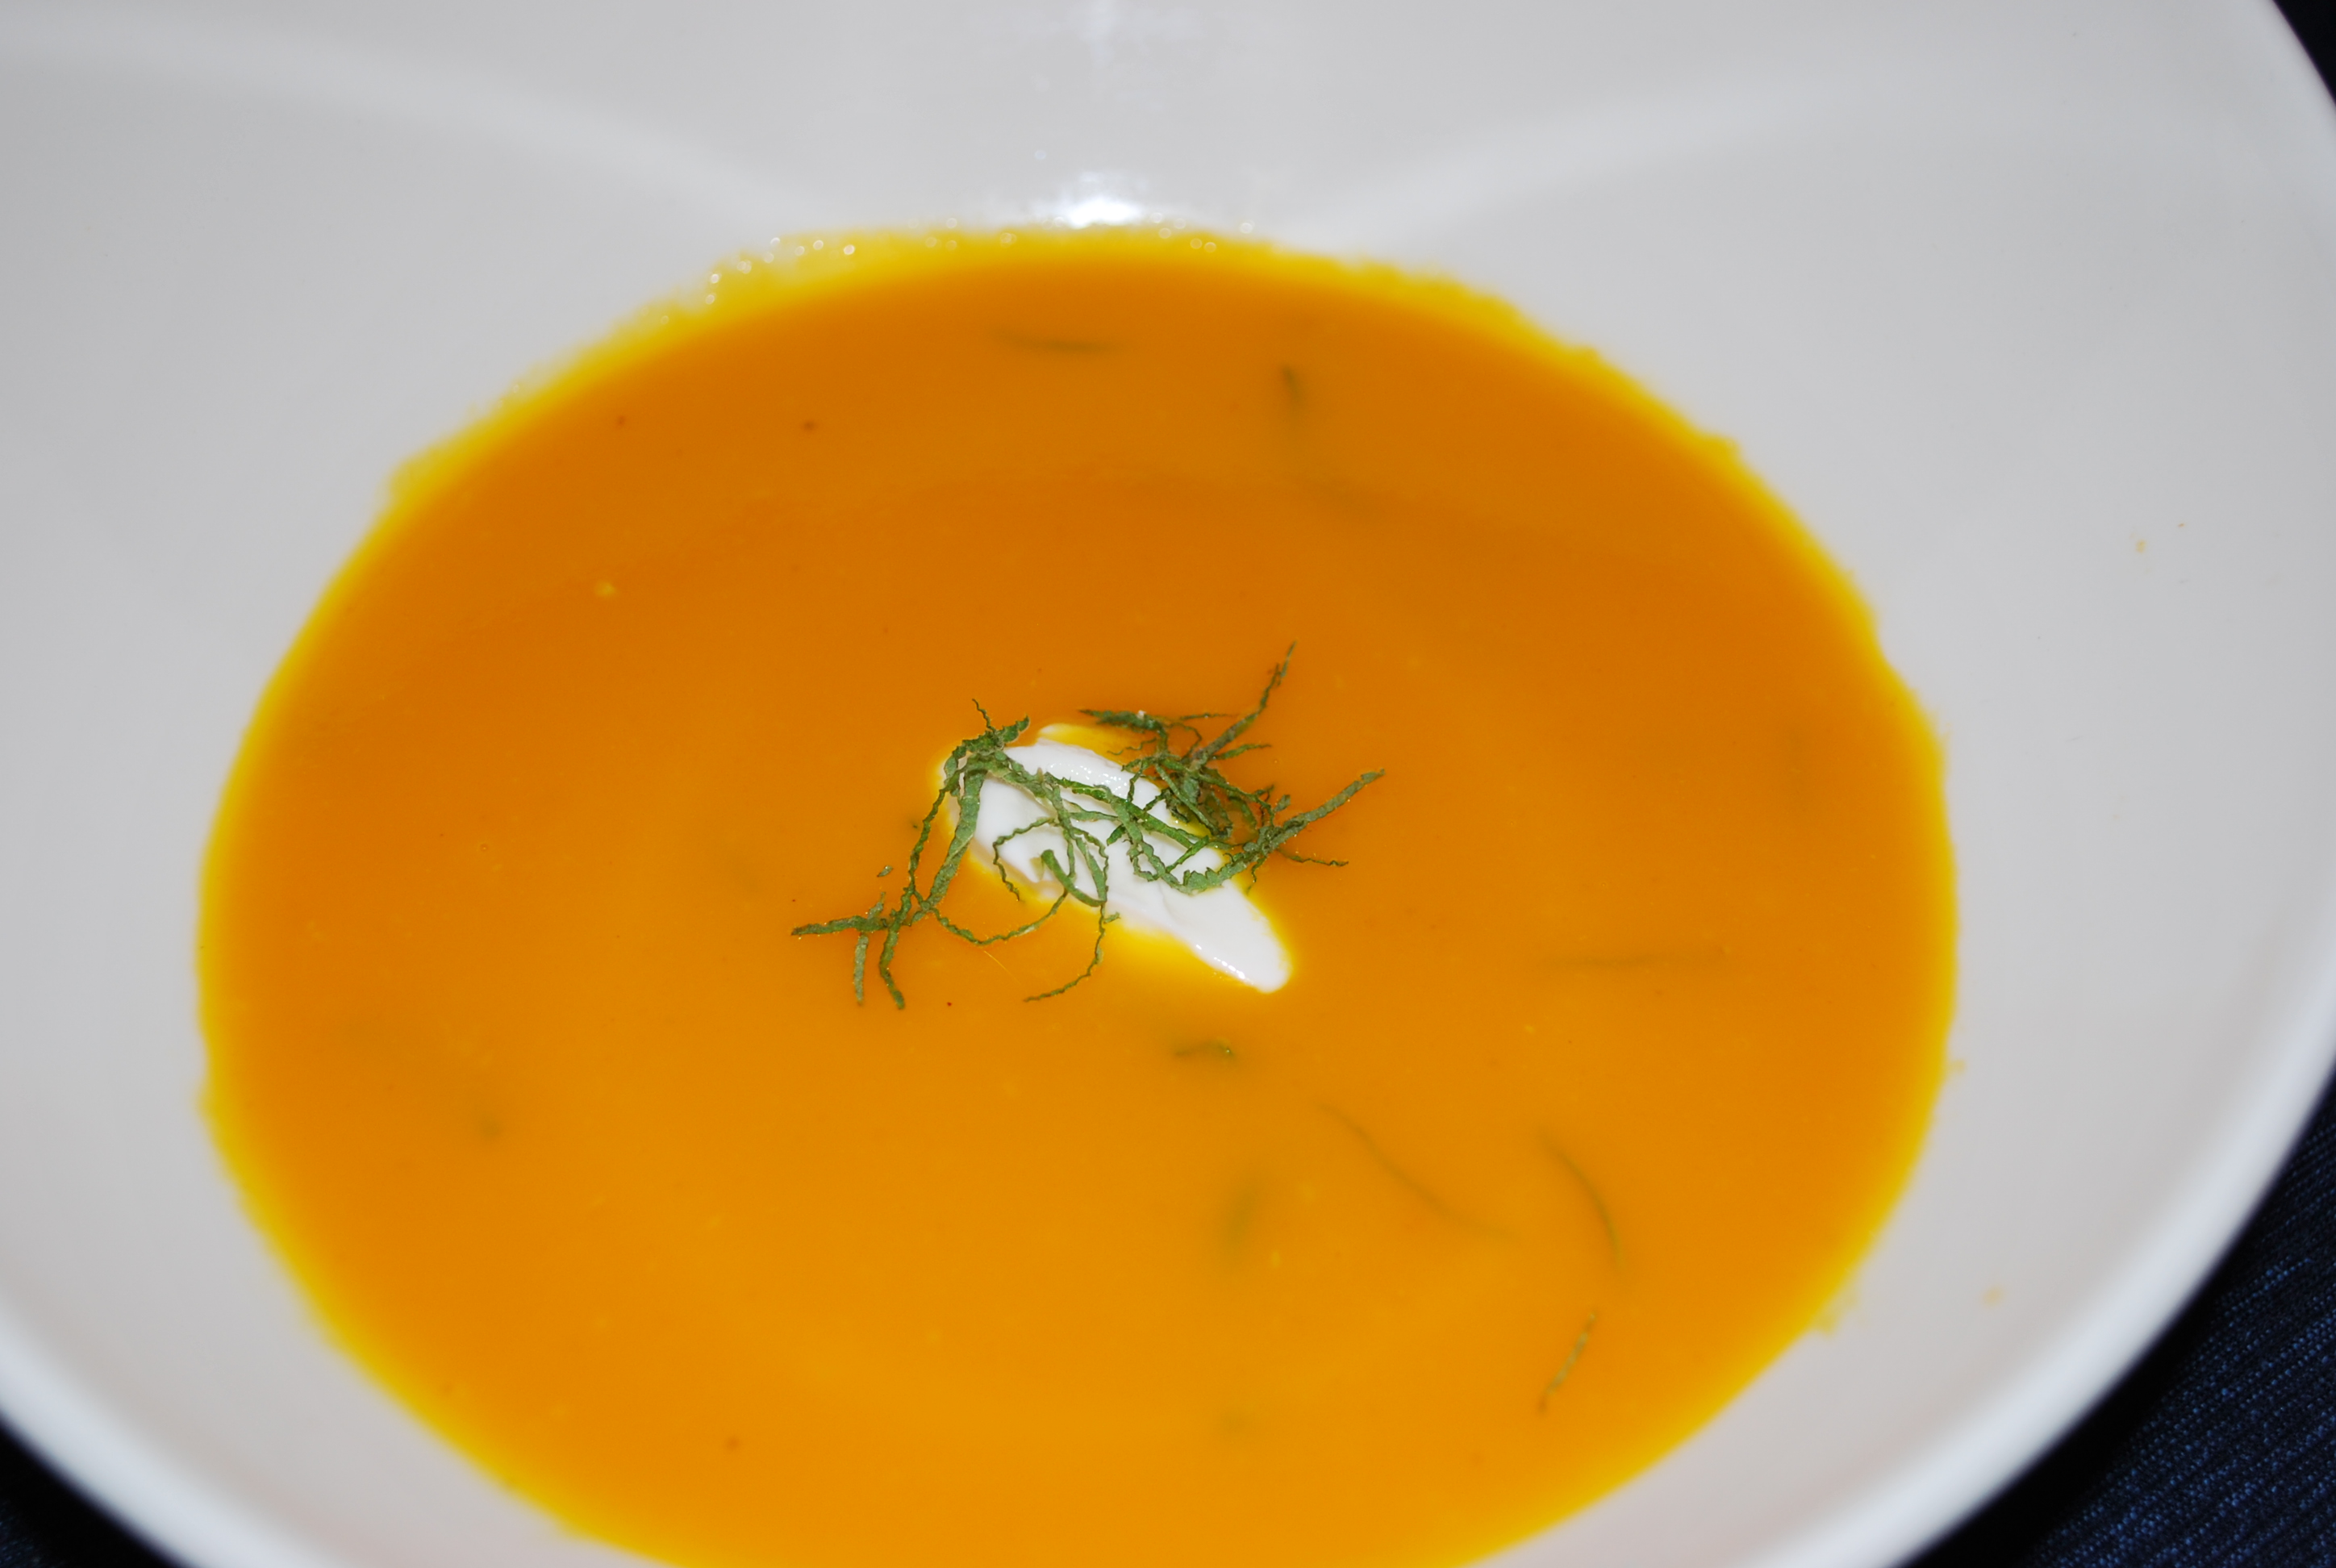
The humble carrot. Often eaten raw, as a snack, or shredded and hidden in some sort of heavily dressed unappetizing “thing” (can’t even call it food). Sometimes thrown into a soup or stew and pulled out and thrown away when it’s done. It’s like the red headed stepchild of the vegetable world, just plain under appreciated. This recipe is here to change that. This recipe was adapted from a sauce used for softshell crabs at some really famous golf resort I worked at. (I’ll give you a hint, the Rider Cup is held there). It was a huge seller everywhere I went and as almost everything i do, extremely versatile.
3 lb. carrots, peeled and rough cut (y’know, just chunks) 1 c. thin sliced onion 3 cloves garlic, peeled 3 tbsp grated ginger 2 qt. chicken stock or vegetable stock 2 tbs sage, chiffonade (so roll up the leaves and slice them really thin)
Girl, look at my veggies…
You’ve made enough soups with me that you know what kind of pot we’re starting in right? Yup. Heavy bottom pot. Start the onions and garlic on low heat, in about 2 tbsp of olive oil. Sweat these out for about 10 minutes.
Add your carrots. Sweat these for about 5 minutes then add your stock.
Bring the stock up to a oil and bring the pot down to a simmer.
Add your ginger and keep simmering for about 30 minutes until the carrots are tender
Start pulling out the vegetables with a slotted spoon and dropping them into the blender. Add just enough liquid form the pot to puree the vegetables. how do you figure that out? Well you start by puling the blender, adding a little at at time, and when you have enough, let the blender rip for about two minuted.
When all of the soup is pureed, add any liquid that hasn’t been put into the blender, into the soup. Add the sage and let it steep for just a minute before serving.
Now you can’t just eat this on it’s own, it needs a complement. Any seafood works very well with this. Shrimp, crab, lobster…it’s all good. I’ve also some small pieces of fried cod, or even a zeppoli with baccalao if you’re feeling excited (for those of you not from my native part of the country, that’s a savory doughnut with salt cod in it, AWESOME!!!!!!) The best part about this, is it’s a hot or cold soup. Serve it either way. You can even add half a cup of heavy cream if you want some richness. You got questions? No problem, leave it in the comments, I’ll get to you.
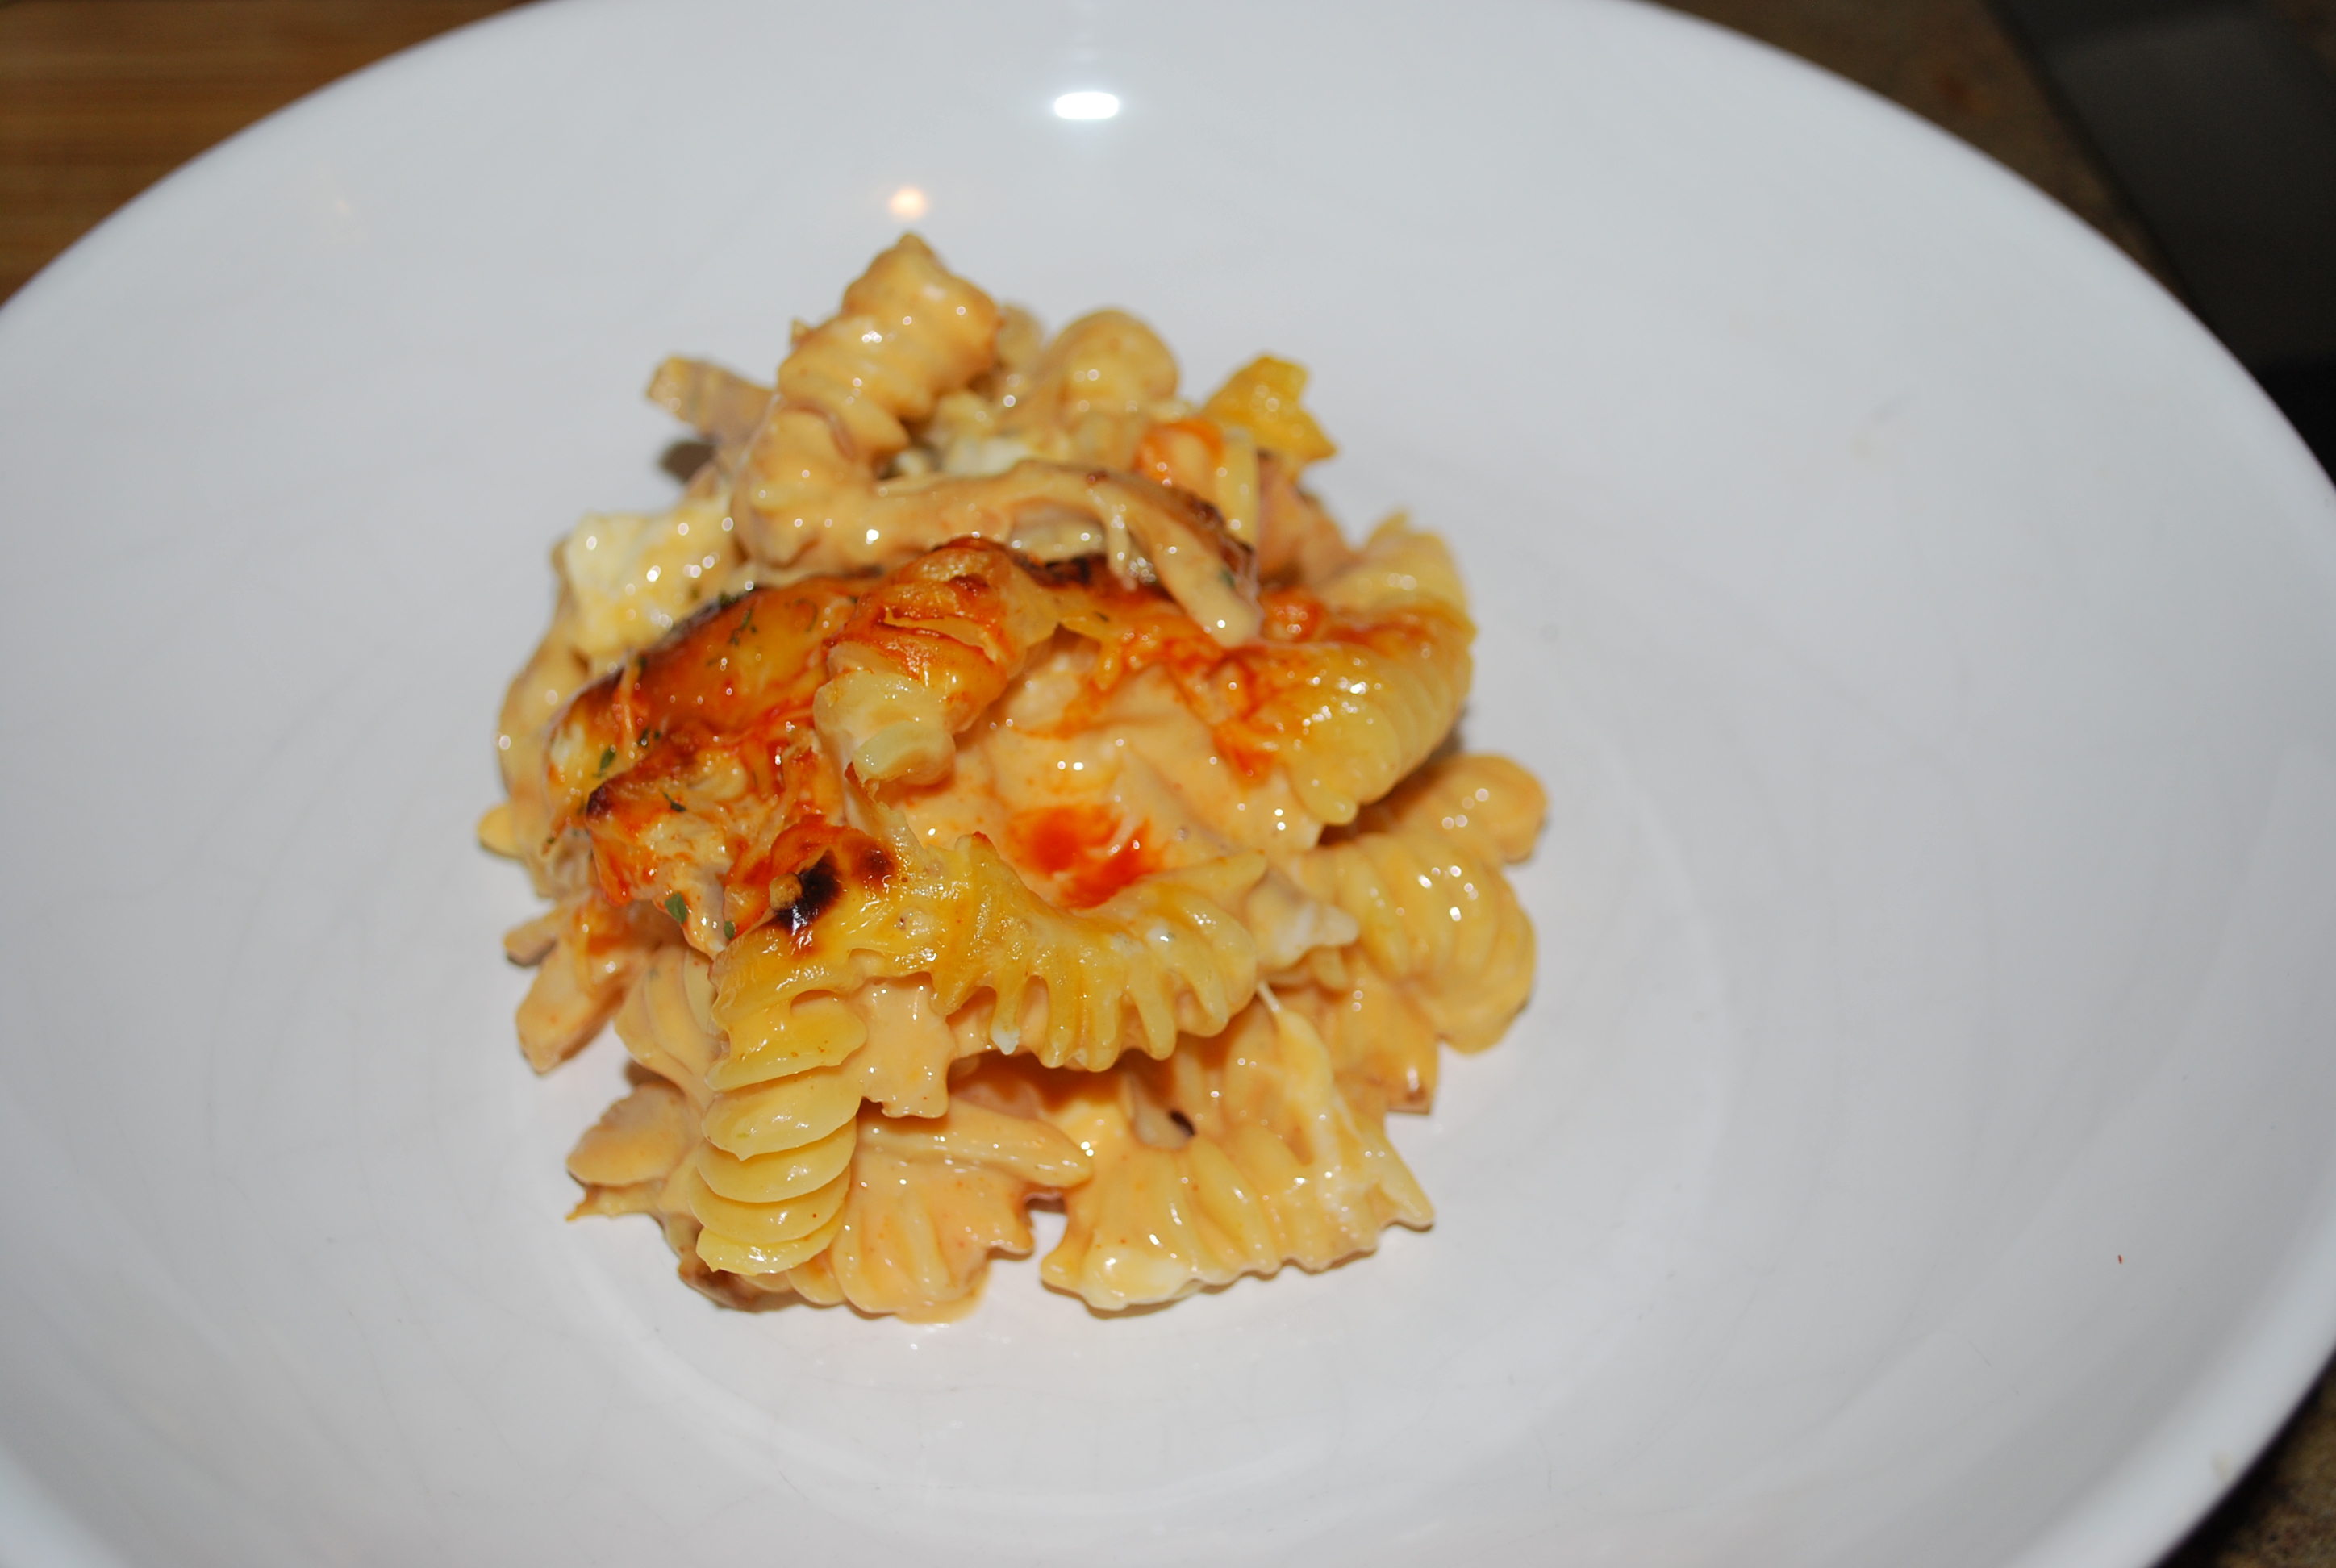
We haven’t done anything good and bad for our arteries in a while, so let’s get cloggin’ shall we? By the way this is also great for using leftover chicken…and clogging your arteries. This recipe actually came along at a party, as an accident, just like the old Reese’s peanut butter cup commercials from the 80’s (if you remember those) I wasn’t looking at what I was putting on my plate and just slapped some of my friend’s buffalo chicken dip on top of some pasta salad. The next night, a new bar special was born and became a permanent resident. It was a great way to use up left over roasted chickens form the night before without them going to chicken salad. Pretty soon we were roasting birds just to keep up with the menu item. If you don’t have time or don’t want to roast your own bird, why not buy one cooked from your grocery store? Most of them have rotisserie birds now. Just don’t use that crap in a can. This makes enough for 4-6.
1/2 lb. and pasta you like ( I used Fusilli for this recipe), cooked
1/2 small block Velveeta
2 tbsp butter
1/2 c. minced onion
1 tbs flour
3/4 c. milk
1/2 c. cheddar cheese ( or another cheese if you want)
1/2 c. blue cheese crumbles
1/4 roasted chicken (I prefer to use the leg and thigh
1/2 Wing Sauce
Start by picking the chicken meat off the bone. SAVE THE SKIN. Chop it in to small pieces, it’s going into this recipe.
Chicken Pickin’
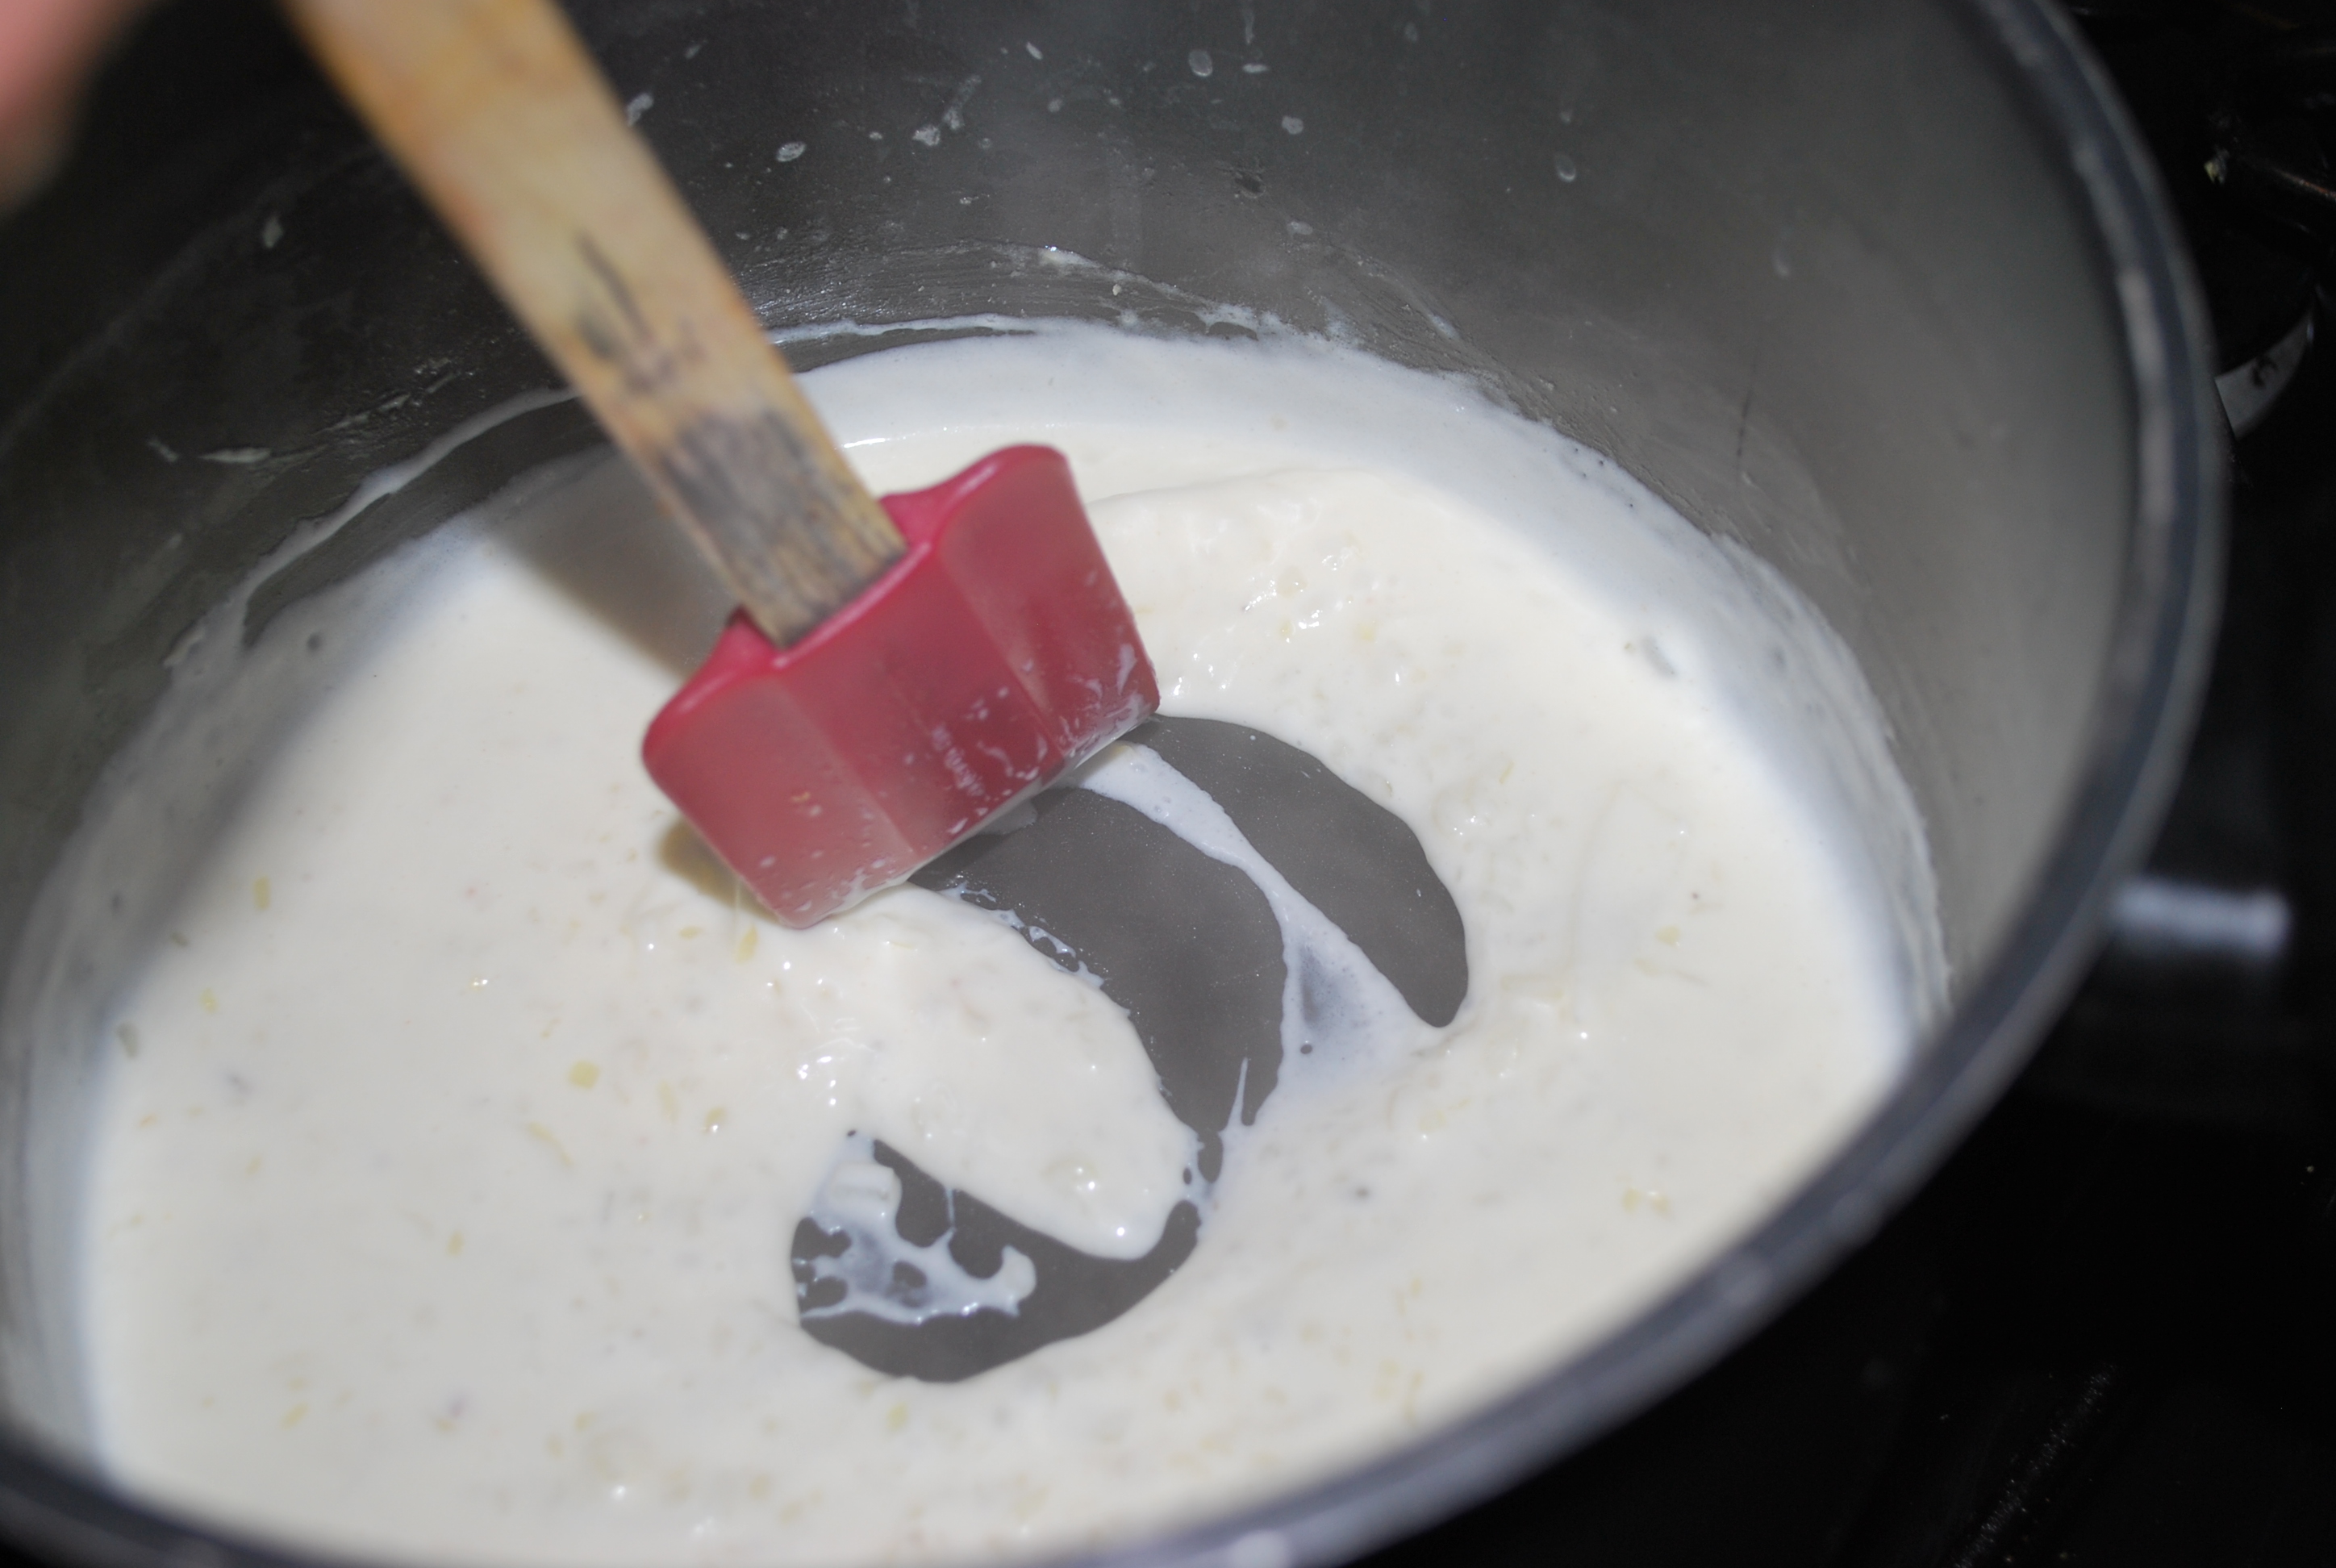
Melt your butter over low heat on the stove and add your onions. Sweat these for about 5-8 minutes. Then add your flour.
Cook the flour, stirring constantly for about 2 minutes. Then add your milk.
Stir the milk mixture CONSTANTLY, for about 4 minutes. Your want this to thicken, but if you don’t keep it moving it’s going to scald.
Your Bechamel is ready, sir
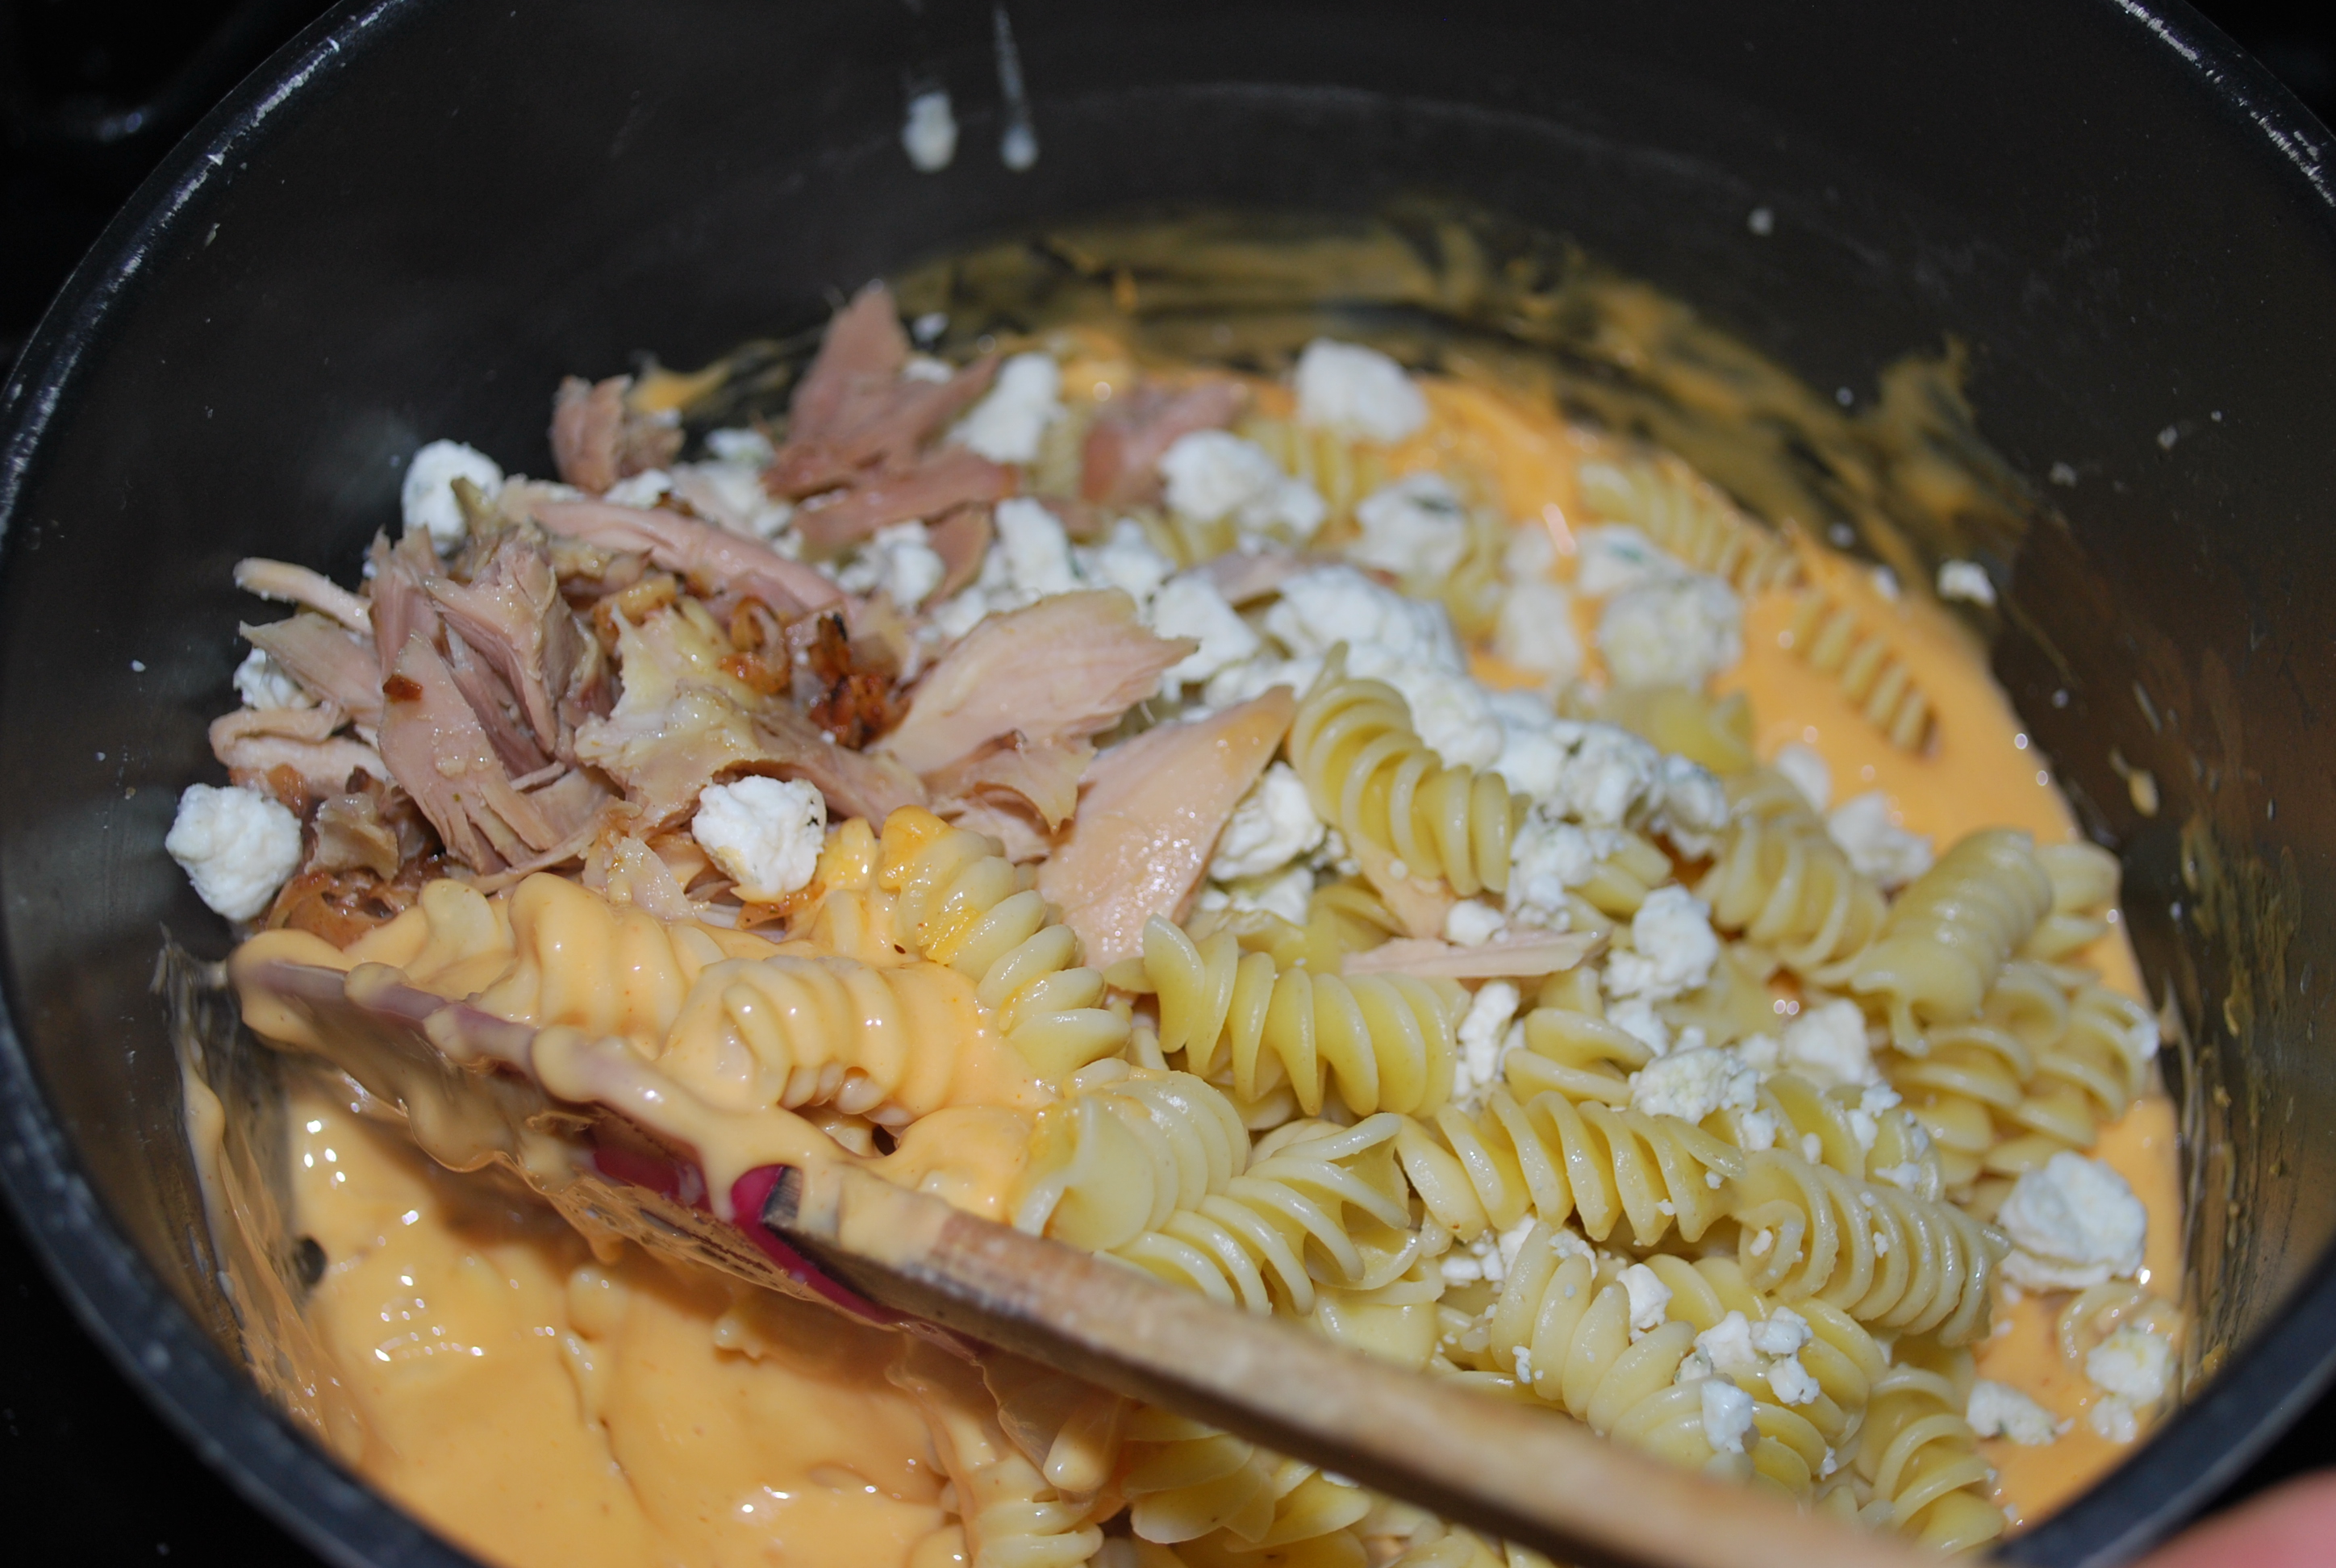
After the four minutes add you Velveeta and your shredded cheddar (or whatever you’re subbing). Wait on the Blue cheese, that’s coming later.
Melt these cheese then shut off the heat. Now stir in the chicken, blue cheese and hot sauce. Just lightly fold everything together.
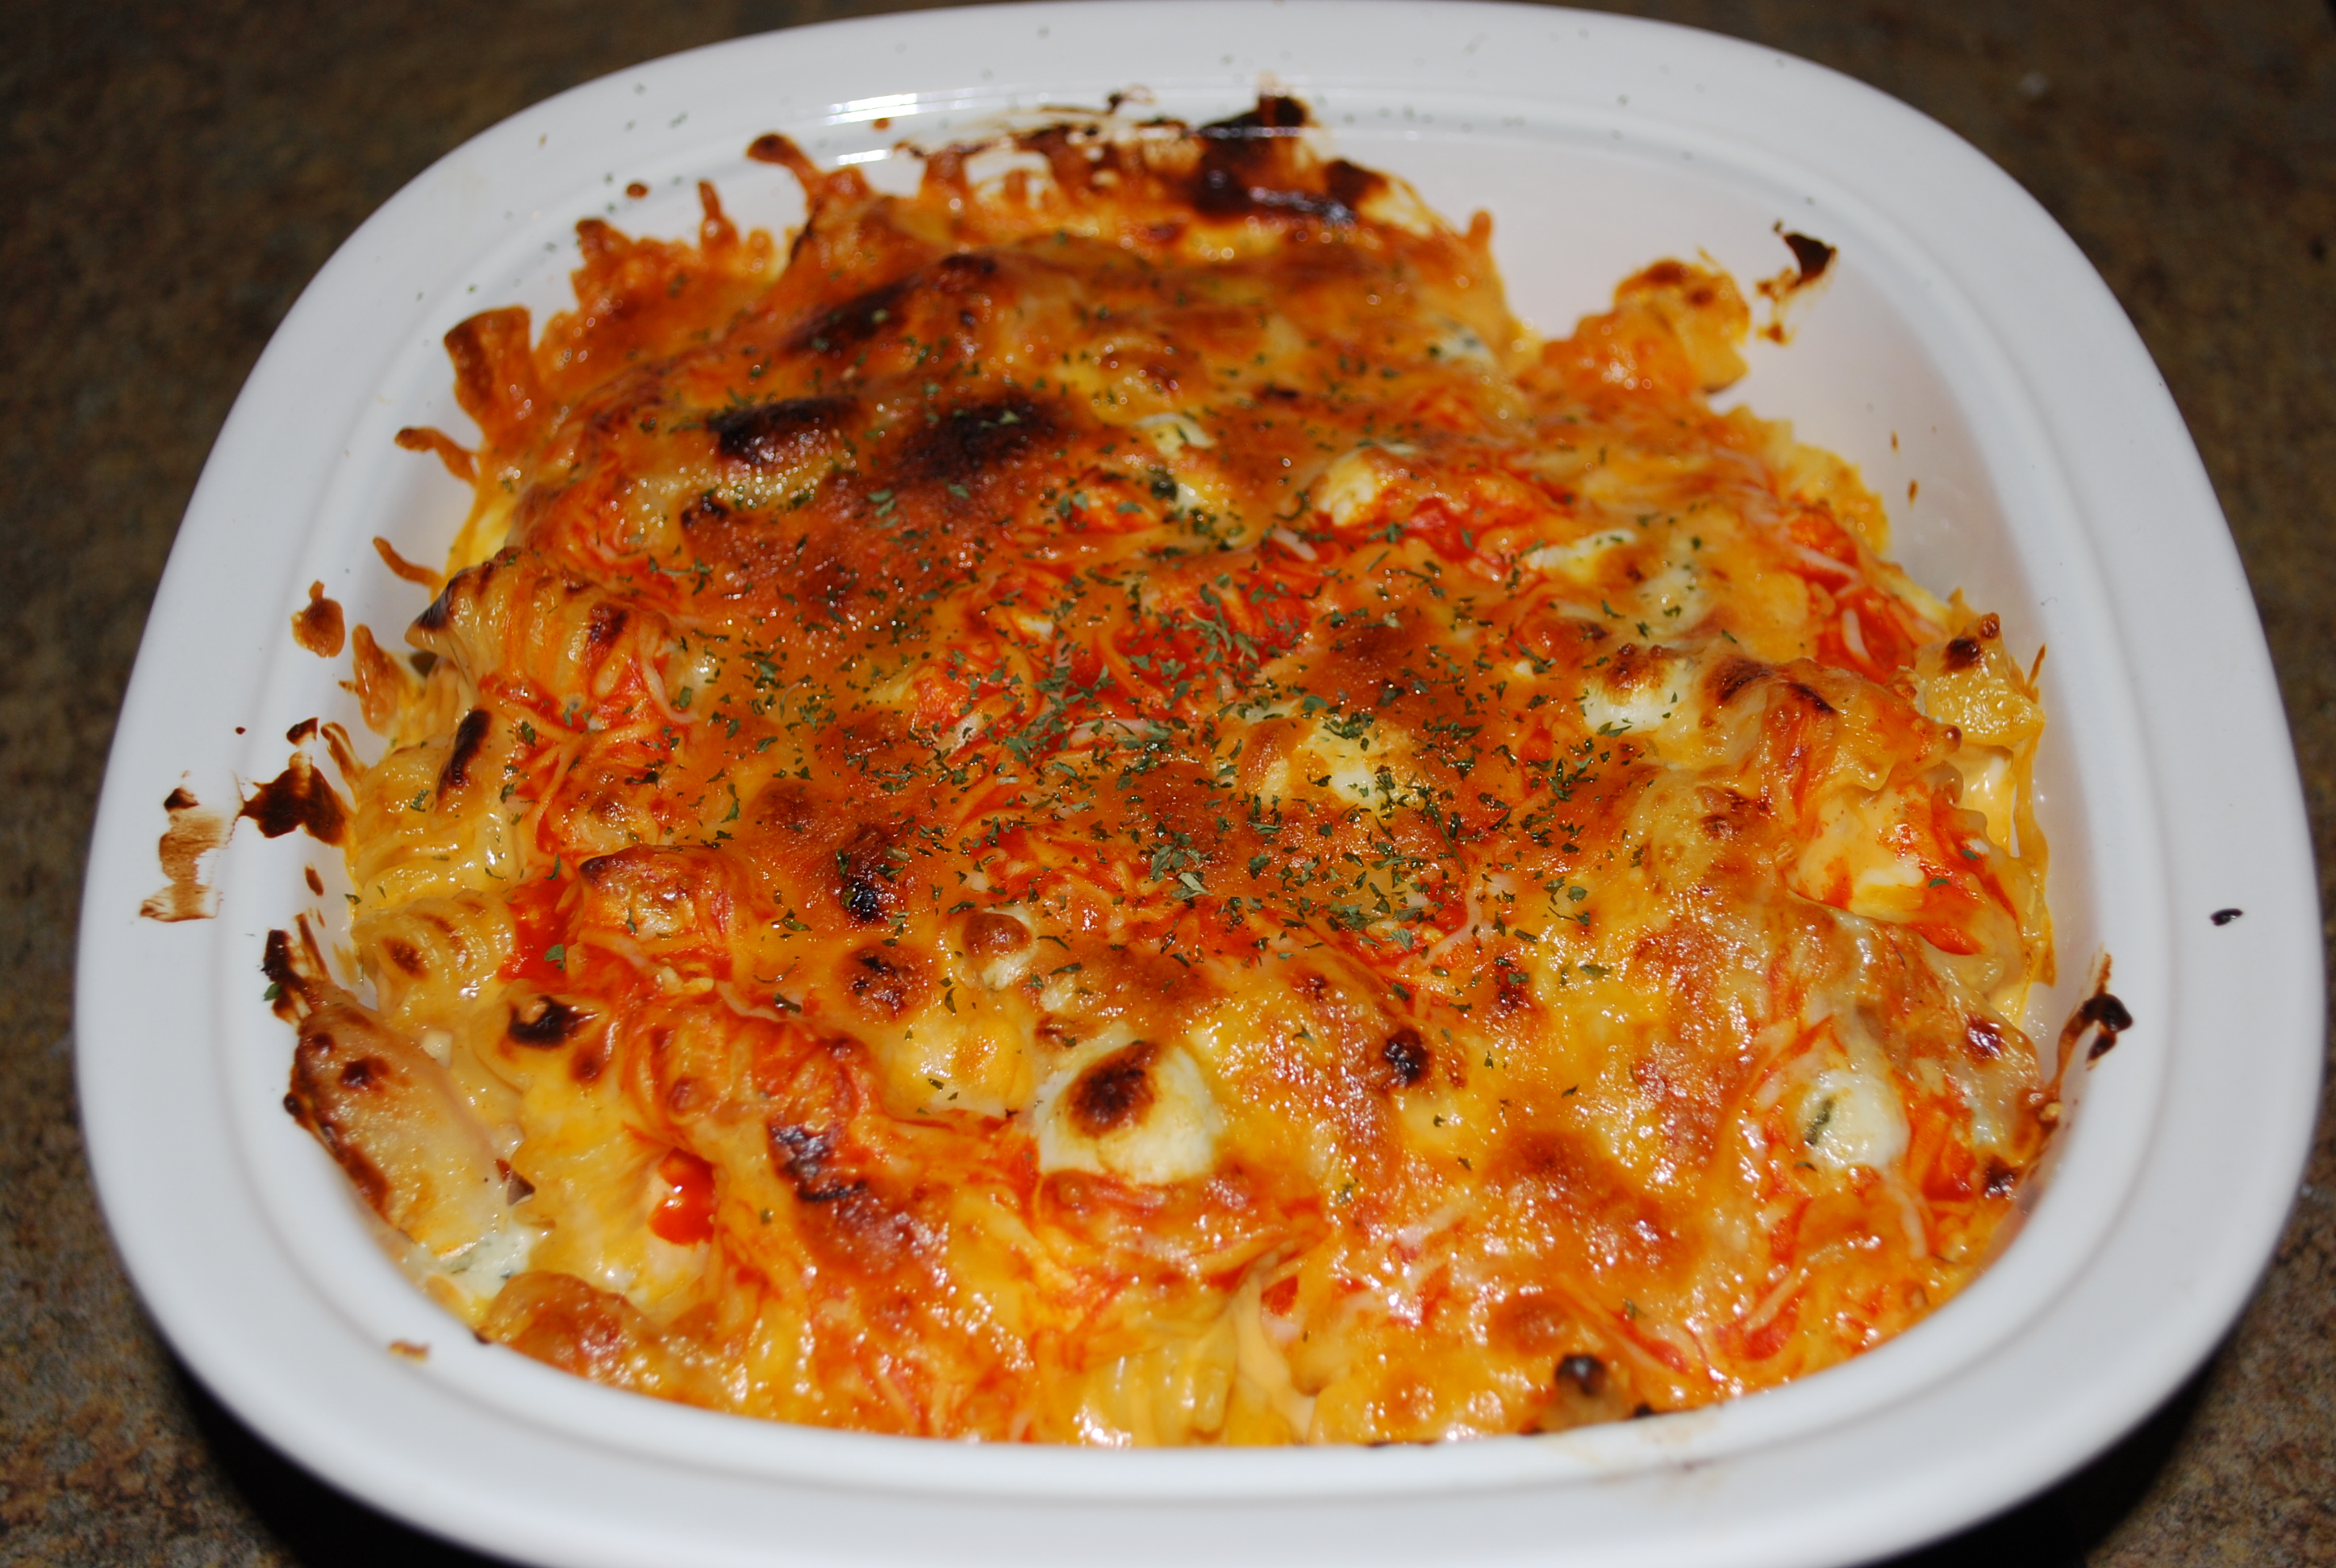
If you like you can serve this as is now, or you can top it with more cheese and hot sauce and bake it in the oven (Guess which one i do)
This is where I tell you to feel free to play with the recipe…and I’m still going to do that. Don’t’ like blue cheese? No problem. leave it out. Don’t like it too hot, don’t’ add as much hot sauce, I don’t care, this is for YOU!!! Leave any questions you got in the comments, I’ll get to ya.
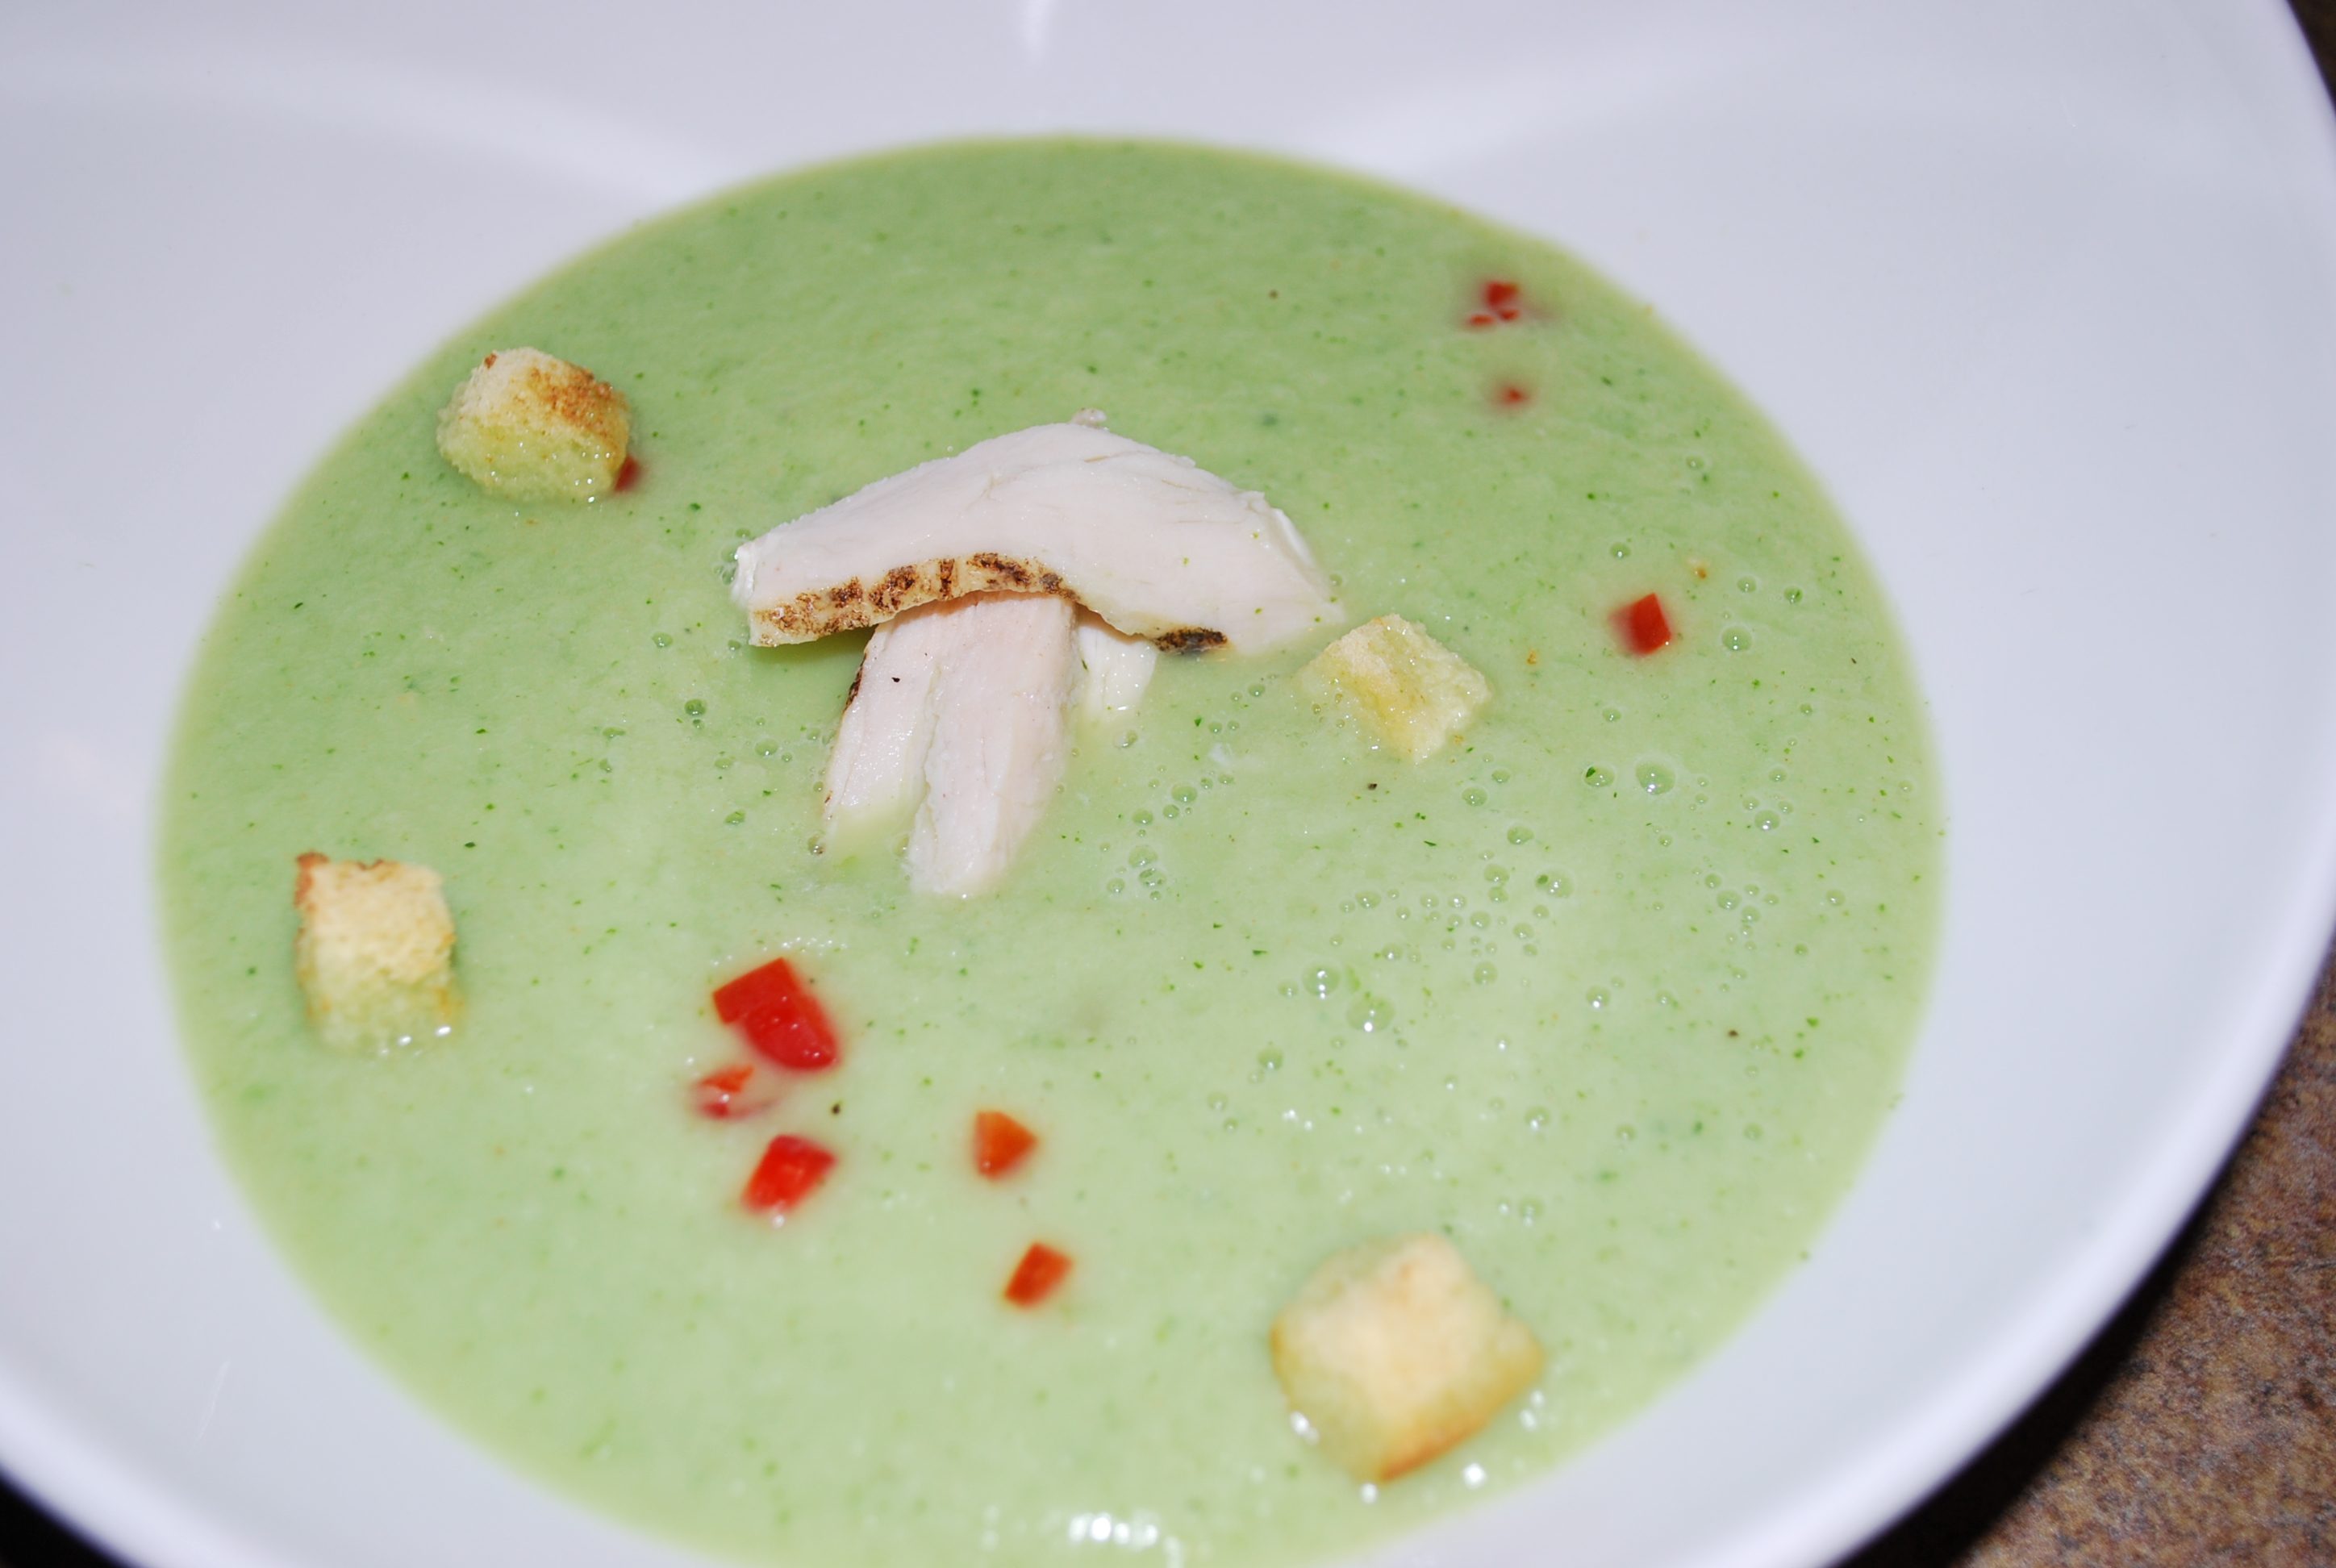
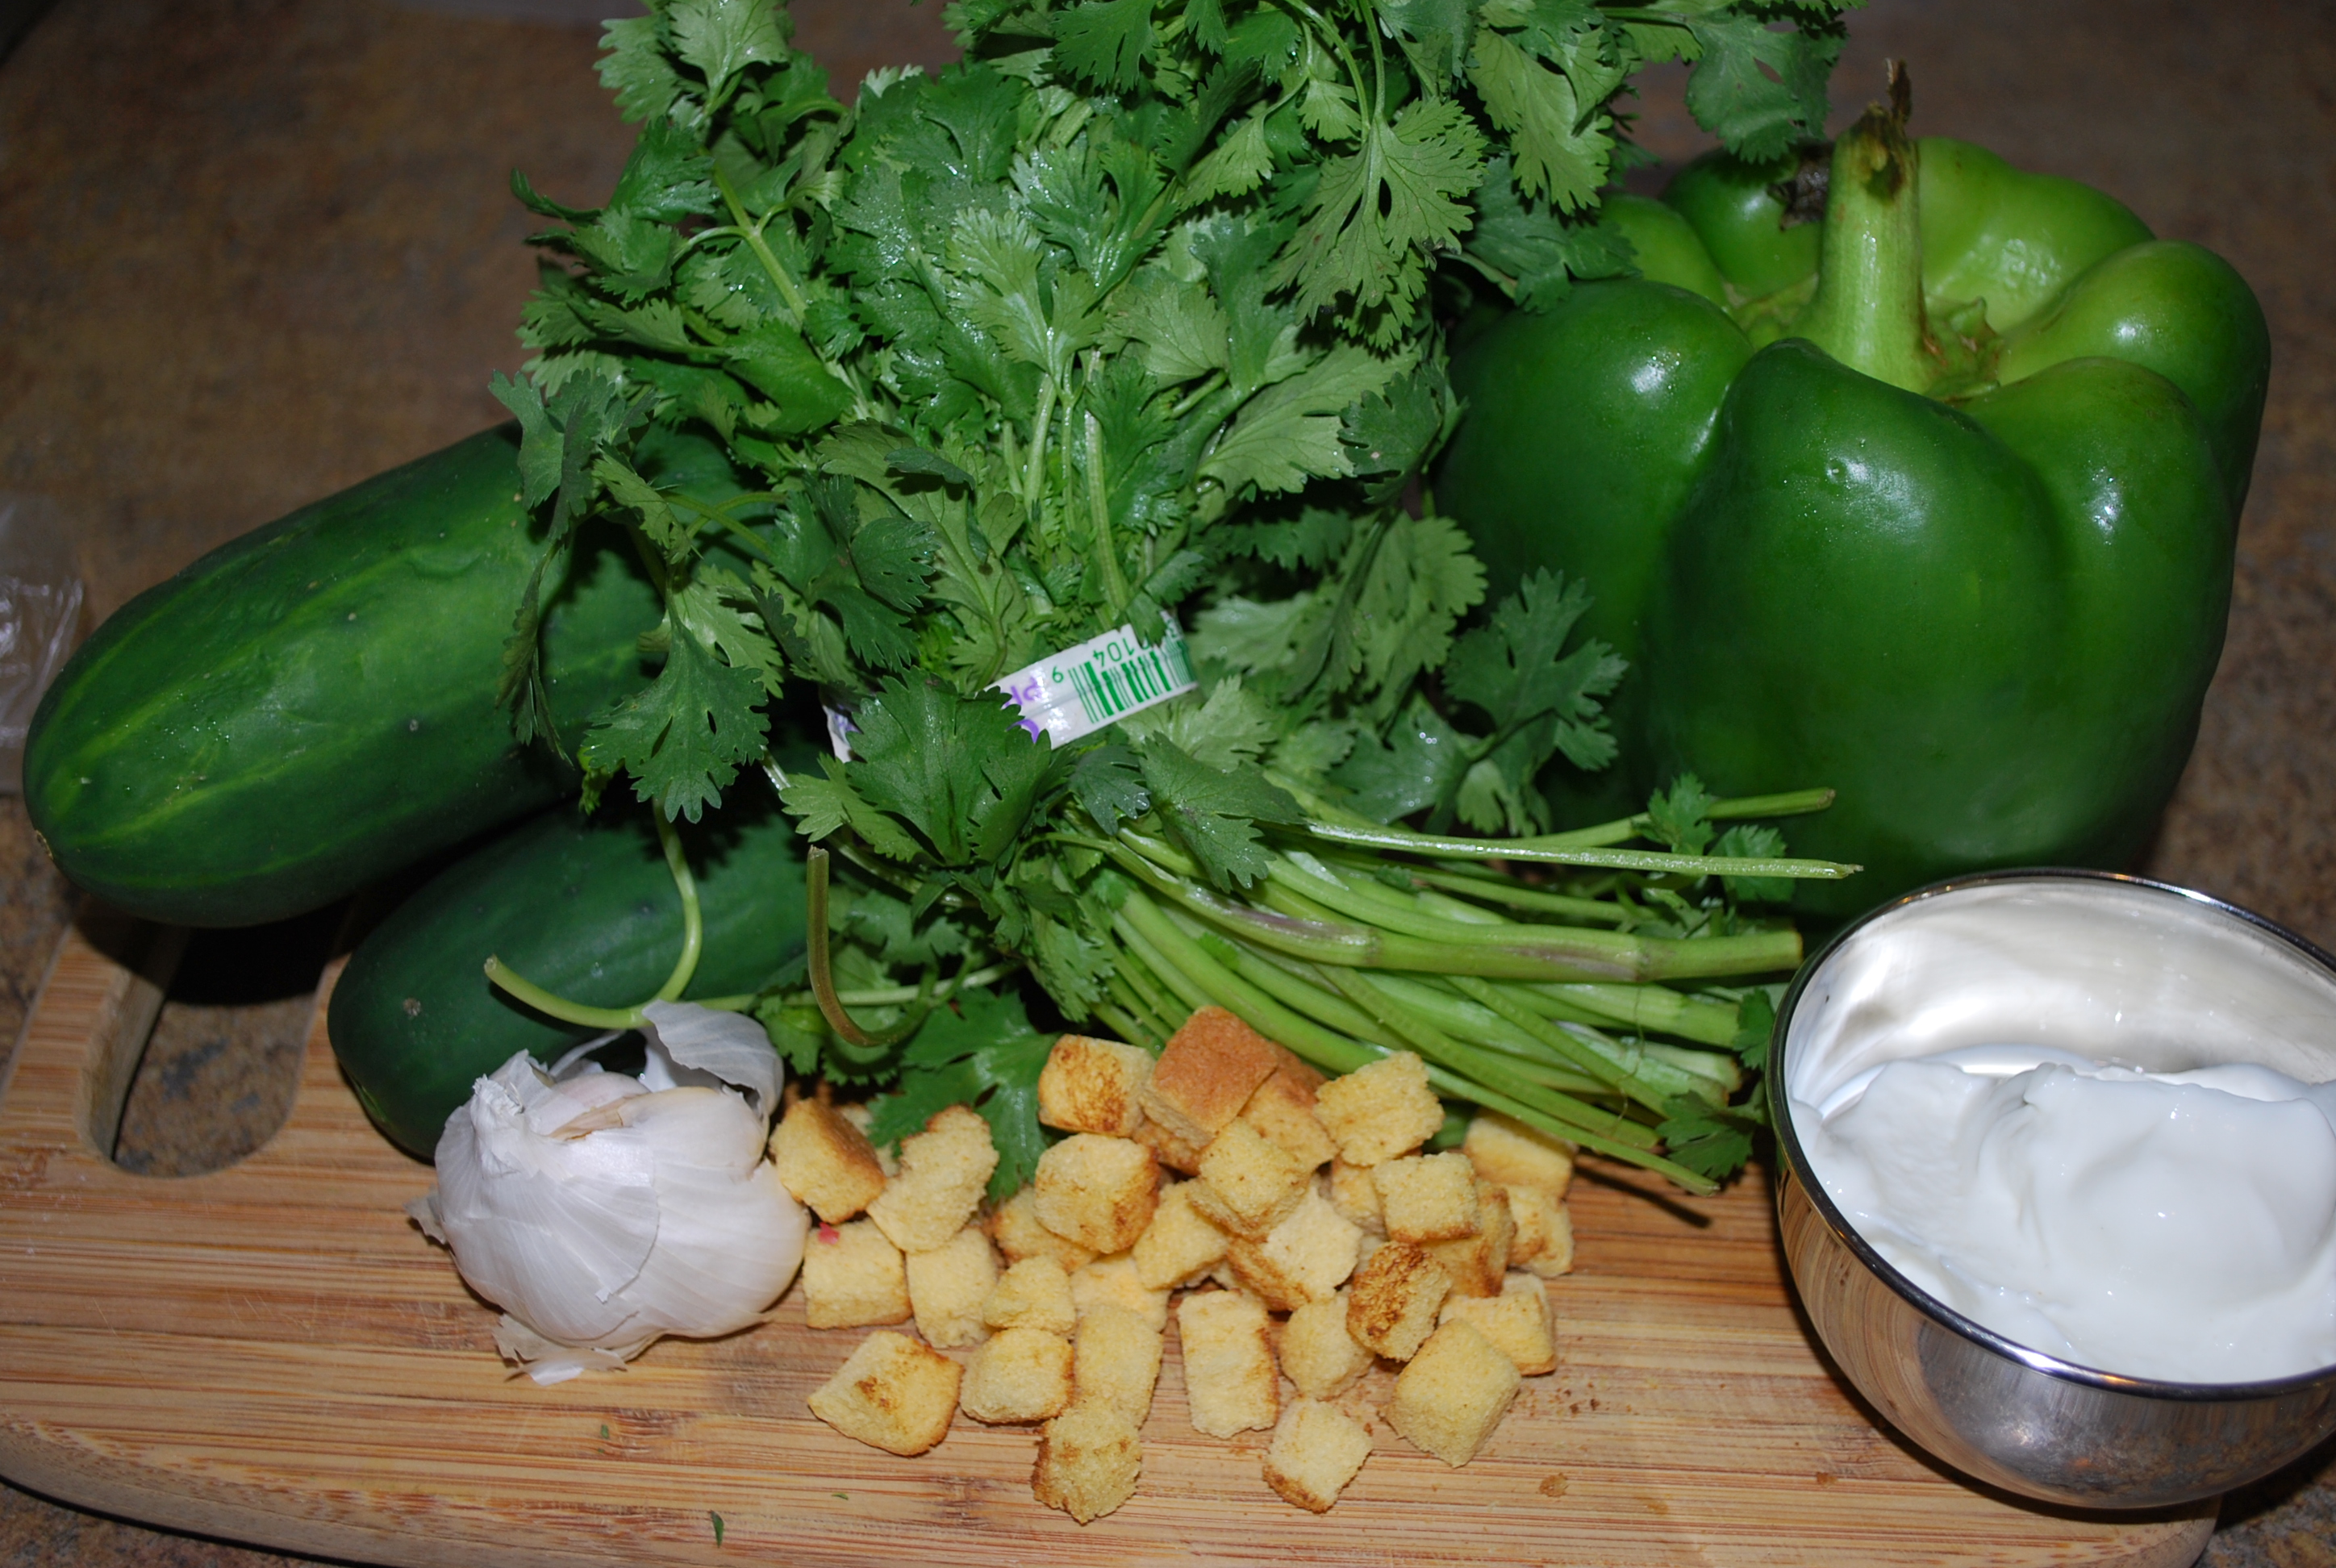
Simple, fresh, mild, refreshing…those are just some of the words used to describe cucumbers. You know what’s better about them? THEY’RE CHEAP!!!!! Seriously, I can get them on the roadside for under a buck a piece. Not many people know what to do with them besides cut them up and throw them in a salad. Well, here’s something different, turn them into a nice cold summer soup. This recipe came from a short stint I did with a chef from Spain, while I was in Germany (don’t’ ask how that happened). It’s a little spin on the traditional white gazpacho, which is the “other summer soup” in Spain. We used to serve this in a little shot glass with Hendrick’s Gin just splashed over it.
3 lb cucumber, peeld and seeded 1 lb. green bell pepper 6 cloves garlic, peeled 1 c. diced Portuguese roll (or any other nice bread) 1/2 c. greek yogurt or sour cream (Crema works best, but it can be hard to find) 3 tbsp cider vinegar 1 bunch cilantro 1/4 diced onion Water as needed
OK, so first step is two steps actually. Just barely cover your bread in some ice cold water and let them soak for 5-10 minutes. While the bread is soaking, bring a small pot of salted water to a boil, and drop your garlic cloves in for 2 minutes. Pull them out and just put them off to the side. This is going to make the garlic nice and mild, so it doesn’t over power the cucumber.
Take half of the ingredients and drop them into the blender. (Literally half of each of everything.) Start the blender on pulse and pulse until everything is starting to break up. Then crank thank puppy up for two minutes.
Repeat with the other half and store in a tupperware container until you’re ready to eat.
I’ve already told you this is great with gin, but if want an excellent cucumber martini, you can use this as part of your mix. I like to serve this with some more yogurt or sour cream , some grilled fish, and croutons. Grilled chicken or turkey works well too. How else can you get creative with it? LIQUOR!!!!! Try splashing some vodka into it, or even Scotch. Add some mayonnaise and herbs, and you’ve got a wicked cucumber dressing. what are you going to do with this recipe? Let me know in the comments.
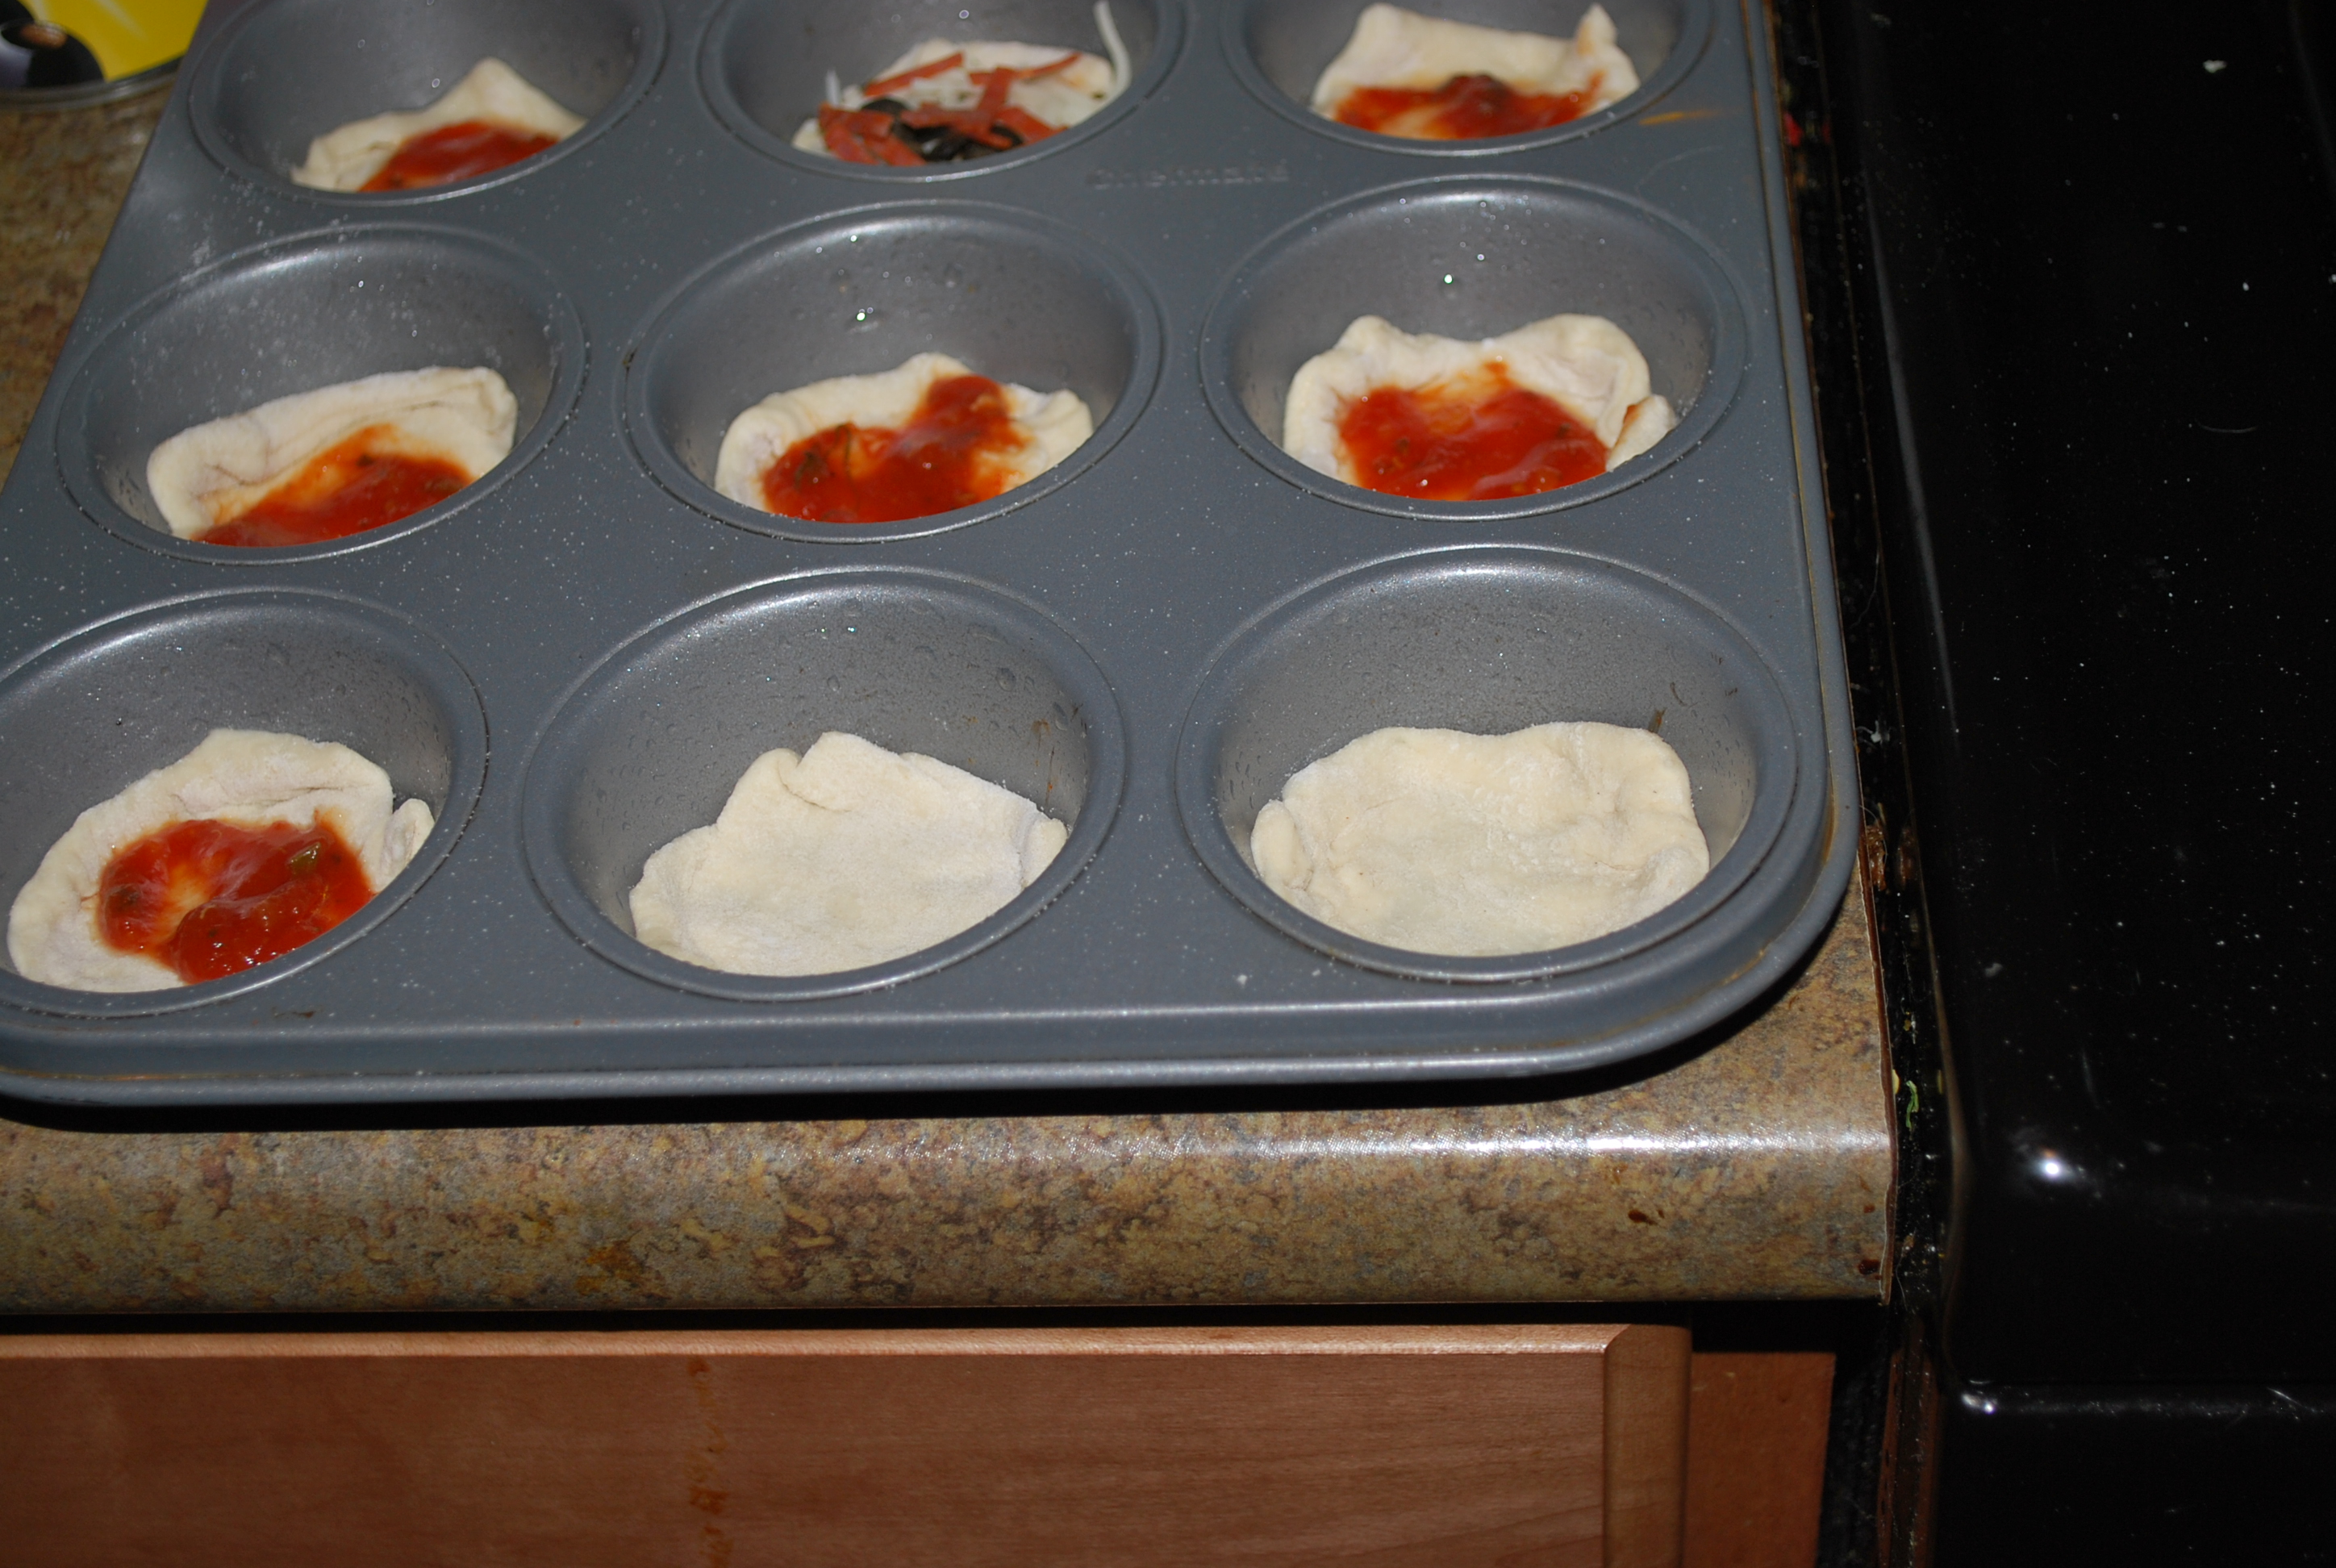
Well, not really cupcakes, but pizza none the less. This is another fun little party idea that you can do with little kids or adult kids. The hardest part of this whole recipe is making the dough (hyperlink to recipe), which isn’t that hard. You can get as creative with this as you can with any other pizza. this is really more of just showing you a technique and then having you run with it. I recipe of dough will give you about 36-48 cupcakes, depending on how thick you want them. Here’s what you’ll need:
Marninara sauce (Optional, you can buy the garbage in a jar our you can make your own)
Fresh or shredded mozzarella (or any cheese you want for that matter)
……Screw it, let’s just get to the instruction you get the idea. It’s PIZZA!!!! Get nuts with it…
Roll you pizza dough about 1/3 inch thick. You can go thinner if you like, or thicket, ain’t no thang.
Brush a muffin tin with some nice olive oil and get your oven heated to between 475-500 degrees
Cut a small square for the dough and lay it around in the tin. Press the edges lightly to make sure you get a good round shape
top with you favoite toppings
Bake for about 10-15 minutes
Now it’s time to eat. This is more of a technique than a recipe but you get the idea. This is actually favorite party activity of some of my friends. they love coming over and getting creative. AND it’s in cupcake form so you can’t go wrong. A favorite is BBQ chicken and blue cheese. We’ve also done classic veggie, Margherita, Buffalo wing, anchove and even white pizzas. Don’t’ be afraid to get nuts. Let know your flavors in the comments.