• Butternut Squash and Seared Apple Soup

    DSC_0469You’ve probably seen this recipe in just about every cookbook, magazine, and Martha Stewart anything, am I right?  They’re all the same. just some boiled pureed squash and apples….BLEH!!!!  Show that squash some respect and give that soup some BALLS!!!  What do you get when you boil apples?  Apple sauce…BOOOOOOOORING!!!!!!  Give them some color and let their autumn essence out!!!  Ok , I got a little carried away there…Anyway, this recipe is my spin on the classic recipe you see every year, but mixing in some old school techniques that bring out the best of all of the ingredients. This makes a little over a 2 1/2 quarts.DSC_0466

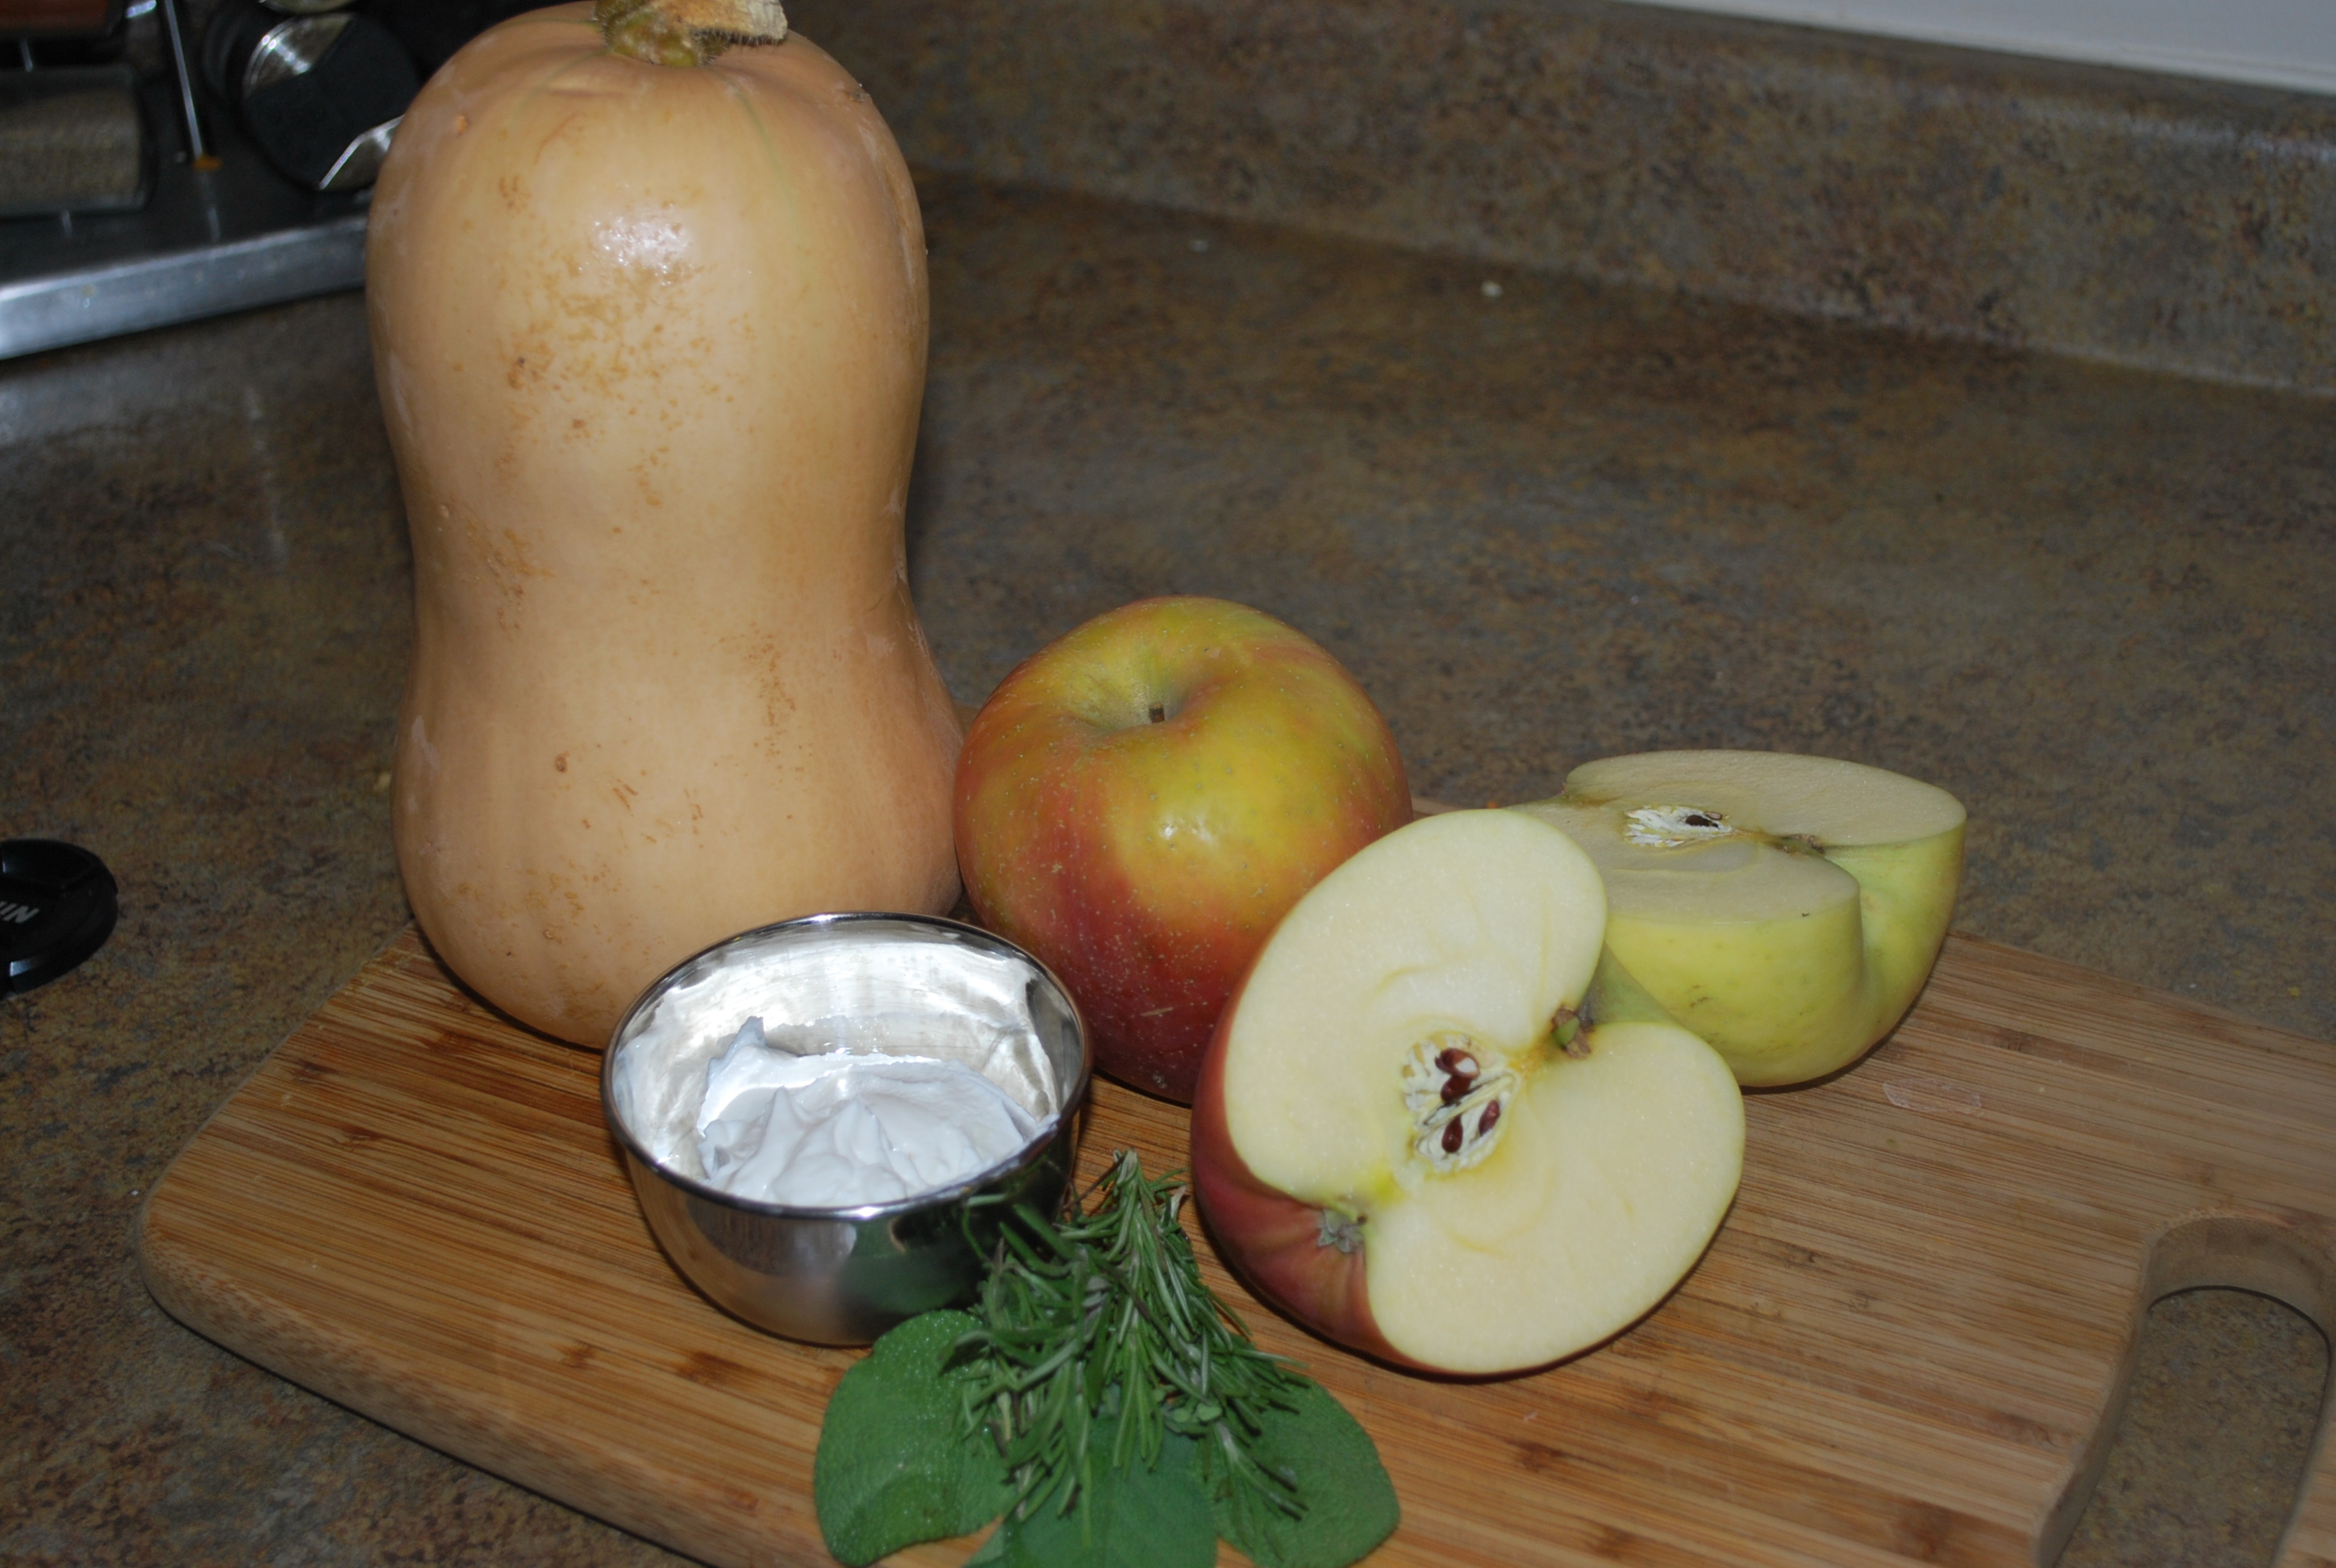
    • 3lbs. Butternut squash (whole or diced form your grocer if they have it pre-cut)
    • 1 1/2 lbs.  Honey Crips (or Granny Smith) Apples
    • 2 tbsp. fresh grated ginger
    • 1 qt. chicken stock
    • 1/2 c. rough chopped onion
    • 1 c. white wine
    • 1 tbsp chopped sage leaves
    • 2 tbsp chopped rosemary
    • Melted butter for brushing and cooking
    • 1/2 c. sour cream or greek yogurt (optional)
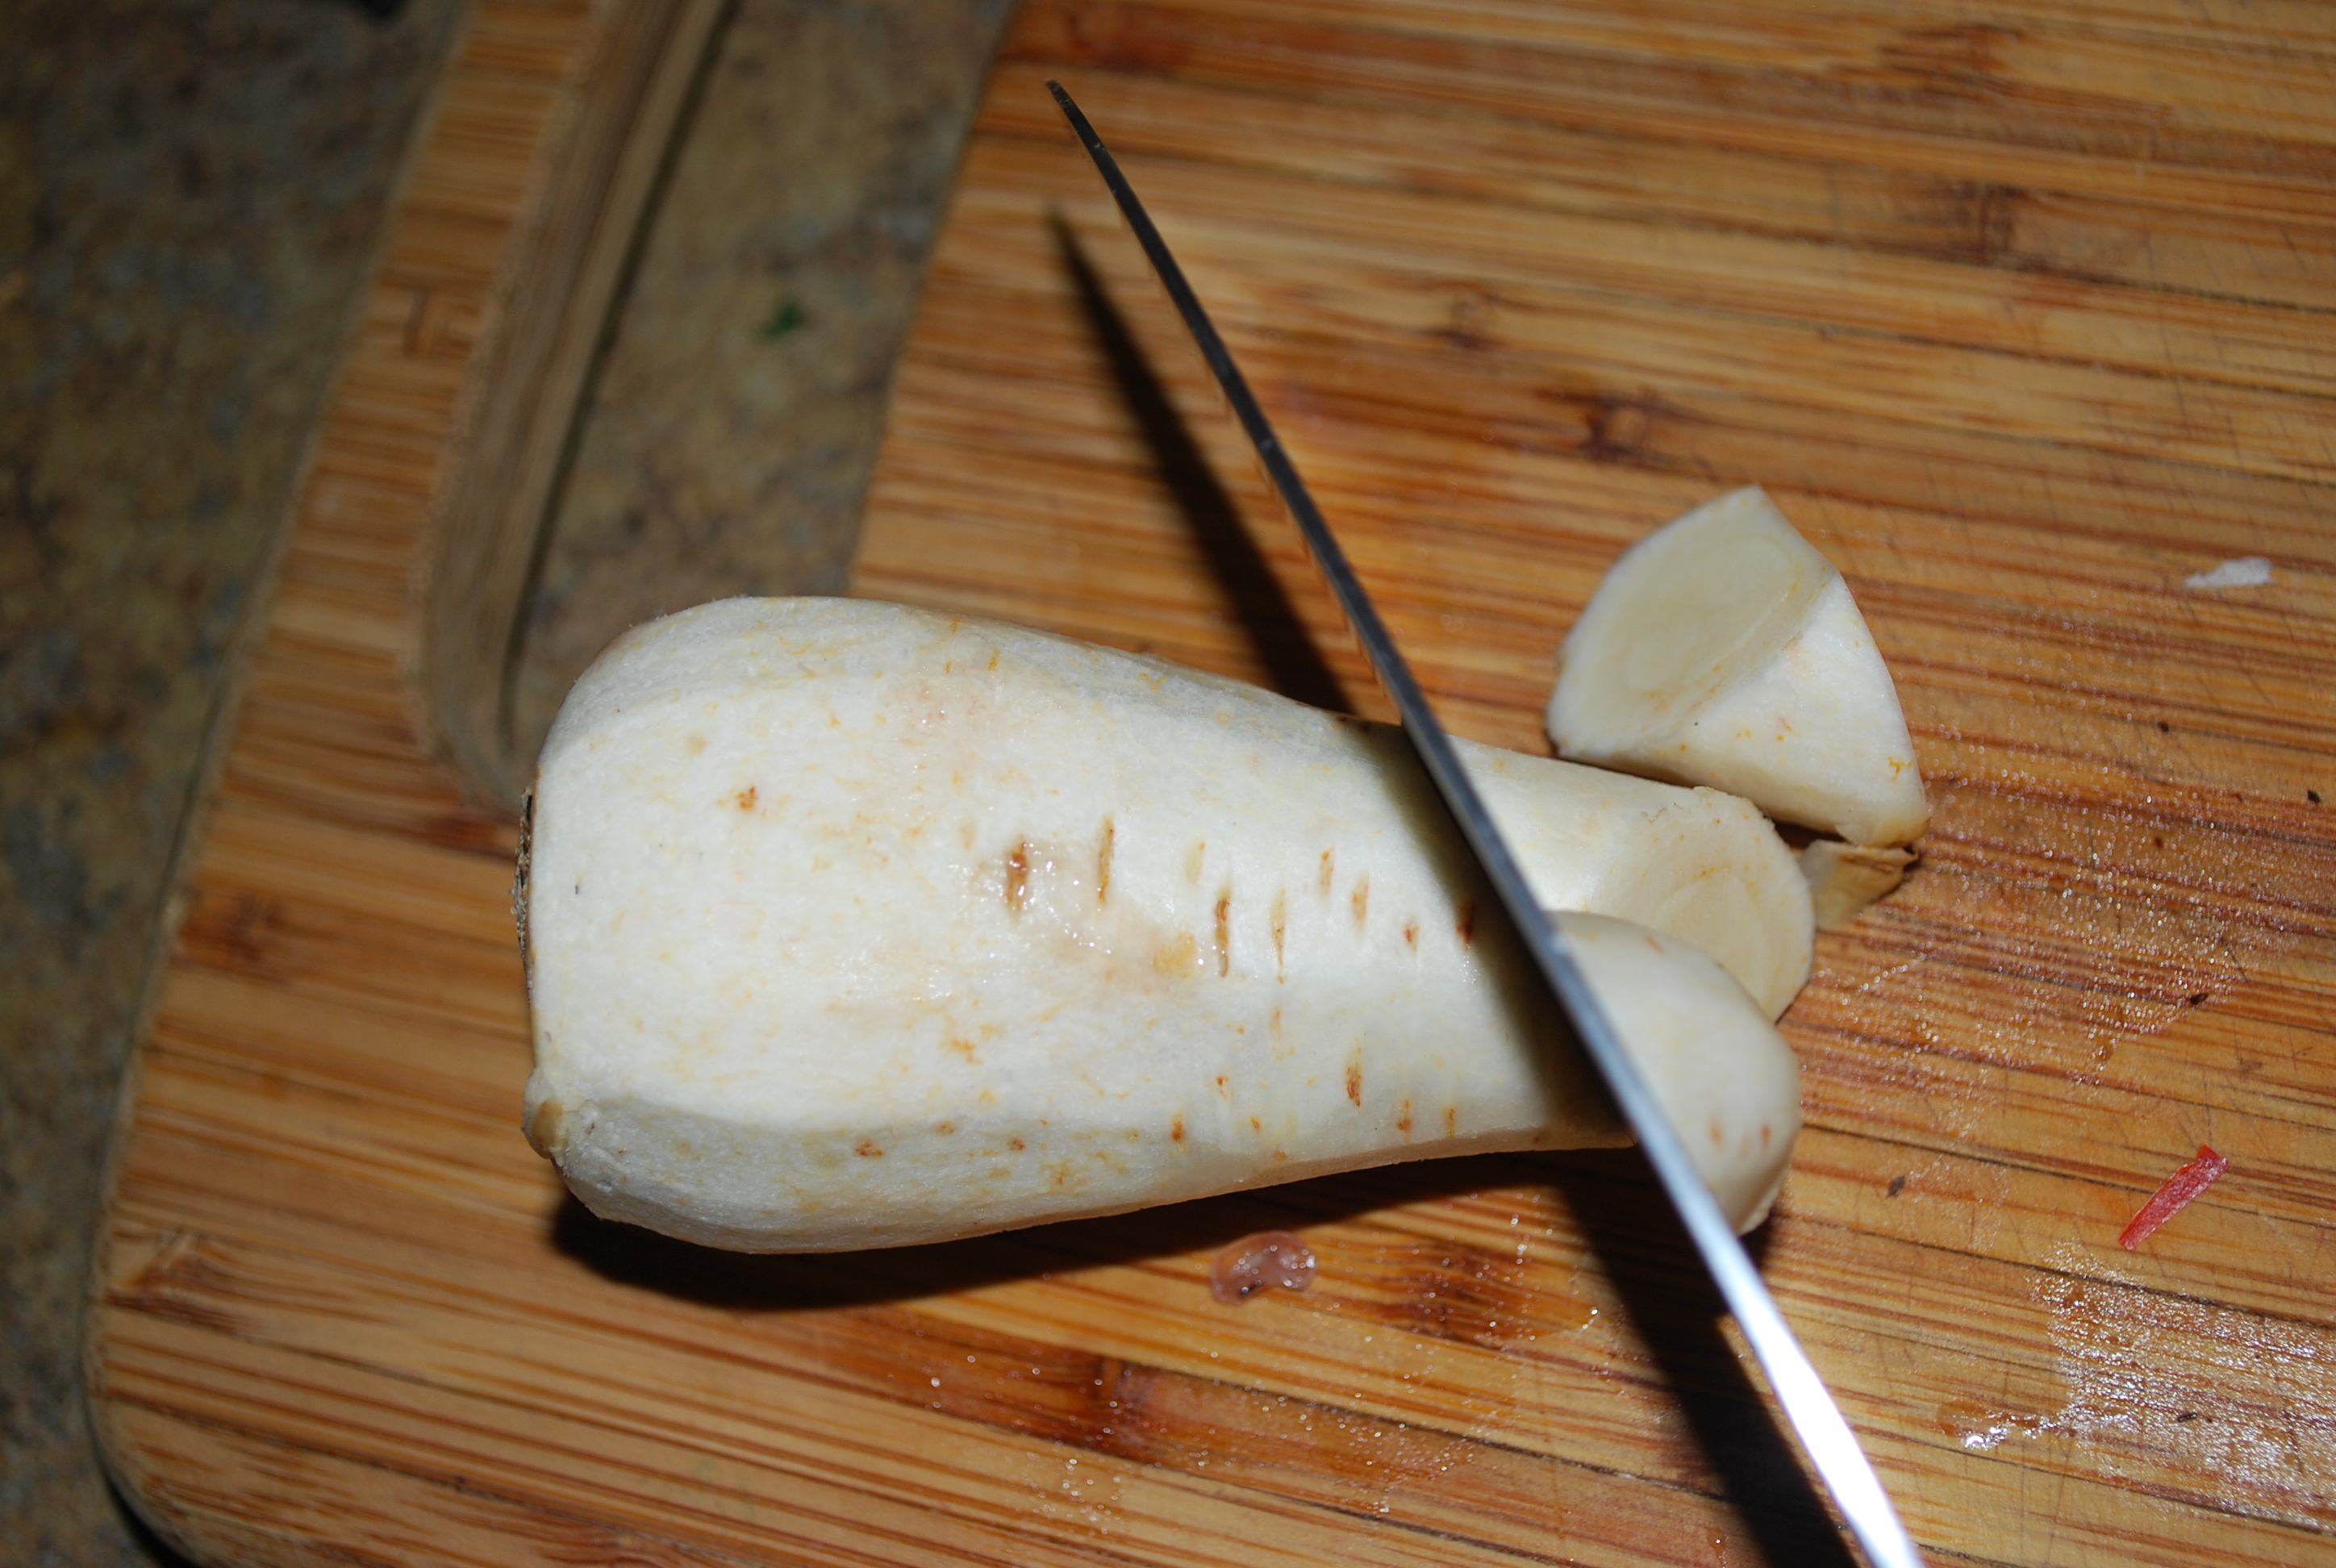
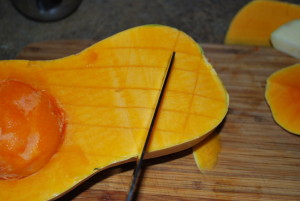
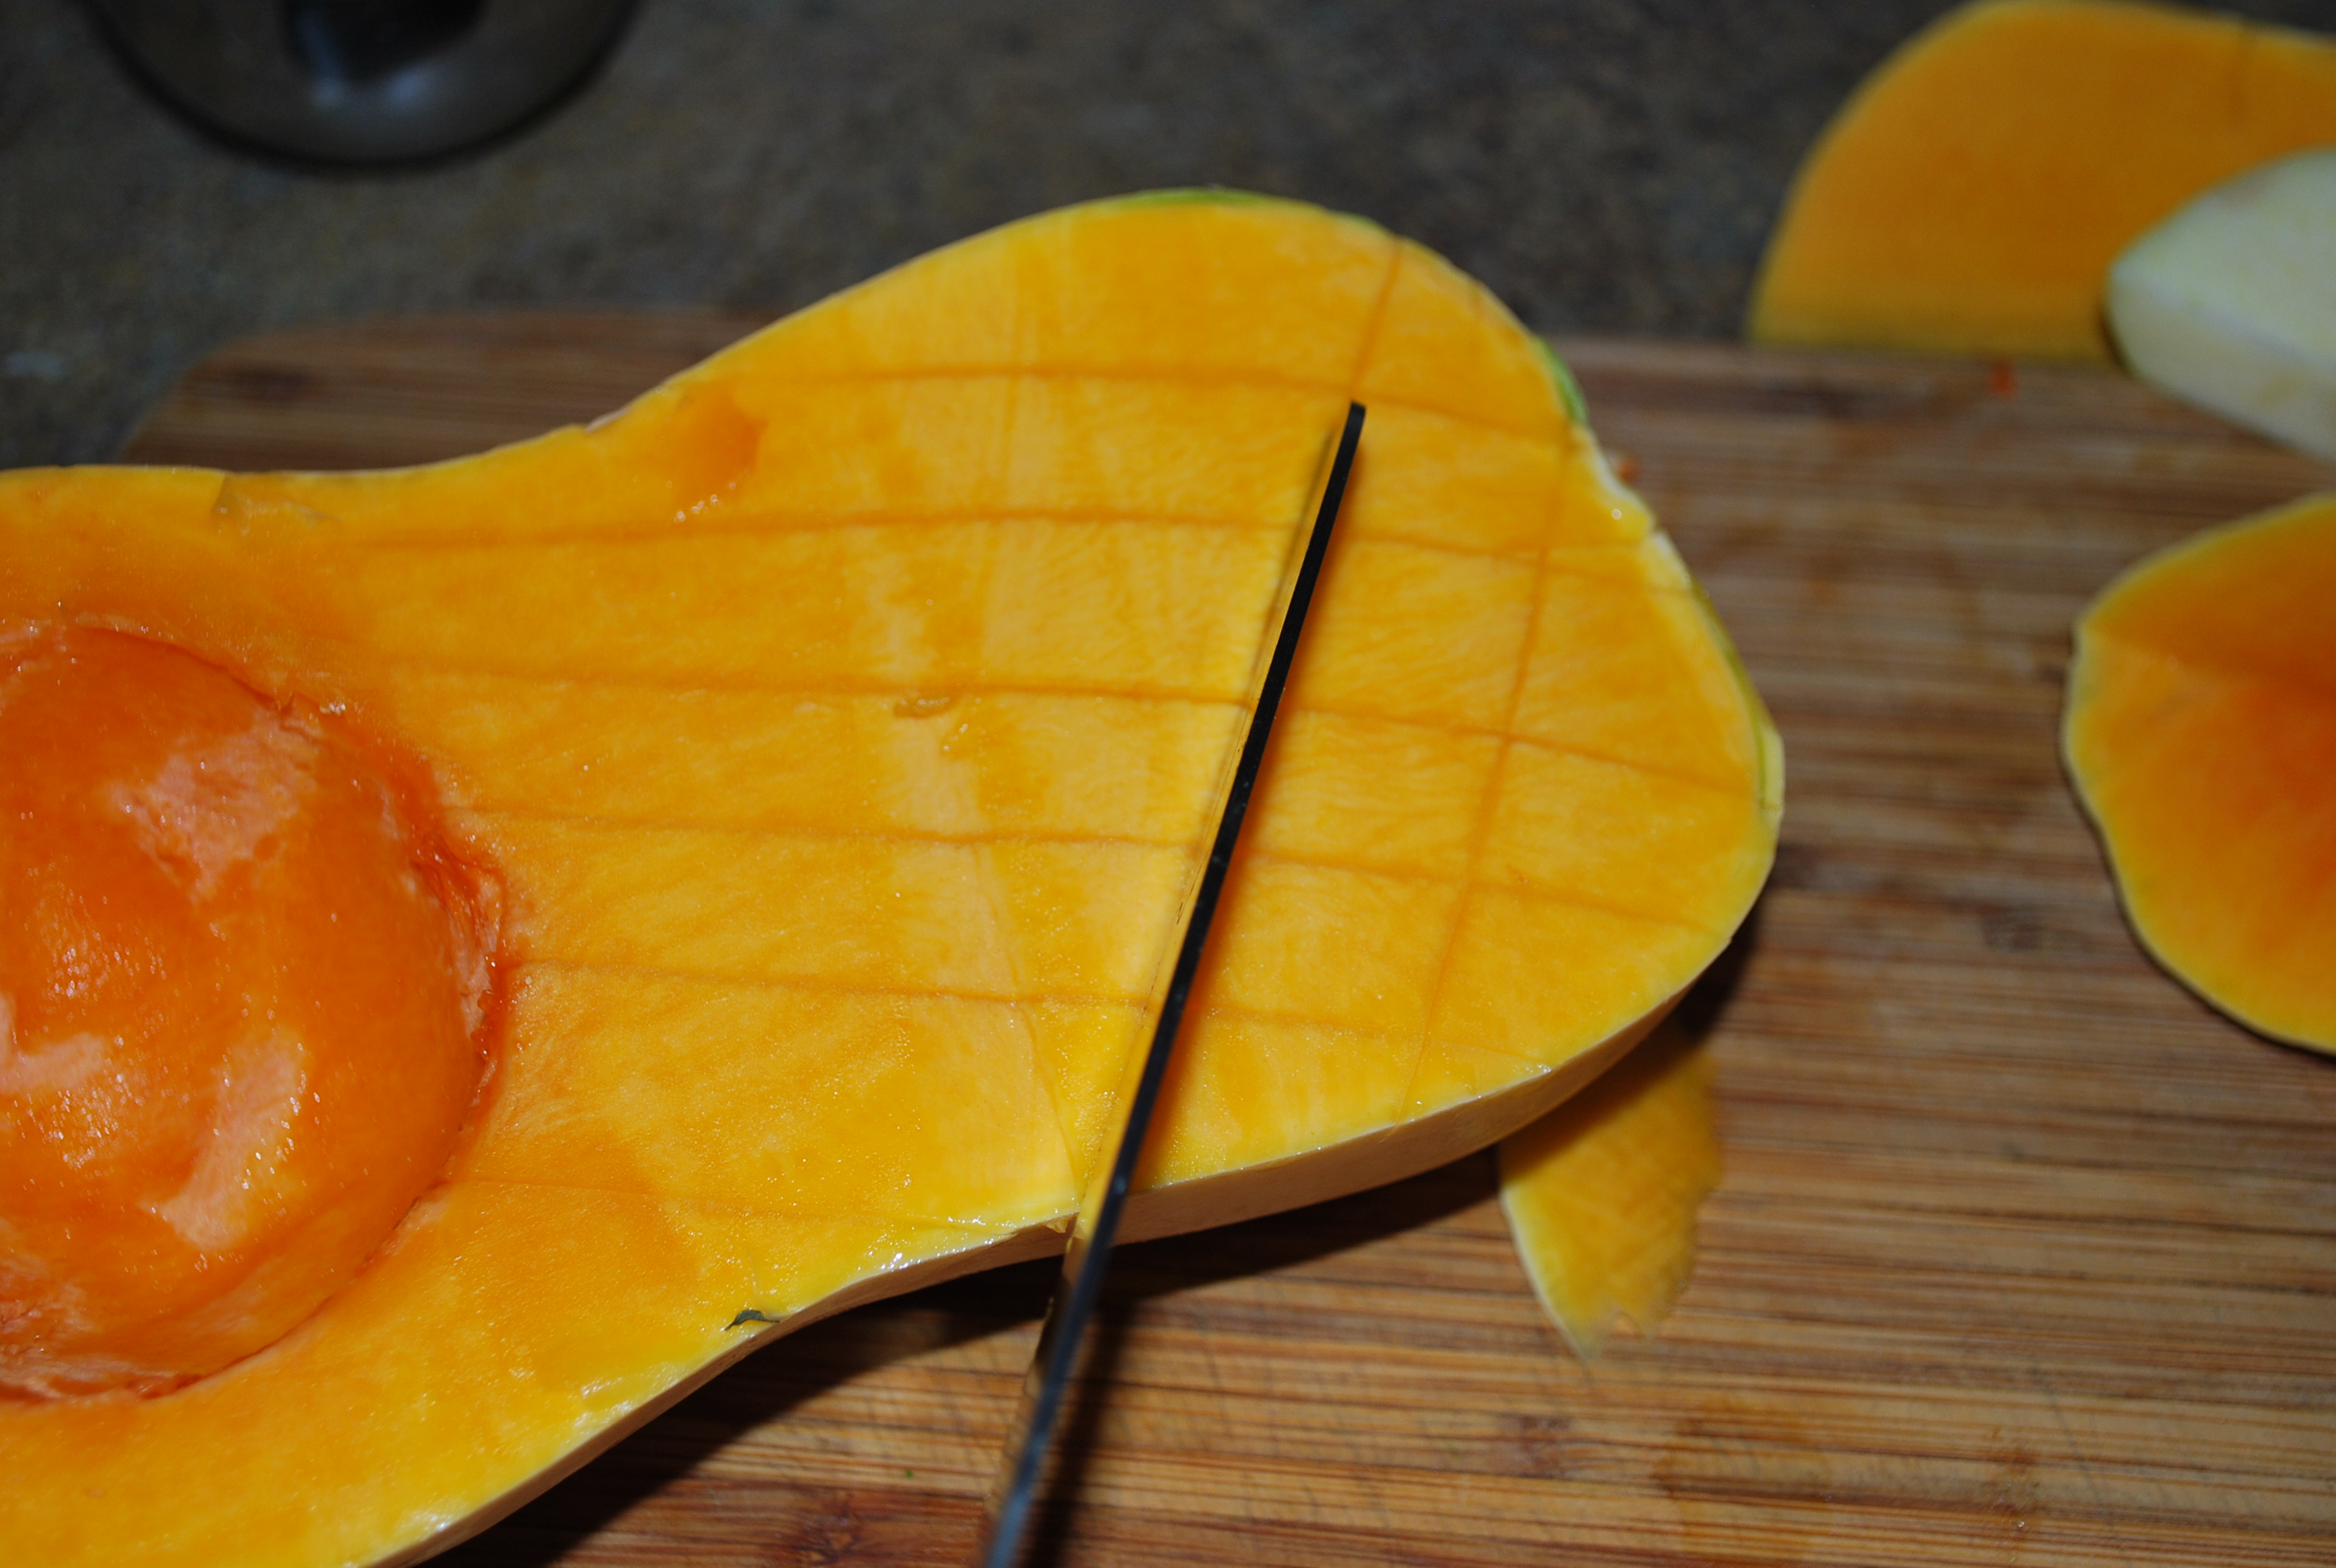
    1. First thing, turn up that oven to about 450.   Take your squash, split it, scoop the seeds out, then score it like this:DSC_0467
    2. If your squash is pre-cut, then just toss it with the sage and some butter or ail and throw it in the oven until it’s soft, about 20-30 minutes.  If it’s whole, cut it in to 3  inch chunks, toss it in the oil and sage, then throw it in the oven for about 40 minutes.  I like to cover the squash the first 10-15 minutes, then uncover it to release the moisture but not allow it to get too dark.  If you like some color on your squash and extra sweetness, go ahead and leave it uncovered.
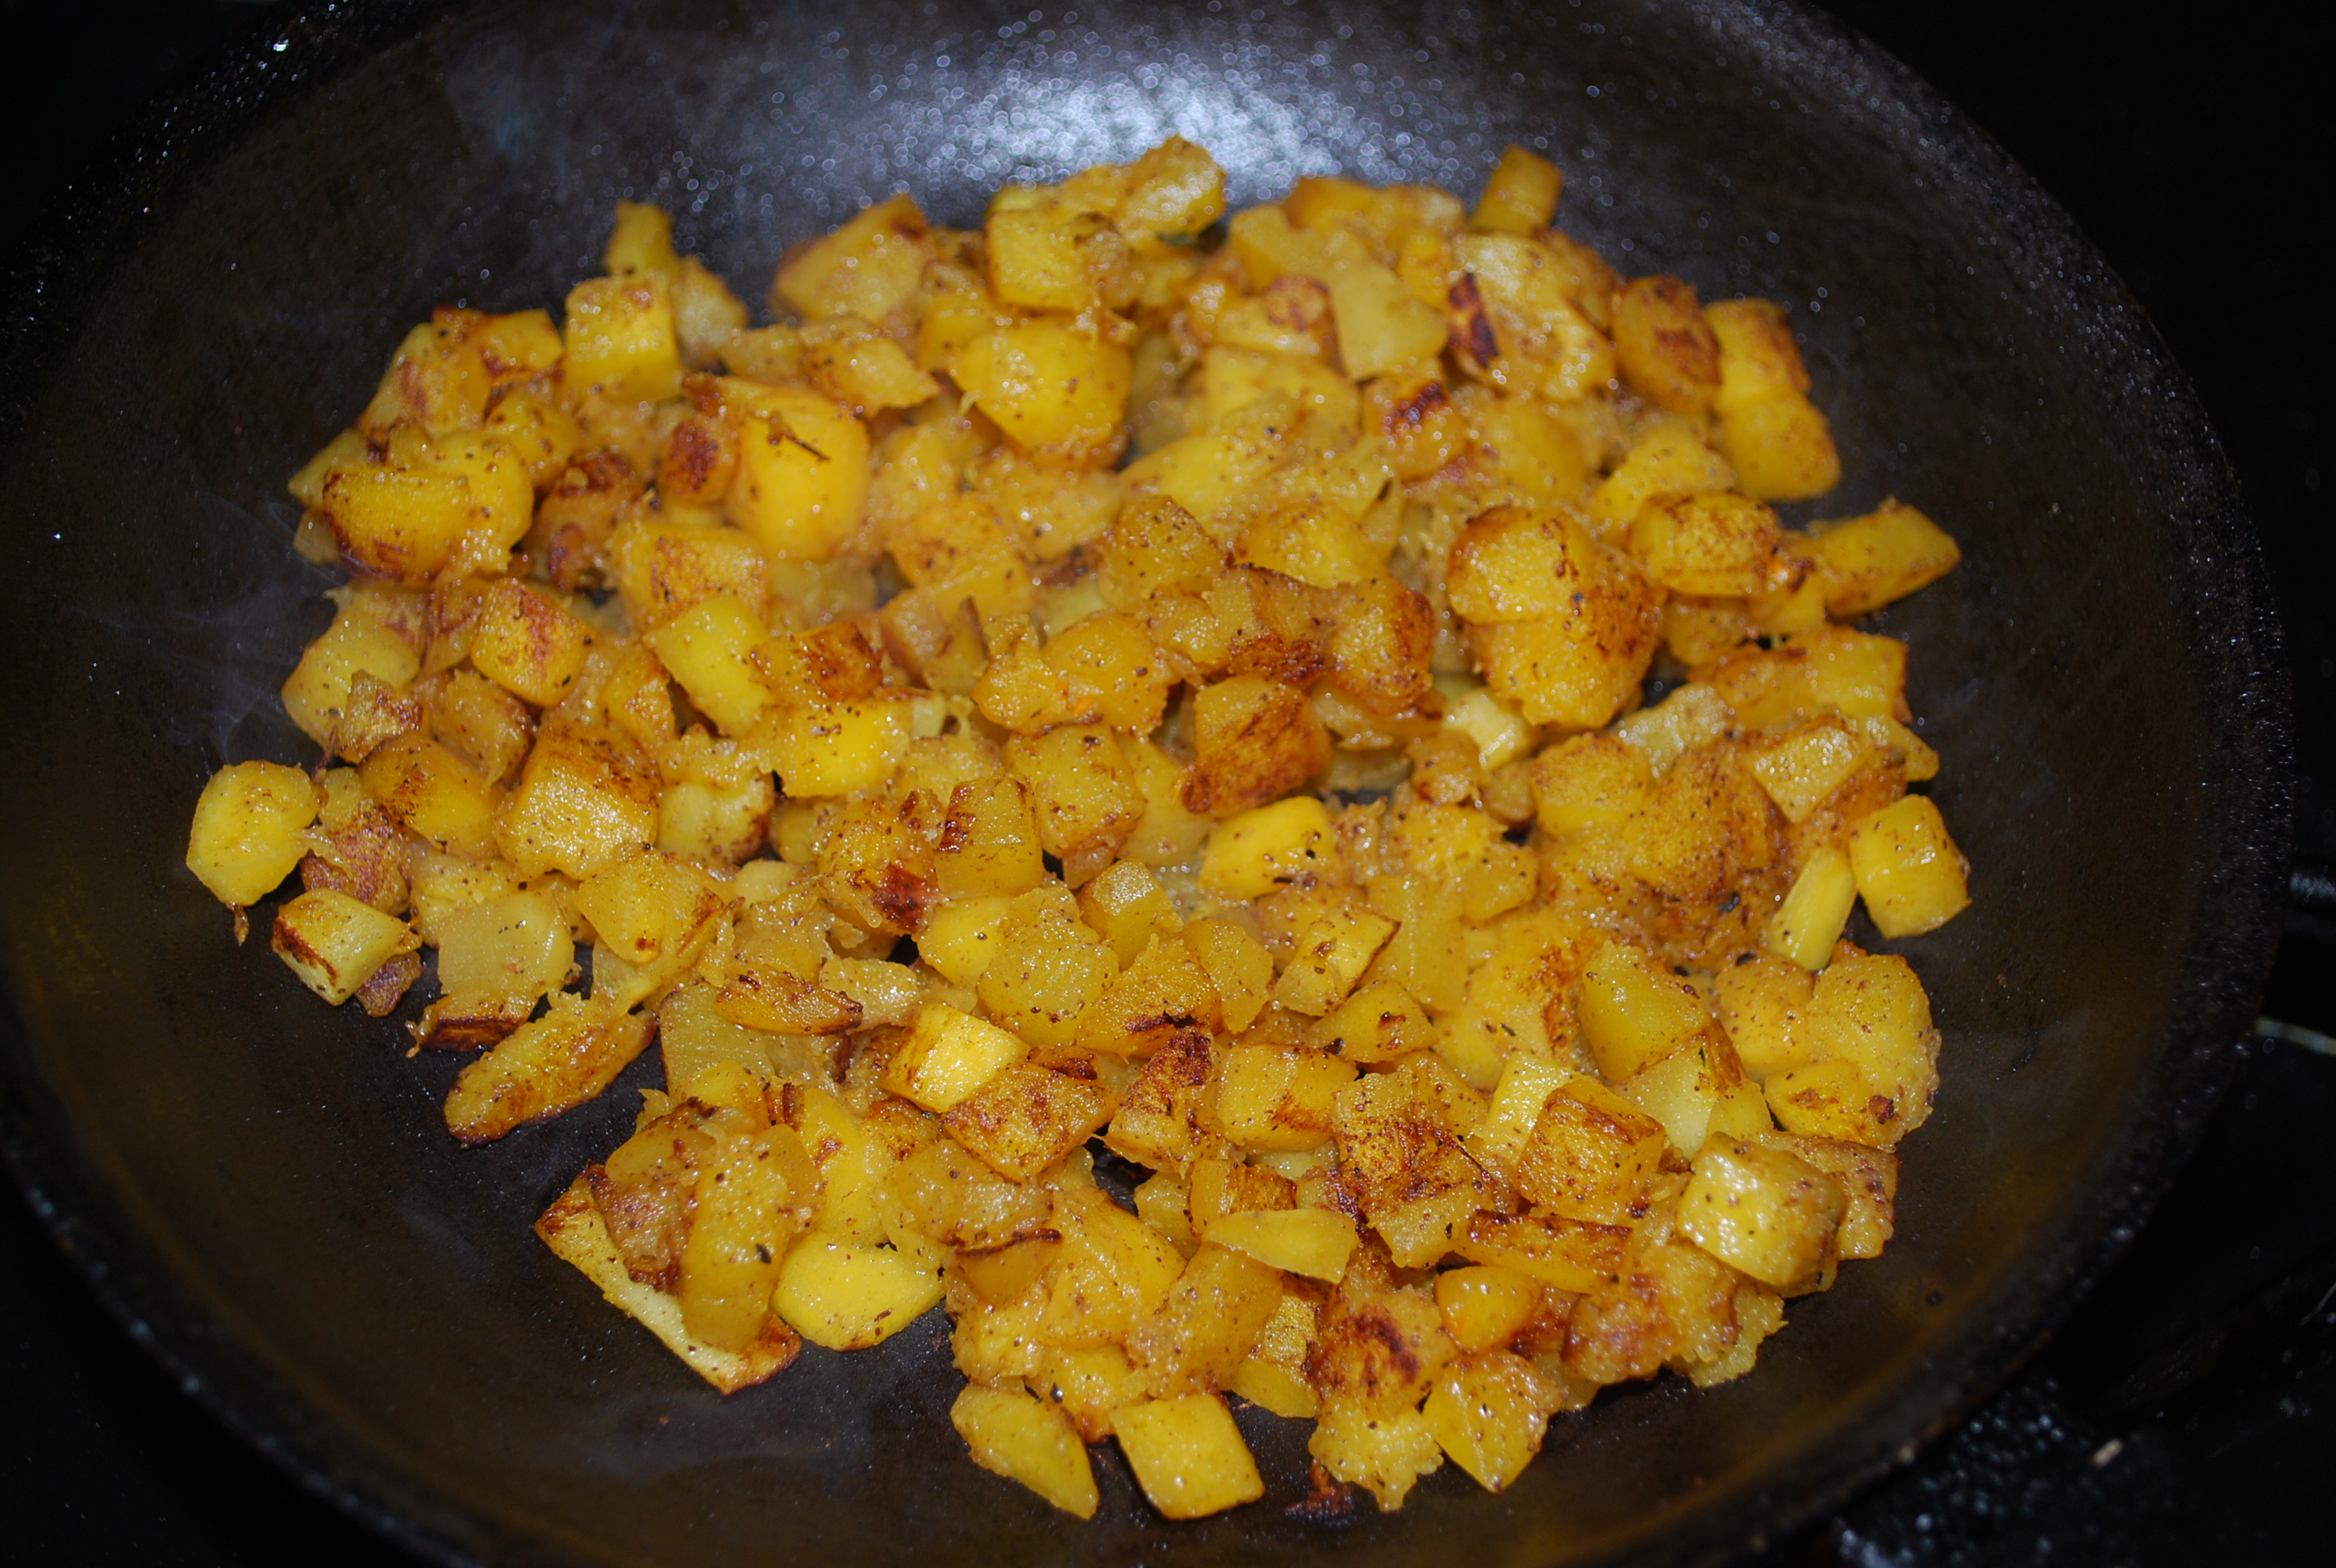
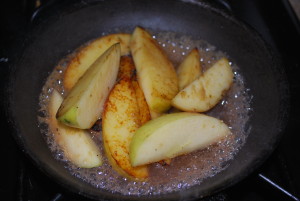
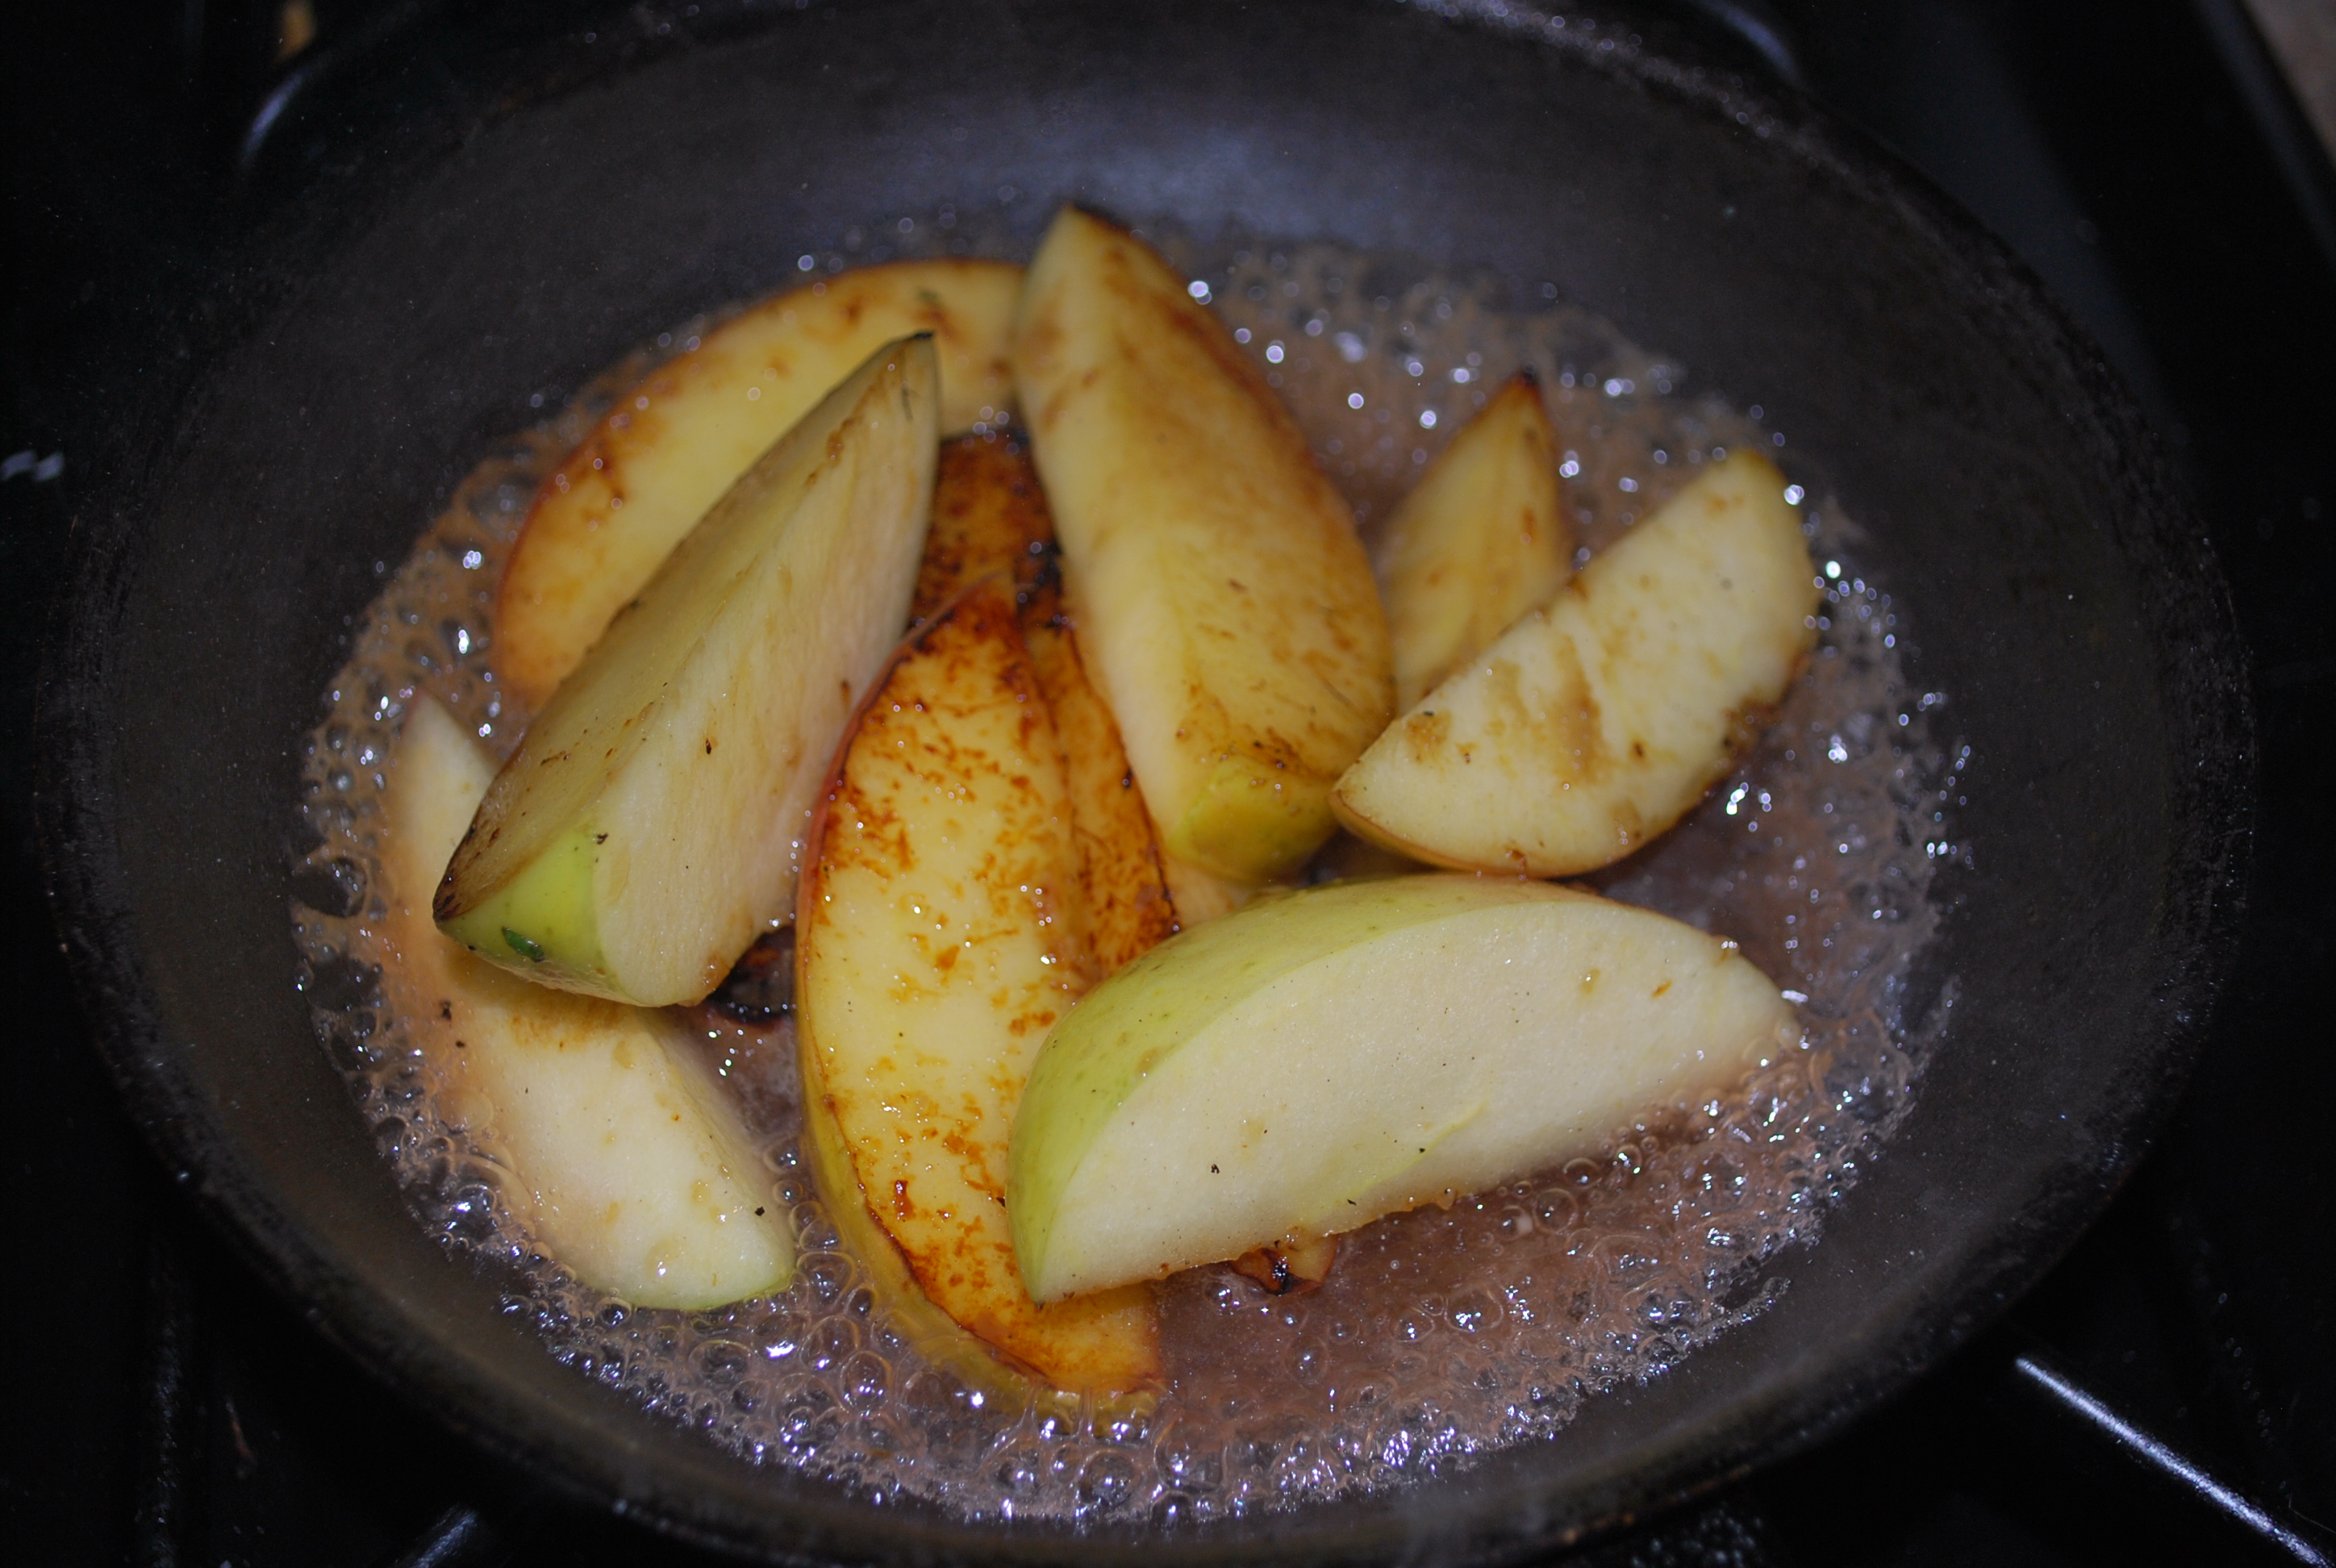
    3. Cut the apples into 2 inch wedges, leaving the seeds out, and get a pan with about 2 tbsp of butter in it nice and hot.  Add the apples and let then caramelize, like this:DSC_0468
    4. Add your onions and ginger and let those cook until the onions get translucent.  Add you wine and turn your heat down low.
    5. Let this simmer until the wine is reduced by half.  Then add you stock  & let everything cook here until the apples are soft.  Put this off to the side until the squash is done.
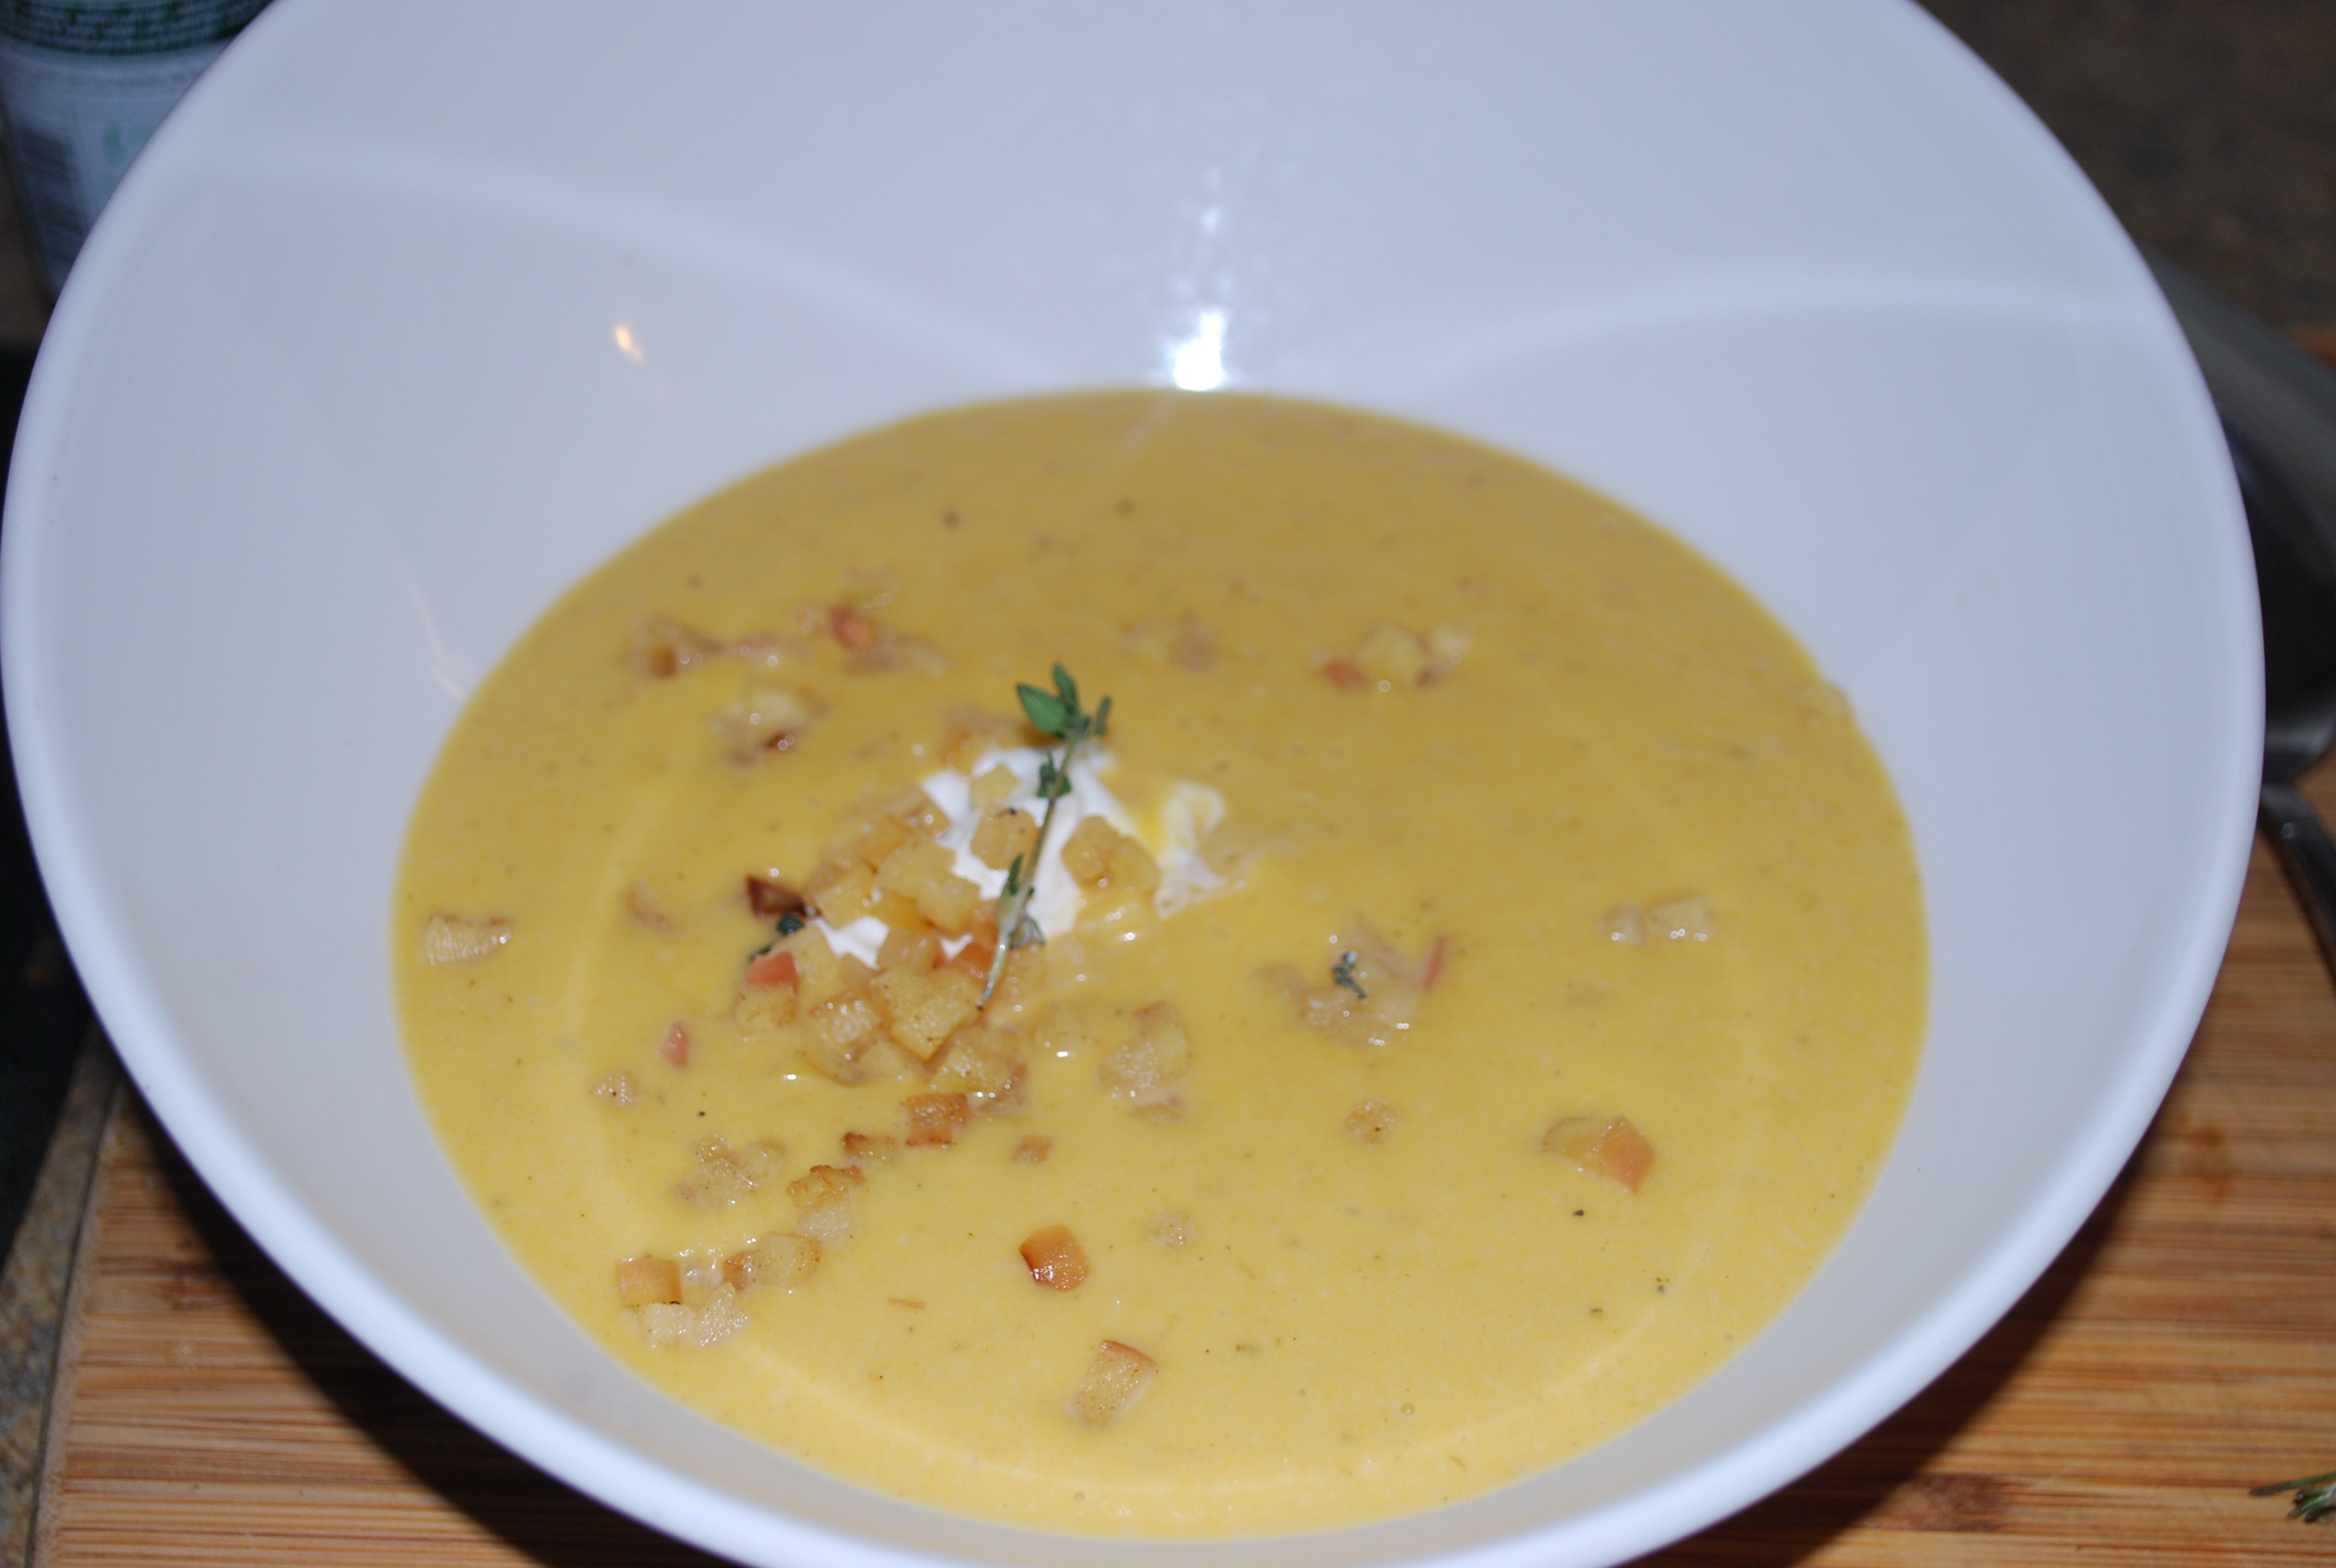
    6. Let the squash cool, then toss the apples, squash and rosemary into a blender and pulse it a few times before you let it rip for two minutes, or until everything is smooth.  If you need to break this up into a couple batches go ahead, it won’t hurt anything.  Also, if the soup is too thick for you,  just add some stock or water.  Now season, season season.
    7. If I’m freezing this soup I stop here.  If not, I’ll add the cream or yogurt, just to finish it out.


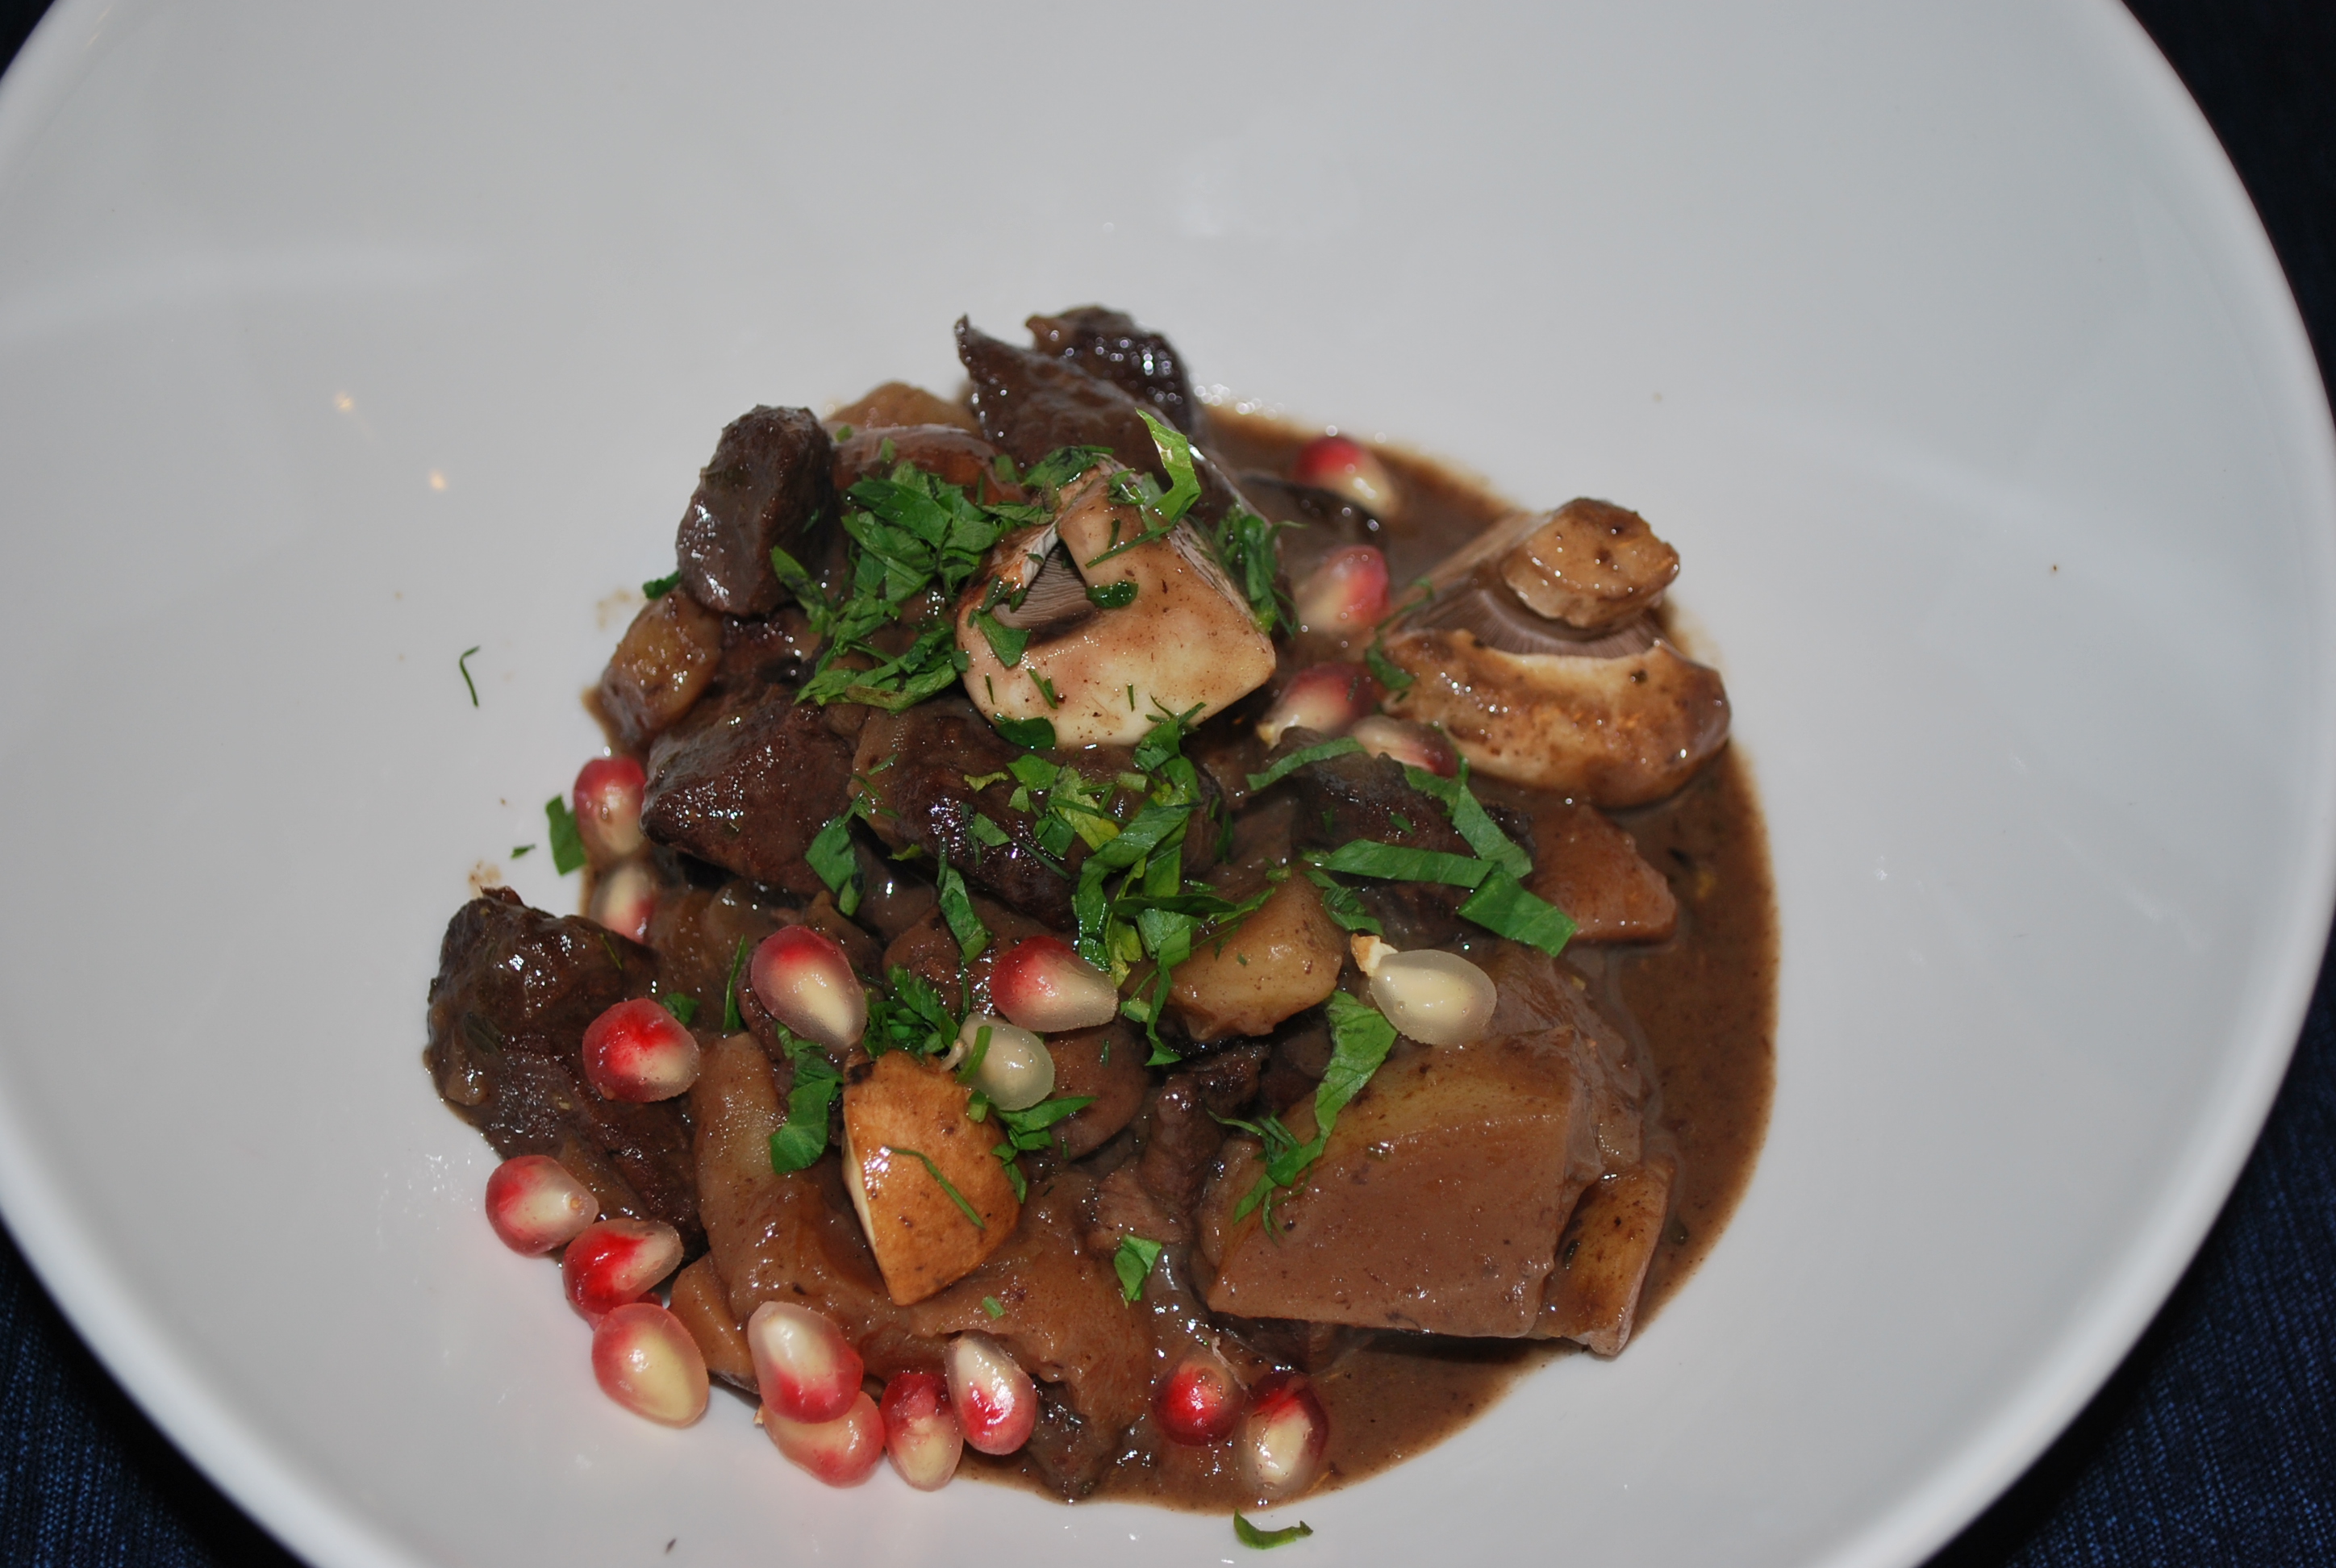
    I like to garnish this soup withe some bacon lardons (Applewood smoked of course) and some small diced apples just seared in butter.  You can do a couple of little pieces of grilled apple too.  Blue Cheese??? OF COURSE!!!! Now some of you may be saying “Doc, I have a veg-head in the family, what about that?”  No problem, just use vegetable stock or apple juice instead of chicken stock.  Got questions? Leave them in the comments, we’ll get your answers.

    Happy Dining,

    -The Doctor


  • Polenta with Venison Sausage Ragout

    So, remember that friend of mine that brought over that deer meat?  Well he brought over some sausage yesterday that he made from some of his venison… It was good on it’s own, but I had some leftover, and needed to stretch it out a bit so I could feed the rest of the crew coming over (yeah I ate a bit too much of it…whoops…).  So what did I do?  Took a page out of Grandma Prosciutto’s cookbook and hooked up some polenta.  This easy recipe can be done with any sausage (or left over meat for that matter) and is heartier than…well…it’s just hearty.  This hooks up enough to feed 4-6:DSC_0490

    • 1  lb. Venison sausage (or hot Italian sausage)
    • 1/2 c. julienne roasted peppers
    • 1/4 c. GOOD olives, quartered
    • 1/4 c. white wine
    • 1 tbsp. oregano, chopped
    • 1/4 c. tomato sauce
    • 2 c. chicken stock
    • 1 c. Polenta
    • 2 cloves garlic, chopped
    • 1/4 c. Parmesan cheese
    • 1/4 c. heavy creamDSC_0482
    1. Cook the vension sausage about 3/4 of the way, you still want it to be a bit pink inside so it doesn’t dry out later (especially with the Venison, it’s very low in fat compared to other meats).  How do you cook it?  Well, however you want.  The grill is nice, under the broiler is efficient, and the oven is easy and a saute pan is…another good method.  Let the sausage cool.  While it’s chilling out, let’s start the polenta.
    2. Put the chicken stock and half the garlic into the pot and bring to a boil.  Turn it down to a simmer after it’s heated up.  Add the herbs and slowly whisk in the polenta.  You don’t half to stir this constantly, but I would give it a stir every minute or so (or when you hear a sizzle type sound).
    3. Depending on the polenta, it could cook for 5 (instant) to 15 (course grind) minutes.  Just follow the instructions for the time on the package. When the prescribed time has past,add your oregano, parmesan, and cream.  Stir these until smooth.  The polenta should be a bit loose right now.  That’s fine it will tighten up a bit as it gets to a more edible temperature.
    4. Now for the easy stuff,  slice your sausage on the bias. And hold it off to the side for now.
    5. Start up some olive oil in a saute pan, at medium heat.  Add the rest of the garlic and sweat it for just a minute.  When you can smell the garlic, add the peppers and olives.  Toss these through and just warm them up.
    6. Now add your wine and let it reduce.
    7. Add your tomato sauce and sausage.  Heat the sausage through and season the sauce up.
    8. Your polenta should be cool enough to eat now and should have stiffened up a bit.  Take the polenta and lay if down in a big bowl or a platter, or whatever.  Make a little well with back of your spoon or ladle, then gently spoon or ladle the  sausage and the sauce over the polenta.

    Now how’s about that for rich, delicious, and just plain damn good.  So can you add other herbs too it?  DUH!!!!!  C’mon you know me by now.  If you’re feeling really adventurous, try it with some cheddar, grits and pulled pork, just replace ingredients as you see fit.  This is a really easy recipe to play with and get creative.  You want some more ideas?  Just comment below.


    Happy Eating,

    -The Doctor


  • Pumpkin Shrimp and Grits

    WHOA DOC!!!!  What’s up with the squash thing you got goin’ on ?!?!?!?  It’s fall stunad.  They’re everywhere, and they go with just about everything, so get used to it.  Besides, they’re CHEAP!!!!!!  So you’ve got a great inexpensive side or entree.  Now…on with the recipe.  Shrimp and Grits is an American classic, and so is pumpkin, so I thought, why not put them both together?  Well I did.  This will serve four.DSC_0476

    • 1 lb, peeled and de-veined shrimp
    • 1 tbsp. Old Bay
    • 1 clove garlic, chopped
    • 3 tbsp. butter
    • 1 lb pumpkin (or another squash, whatever.  I used a little Sugarloaf pumpkin)
    • 1/2 c. Cheddar Cheese
    • 1/4 c. heavy cream
    • 1 1/2 tsp. cinnamon
    • 3/4 c. grits
    • 2 c. Chicken StockDSC_0472
    1. This is another crazy one for you…NO OVEN PRE-HEATING!!!!!!  What I like to do to soften up the pumpkins a little bit and make then easy to peel is split them and pop them in the microwave for 3-4 minutes, depending on the size.  Let them cool for a minute, them either cut the skin off with a knife, or scoop it out with a spoon.  Now dice the pumpkin into 1/4  inch pieces.
    2. Take just a bit of the butter and melt it in a saute pan.  Add your squash and let it caramelize.  Toss or stir after a minute  Season with salt and pepper and add the cinnamon.  Keep cooking it for a few more minutes until it’s  nice and brown.  Set this aside for now.DSC_0474
    3. Now for the grits.  Take some of the butter and your garlic and start it on low heat.  Sweat the garlic for just a minute, then add your grits and stock and let them cook on low heat.  Stir them with a whisk every minute or so until they’re soft.  This can take about 15-20 minutes (there’s usually instructions on the bag…just sayin’)
    4. Add most of the pumpkin you caramelized, save just a bit for garnish.  Then add 1 tbsp of butter, and the cream.  Season with salt and pepper. Set this aside to set up for just a minute.
    5. SHRIMP TIME!!!!  Heat up the last of your butter in a saute pan, on a medium flame, and wait until it starts to sizzle.  Toss your shrimp in the Old Bay and cook it slowly in the butter.  This is one of the very few times you don’t want a good hard sear.  Why not?!?!  Easy, it wouldn’t be shrimp and grits.  Add the last bit of pumpkin after a couple of minutes and heat it through.  If you like, you can add some of the last bit of cream and make a quick sauce.
    6. Now just put it together.  Lay the grits down in a bowl and pour the shrimp over top.

    If you want to do your grits ahead of time, you can certainly stop the cooking process right before you add your cream and pumpkin.  When you’re ready to heat them up, just add some water or chicken stock and loosen them up a bit.  Not a pumpkin fan or a squash fan?  Tough.  Try it, trust me you’ll like it. Happy Eating -The Doctor.


  • Venison and Pomegranate Stew

    I had a fan stop by the other day that gave me challenge. He wanted me to come up with an easy recipe
    for Venison, that he could use for just himself or for a huge community meal on his next hunting trip. I
    had this recipe made up and ready a couple of hours later for him and a few of his hunter friends. Done
    right in a Dutch oven, over a fire. The dish was a HUGE hit, so it ended up on the blog. C’mon Dude, you
    gotta make it harder than that!!!! I made enough to feed 4-6 people from just this:DSC_0484

    • 1 1/2 Lb’s Venison Stew meat
    • 1 small onion, sliced thin
    • 2 small Yukon gold potatoes (or Red Bliss, no big deal), quartered then sliced 1/4 inch
    • 1 cup quartered Crimini Mushroom (really any mushroom will do)
    • 1 cup parsnips, roll cut ( I’ll show you in a second, don’t freak out over here)
    • 1 tbsp. chopped Thyme
    • 1 tbsp. chopped rosemary
    • 1/2 c. red wine
    • 1 c. Pomegranate juice
    • 1 c. Chicken Stock
    • 1/2 . Pomegranate seeds
    • Roux as needed (y’know equal parts flour and butter)DSC_0477
    1. Get a pot (or a dutch oven) nice and hot.  Add some oil and start searing you venison meat.  While your meat is browning, cut up any of the vegetables you have left to cut.  Like those roll cut parsnips.  How do you do them?  Easy  place your knife at a 45 degree angle on the parsnip, then roll 1/4 turn, then cut, now repeat until the entire parsnip is cut.DSC_0479
    2. When you meat is brown, add your onions, parsnips and mushrooms.  Let these cook on high heat and caramelize.  Stir these every 2-3 minutes or so, then add your wine when the onions are soft and cooked down.
    3. let the wine reduce by half, then add you herbs, stock potatoes and pomegranate juice.  Turn this down to a simmer and let it cook for about 60-90 minutes, depending on how big your venison chunks are.  I was taking the oven lid on and off about every 15 minutes or so.  Just so it would reduce, but not too quickly.
    4. At the very end, pull everything out of the pot and hold it for just a minute.  Taste your sauce.  If it’s think but has a lot of flavor, add some roux to thicken it.  Really 1-2 tbsp should be good.  if your sauce is think and has no flavor, let it reduce.
    5. When your sauce is to your liking, add the meat and vegetables back to the pot, season and serve.  OH, and uh…don’t forget the pomegranate seeds.

    Happy Eating

    -The Doctor


  • Mexican Lasagna

    Well, you shouldn’t be surprised about this one, I told you it was coming.  No lies, this was a very popular dish of mine, but it was never served in a restaurant or at a party.  It was something I created for a very well known hippy grocery chain, while doing a consulting job for them (we’ll leave them nameless for now) and their hot bar/chef’s case.  We would feed about 1,000 people a day and we’d have to make at least 60 trays of this just to keep up.  (For reference each tray is SUPPOSED to feed 25 people.)  It was a great way to use up the leftover rotisserie chickens, and a way to use up onions and peppers that didn’t make it to the displays (nothing wrong with them they just didn’t look pretty).  This should make enough for 4-6 people:

    DSC_0490

    18-20 corn tortillas
    1 qt Enchilada sauce
    3 oz. queso fresco
    1/2 lb pablano peppers cut into 1/3  inch strips
    2 cups julienne onions
    1/2 lb shredded chicken (you know leftover)
    1 bunch cilantro, rough chopped
    Crema (Not cream, not a typo, this is sour cream’s older badass brother) or sour cream, as needed.

    Tasty looking makings of this dish.
    Tasty looking makings of this dish.
    1. Yup.  Oven, 350.  Preheat it now.
    2. Next up,  get a skillet on to medium heat and start up some olive oil.  Add the onions and peppers and let them sweat down real slow for about twenty minutes, or until they look like this:DSC_0483
    3. Add 3/4 of the cilantro and cut the heat. Now add your shredded chicken, season it up, and get those two mixed well.  Set this aside for now.
    4. Now grab your favorite lasagna pan, and lay down a bit of the enchilada sauce.  Start layering your tortillas, then you peppers and chicken, then your cheese.  Got it?  Good now repeat, and repeat again.  You want another layer?  Sure  go again if you have enough ingredients.
    5. Pop this in the oven for about 10-15 mintues, just enough to get a bit of color and let everything come together.
    6. Top this with the crema , some very thin sliced onions and the rest of the cilantro and go to town.

      Fresh out of oven awesome
      Fresh out of oven awesome

    So what can you use with this besides chicken?   Well obviously pork BBQ, or if you have some leftover ropa vieja, you can use that too.  Don’t like queso fresco?  Ok. Use some other cheese, PepperJack or Oxacan cheese works nicely.  Don’t like the bitter enchilada sauce?  Well, use some BBQ sauce (you can make your own here) which goes great with blue cheese by the way.  Let me know what you do with this in the comments.


    Happy Eating,

    -The Doctor


  • Spaghetti Squash Breakfast Casserole

    It’s fall.  Fall is my favorite season.  Fall bring us squash, which is one of my favorite things to cook with. One of the most versatile squashes out there is the spaghetti squash.  I do everything with this vegetable.  I pickle it, I roast it, make ragouts with it…I even (dare I say) make BREAKFAST WITH IT!!!!  Spaghetti Squash is very flavorful and can be a substitute for hash brown potatoes.  I used it quite a bit  as something different, yet familiar, for the most important meal of the day.  One of the more interesting things I did with it was take a spin on the traditional breakfast casserole, and use the squash instead of shredded potato.  Some people could never tell the difference and some people knew and loved it.  It’s a great way to get kids to try squash to and start that love affair with fall gourds.  This recipe feeds about 4-6.  You’ll need:DSC_0484

    • 1 whole spaghetti squash
    • 3 oz, breakfast sausage cooked and rough chopped
    • 8 strips of bacon, cooked and chopped
    • 2 cups of your favorite shredded cheese (I’m using smoked gouda today)
    • 4 large eggs
    • 1/4 c heavy cream
    • Salt and pepper to tasteDSC_0480
    1. Start this up by turning your oven up to 350.  Split the squash in half and take the seeds out.  Rub it with some oil or melted butter and season with salt and pepper.  Through that bad boy in the oven, skin up, for about an hour.  You can do this the day before too.
    2. Let the squash cool, then pull it out of it’s skin with a spoon like this:DSC_0481
    3. Crack your eggs into a bowl, add the cream, the beat the eggs well.  BEFORE YOU ADD THE EGGS TO THE SQUASH!!!!!  Taste the squash and season it again.  Taste good?  OK great.  Now add your eggs, meats, and half the cheese to the bowl and mix everything together.
    4. Butter up a lasagna pan or casserole dish and lay down that mixture evenly.  Cover it with parchment (or wax) paper and foil then throw it in the oven for 40 minutes at 350.  Take it out, add the rest of the cheese to the top and cook it another 10 minutes.

    This doesn’t need any accompaniments, it’s perfect on its own.  Aaaahhh, who am I kidding it’s breakfast.  It gets slathered in hot sauce and ketchup.  I prefer some Hollandaise if you know how to make it.  It’s a perfect foil for the sweet squash.  Change up the cheese and meats too.  Why not do a casserole with ham and cheddar, or pulled chicken and queso fresco?  Tell me how you changed this up in the comments.

    Happy Eating,

    -The Doctor


  • Mussels with Papaya and Coconut

    This is my favorite time of year.  The time of year when summer and fall start to mesh and you get great mussels from up North and you still have fantastic summer produce.  This recipe comes straight from a little old Filipino lady that worked in one of my kitchens in Atlanta.  It was part of our “family meal”  every week, and eventually became part of a bar menu every late summer when the papayas were at their best.  I know deep down she wanted to use the unripe green papayas she had back home, but mature papayas are good enough for us.  This will hook up a pound of mussels:DSC_0472

    • 1 lb mussels, cleaned and washed
    • 2/3 c. coconut milk
    • 2 tbs fish sauce
    • 1 tbsp sweet rice vinegar or fruit vinegar (optional)
    • 1 1/2 c. papaya medium dice
    • 3 cloves garlic, chopped
    • 1 tbsp grated ginger
    • 2 tbsp chopped lemongrass
    • 1/2 c. rough chopped cilantro
    • 1/4 c. rough chopped basil
    • 1/4 c. rough chopped mint

    DSC_0468

    1. First up, we need to make our coconut base.  Take 1/3 of the papaya, and puree it into the coconut milk.  Set this off the the side for the time being.
    2. Start up your sesame oil on a medium high flame.  Add you garlic, ginger, and lemongrass and sweat it out for just a little over a minute.
    3. Add half of your herbs and sweat for another minute.
    4. Add the vinegar and fish sauce.  Let that go for just a minute, then add your mussels.
    5. Add your coconut milk mixture and cover the pot.  Let these steam for about 8-10 minutes.  Give them a good stir, then add the rest of the herbs and papaya.

    Sweet and briney, just how I like ’em.  Mussels are incredibly versatile and lend themselves so well to the flavors in this recipe.  I’ll be putting up some more mussels recipe as the fall goes on.  You got requests?  Lemme know in the comments.

    Happy Eating,

    -The Doctor


  • Roasted Beet and Brussels Sprout Salad

    Brussels sprouts are hot right now, let’s face it.  These little mini-cabbages are packed with nutrients and great stuff for you.  The only problem is not many people like them.  Why?  They’ve probably never had them done correctly.  This recipe is one I use to introduce people to  these little bundles of awesome, and it’s like Colt 45, it works every time.   This recipe will serve 2-4.DSC_0475

    • 1 lb. raw brussles sprouts, quartered (If they’re frozen just let them thaw)
    • 1/3 lb beets, scrubbed
    • 1 tsp grain mustard
    • 1/4 c. cider vinegar
    • 1/2 cup olive or vegetable oil
    • 1 tsp brown sugar
    • 1 tsp chopped sage
    • 1 tsp chopped sageDSC_0466
    1. So, as usual, let’s get our oven on and up to 350.  Let’s get a pot of water on the stove two, with some salt in it.  Ya’ know the ocean water salty we use for blanching vegetable.  You’re going to want to get a bowl of ice water ready too.
    2. To roast the beets, all you have to do is rub the with some oil, wrap them in foil and let them go.  Here’s the tricky part, the sizes are never the same sometimes they’re small, sometimes, they’re big, they can go anywhere from 30 -120 minutes.  You know they’re ready, when you can take a knife and put it through the beet.
    3. Now, while the beets are roasting, drop your sprouts in the water.  They need to boil for just under a minute.  Strain them then drop them in the ice water until they cool down.  Set these aside for now.
    4. OK. DRESSING TIME!!!!!!!!!  Seriously, if you’ve been following a while you can probably guess how to do this, but if not, let’s get the learn on.  In a bowl, combine your mustard, herbs, vinegar and sugar and start whisking them together.  Now start whisking in the oil slowly.  if you have a burr mixer (or mini immersion blender) or a blender, feel free to use those.

      Burr mixer dressing action
      Burr mixer dressing action
    5. So when your beets are ready, let then cool, (put on some gloves in you have them) and just literally rub the skin off of the beets.  Then just slice them down.  (Oh here’s tip…if your hands or anything gets stained, don’t freak out, just wash it with cold water, comes right off)
    6. So everything is ready, now what?  Take some of the dressing and toss it in with the beets. Take some more dressing and toss in in with the sprouts.  Now just plate them up.

    If you use golden beets or candy cane beets, you can mix everything together without exchanging colors.  Nice right?  You can serve this little recipe up anytime, anywhere.  if you cook everything s day ahead of time just be sure to dress the sprouts right before you serve it.  You actually benefit the beets if they sit in the dressing for a while, so doing this a day ahead of time is a good thing.  Quetions?  Lemme know in the comments.

    Happy Eating

    -The Doctor


  • Back to the basics…Easy Roasted Chicken

    Believe it or not, chef’s and restaurants are judged on very few things (well if you’re not the French Laundry or El Bulli).  You’re judged on your burgers, your steaks, and your chicken.  Why?  They’re the three most basic things to cook, and if those are good and made with care, chances are your restaurant is good and your customers will be back and more adventurous for the next meal.  Let’s face it, there’s many ways to roast a bird, but his is the fastest most basic way.  I already have a few recipes here on the blog that call for leftover chicken, or pulled chicken, that I like to use this simple recipe for.


    This is what happens to Angry Birds...
    This is what happens to Angry Birds…
    • 1 roaster or fryer chicken
    • 5 springs thyme
    • 1/2 lemon, cut into wedges
    • 3 sprigs rosemary
    • 3 sprigs sage
    • Olive oil or melted butter for brushing (and a brush , duh)
    • Salt and pepper
    • 1 onion, cut into chunks (optional)
    • 2 carrots cut into chunks (optional)
    • 4 cloves garlic, unpeeled (optional)
    1. You should know this one by now with me.  Crank that oven on, this time to 450.  Trust me.
    2. Tuck the wings of the bird underneath themselves like this:

      Wing foldins'
      Wing foldins’
    3. Season the inside and the outside of the bird and place it in a roasting pan.  If your using the optional vegetables, toss those in some oil or butter first, then lay them on the bottom of the pan, then place the chicken over those.  I like to use the vegetables if I’m making a gravy from the drippings.
    4. Stuff the bird with the herbs and lemon.  If you like you can pop an extra garlic clove in there. Brush the bird with oil or butter and pop it in the oven.
    5. Easy so far right?  Here’s where people forget… about the awesomeness of basting.   After 20 minutes, take the bird out of the oven, and spoon the drippings over it.  Why?   Couple of reasons.  The first is your reintroducing fat to this skin which is going to help it render further and stay crispy.  The second is you’re imparting more flavor to the bird.  Unlike the myth states, it does not keep the bird moist.  Not overcooking the bird is what keeps in moist.

      Bird Bastin'
      Bird Bastin’
    6. Baste the bird every 10 minutes for the next 30-40 minutes (or until the juices run clear).  If you have a meat thermometer, check the temp by the thigh.  If it’s 155-160 you’re good.  Let it carry to 165.  If not, you have a pretty big bird.  No big deal.  Turn down the heat to 350 then continue the basting every 10 minutes until the chicken is ready.

    So now you can eat it as it is, shred for another recipe, or do whatever you want.  Some of you may be asking “Que fai?  Why didn’t you brine it?”  Easy I didn’t want to.  You absolutely can brine this chicken and roast it using the same method.  Some chefs will also say to truss, or tie, the bird.  Nothing wrong with trussing,  if you’re presenting the whole roasted bird, but if I’m not, I find it cooks more evenly if you just let the legs hang.  Feel free to add any of your favorite spice rubs to this too.  It’s really super versatile.

    Happy Eating,

    -The Doctor


  • Bourbon Peach Country Ribs

    Raise your hand if you’re into peaches!!!!  Raise the roof if you’re into PIG!!!!!!!  Crap, my roof just exploded…..

    Here’s one from Atlanta.  The “country rib” is a cut from the very top of the loin.  It’s tough, but full of flavor and  perfect for braising. Georgia is, of course, famous for peaches, so when I was asked to come up with a knock out dish for a restaurant out there, well this is what happened.  This recipe can feed four.

    DSC_0476

    4 x pork country ribs or short ribs (they’re usually cut 5-6 oz each)
    1/2 c sliced shallots
    3 clove garlic, sliced
    2 whole white peaches, cut into 1/2 inch thick wedges
    2 oz Bourbon
    2 tbsp grain or creole mustard
    1/4 c ketchup
    2 tbsp. Brown sugar
    1/2 c chicken stock

    The lineup...
    The lineup…
    1. Start by getting a pan hot with about 2 tbsp of olive oil and preheat your oven to 350.  When the pan starts to smoke, sear your meat.  It should look like this when you turn it:

      Perfect Pig Sear
      Perfect Pig Sear
    2. When the meat is nice and brown on all sides, take it out of the pan and add your peaches.  Let these sit for jut a minute, then toss them around.  Let them it just another minute, then add your brown sugar, garlic, and shallot.  Sweat these out for 5 minutes, stirring every 30 second or so.
    3. For safety’ sake, turn off the flame, then add your bourbon.  Turn the flame back on and let this reduce for two minutes.  When you don’t smell anymore alcohol,  add your mustard, ketchup, and chicken stock.  At this point, I like to pull out 3 or 4 pieces of peach jut to have a nice colorful garnish at the end.
    4. Now, transfer everything to a roasting pan and cover with foil.  Pop it in the over for 2 hours.  Yup.  Slow cookin’.
    5. When your 2 hours is up, and the meat is falling off the bone,  Take jut the meat out of your braising liquid.  Now you’re going to take 3/4 of your braising liquid and puree it.  Add the rest of the liquid and pour if over the ribs on a platter or any other serving vessel.

    So now what do you serve this with?  I say….’Tater Salad.  Not Ron White, just ‘Tater Salad, with lot of mayo, and crunchy vegetables.  You can do grilled corn, collared greens, or black-eyed peas too.  As for what you can do to play with the pork?  Well, keep it seasonal, when fall come around, replace the peaches with pomegranates.  Heck plums go nicely as well if your looking for something new.  Apple will do you wonders too.  Go ahead, play with it.


    Happy Eating,

    -The Doctor