• Category Archives Appetizers and Party Faves
  • Coffee Smoked Wings and Shishito Pepper Sauce


    20160130_135545

    IT’S SUPERBOWL TIME!!!!!!!!!!!  A Superbowl party isn’t a Superbowl party without wings, but you eat them at the bar every Sunday, and unless you go to one of those chain places that specializing in dressing their wings in chemical flavors, you’re options are pretty limited.  Buffalo is great, but it’s the old standby, Honey-BBQ is overplayed, Ghost Pepper might leave you hurting for a few days.  What can you do?  The answer  is here. You smoke ’em.  Then you grill ’em.  Plus, the heat here is in the sauce, so if you have cry-babies that don’t like a little fire, they can be happy too. This recipe makes a pound, adjust as needed:

    20160130_123503

    For the Wings:

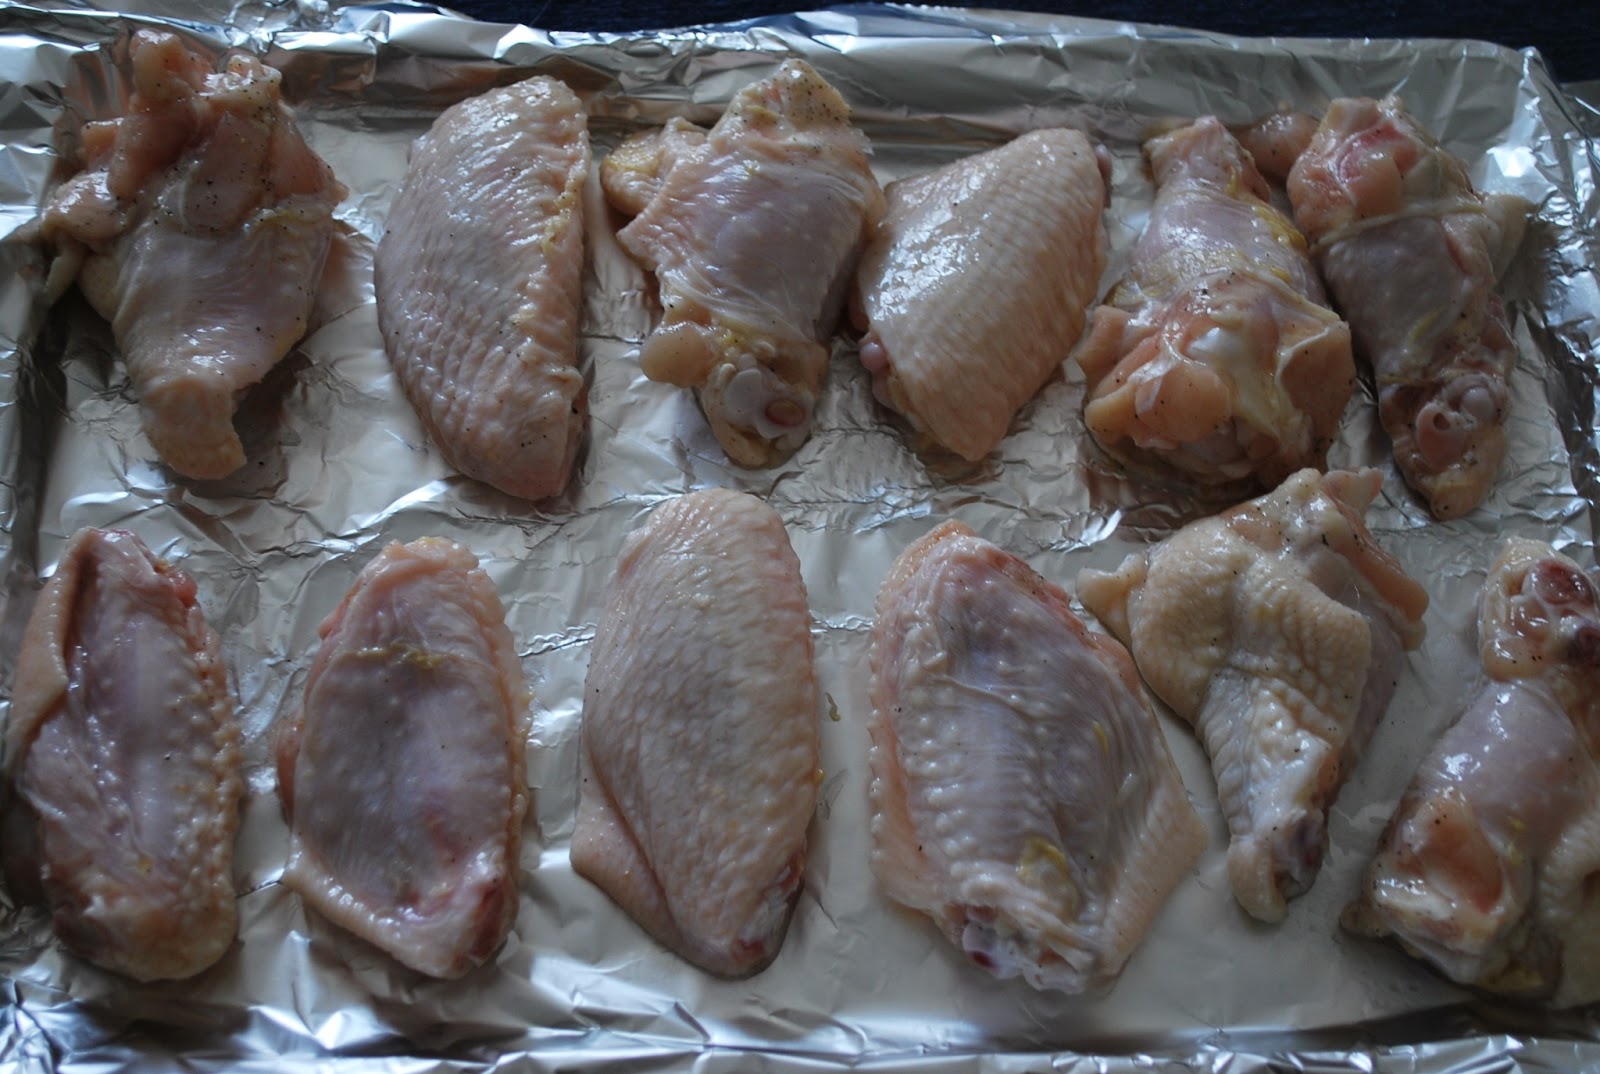
    • 1 pound raw chicken wings cut into drumettes and flaps (the part with the tip in it)
    • 1 tbsp. brown sugar
    • 2 tbsp. BBQ Rub (You can make it or buy your favorite)
    • 1 tbsp instant coffee (trust me is dissolves  better and you won’t be chewing on grinds)
    • 1 c. Honey Brine (your can find that recipe here)

    For the sauce (This makes 1 cup,  scale it up as you like)

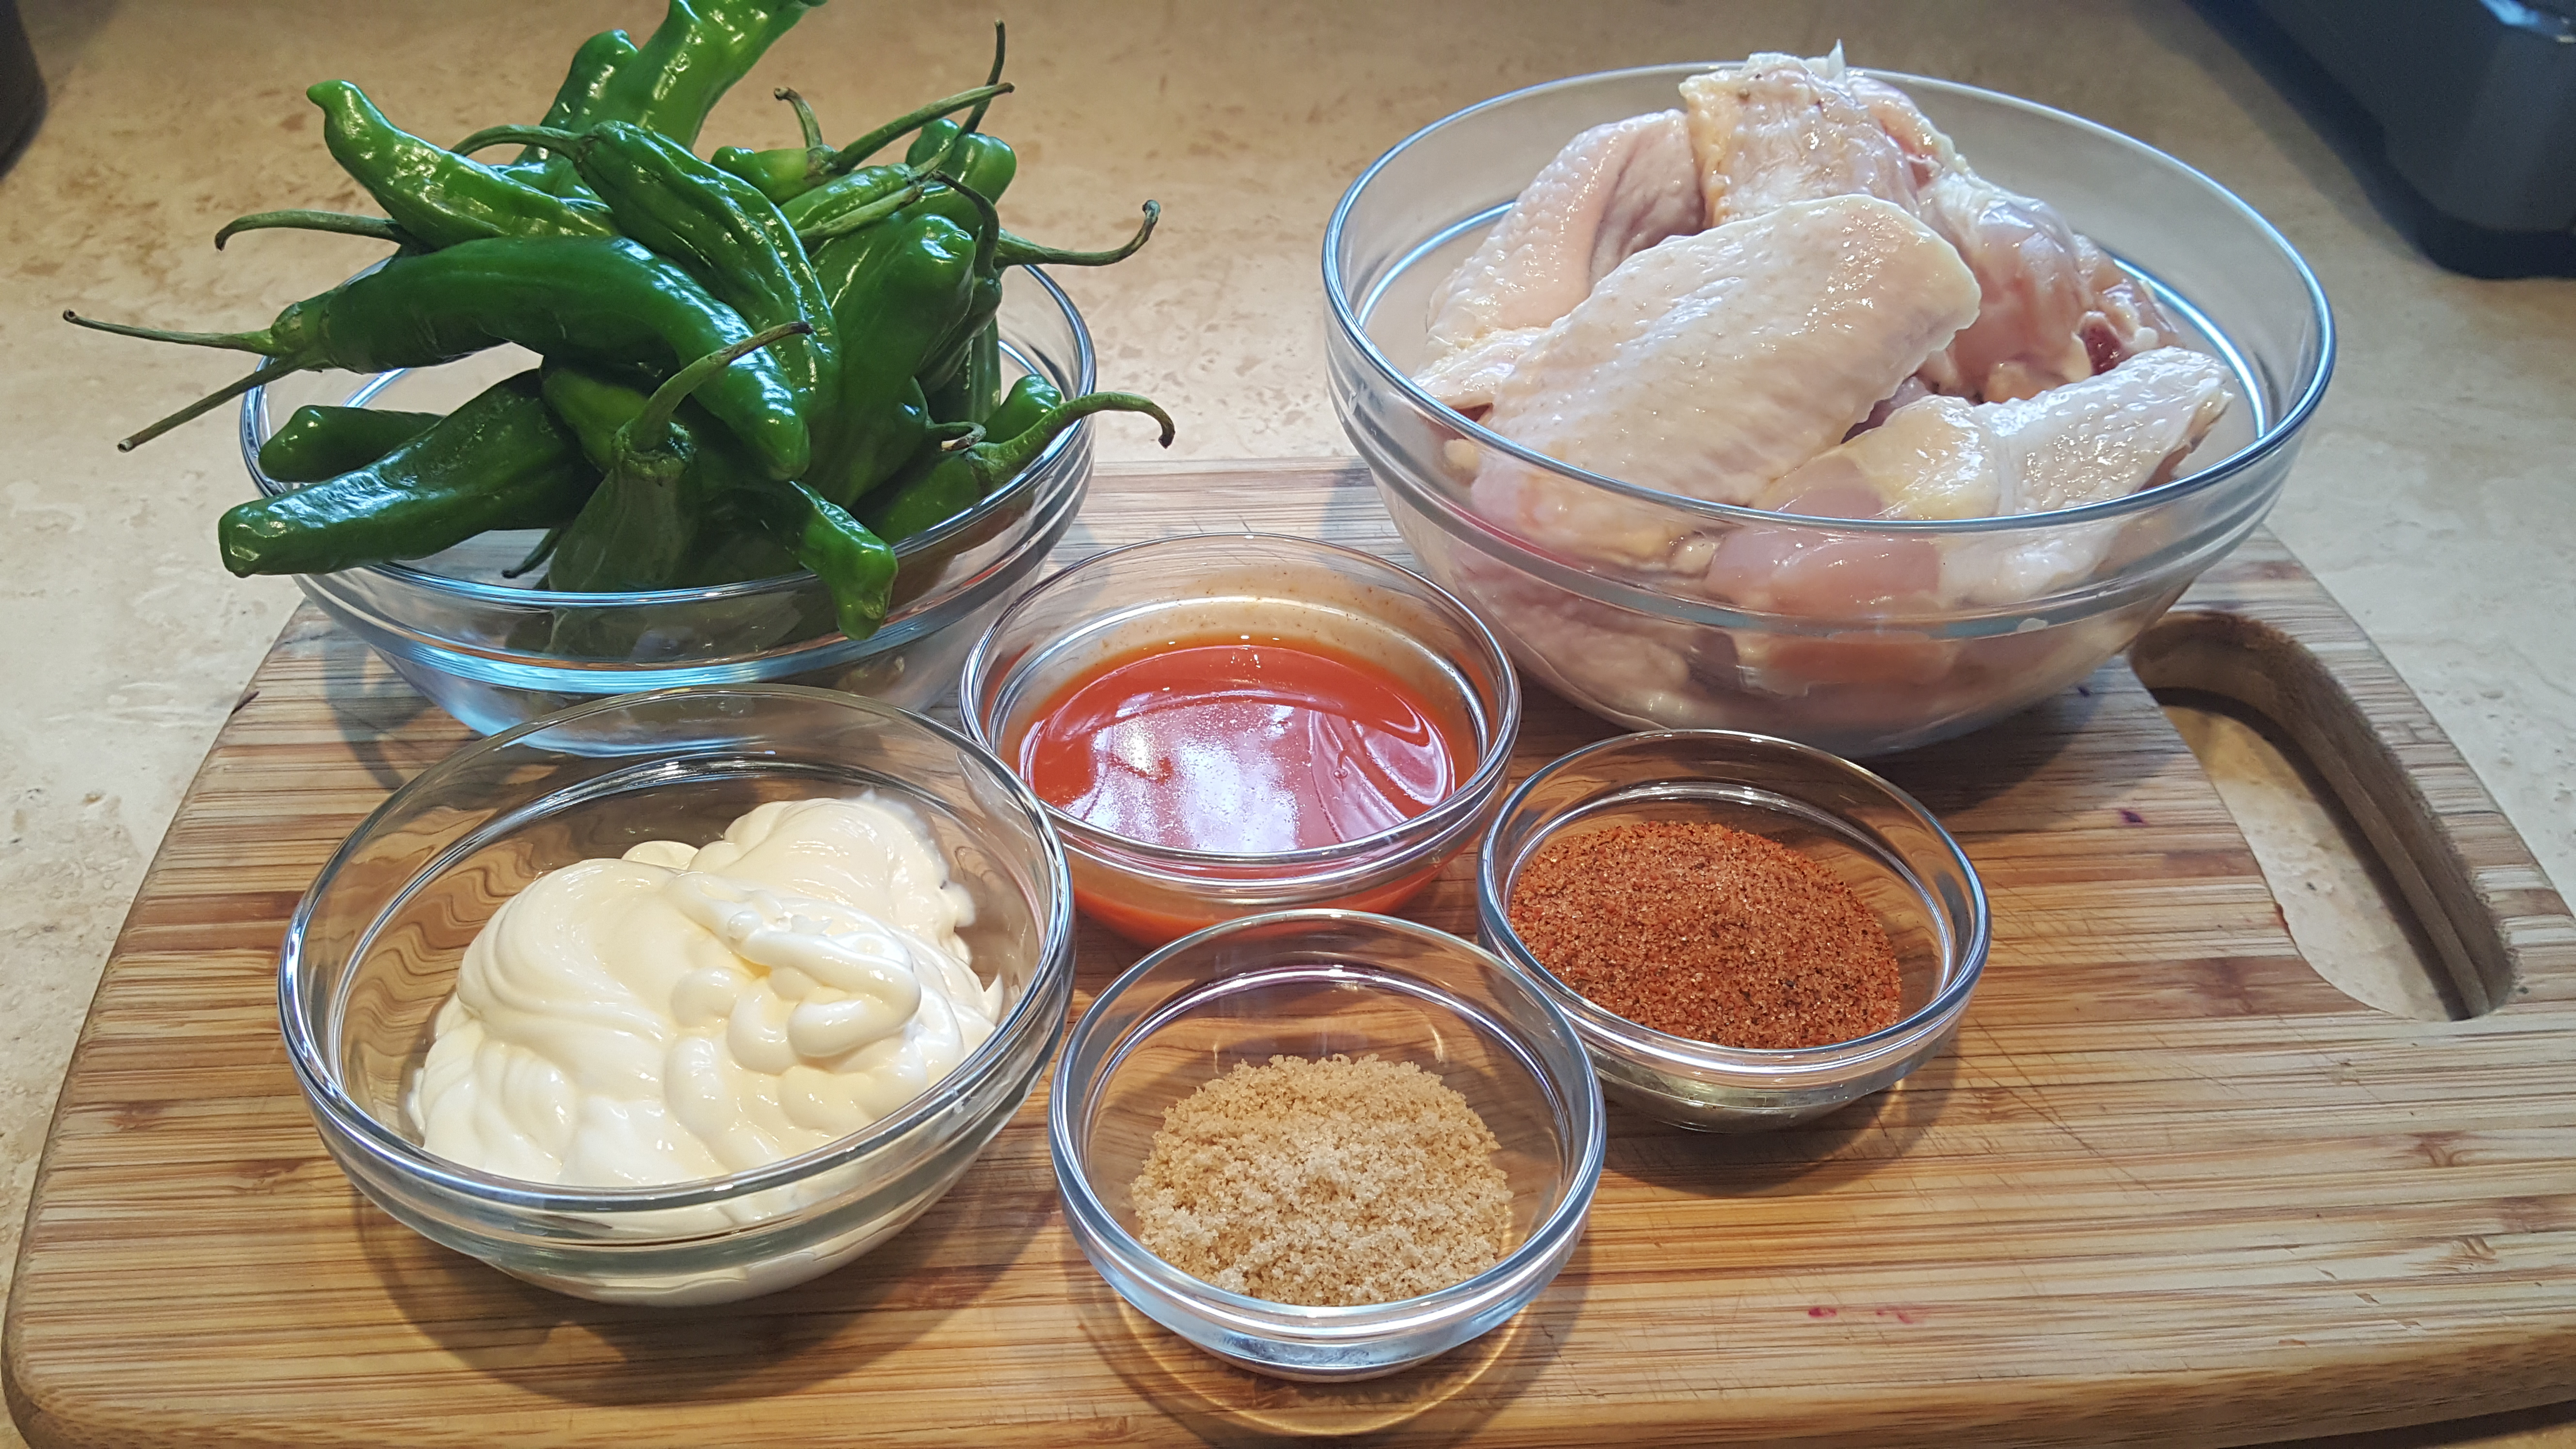
    • 1 lb. shishito peppers (these will be a garnish, and some will be used in the sauce)
    • 3/4 c. Mayonnaise
    • 3 tbsp Hot sauce
    1. First things first, drop your wings in the brine.  Those have to site for about 4 hours. Any longer and they might get too salty.
    2. Drain your wings, then pat them dry.  In a separate bowl, mix the BBQ seasoning, Coffee, and brown sugar and toss the wings in the mix.  Let these sit for 10-30 minutes before you toss them in the smoker.  These should smoke at a bout 225 (medium if you have a gas smoker) for about an hour.  They will not be cooked all the way though when they come out.  Don’t worry about it, that’s what the next step is for.  By the way, you might want to turn your grill on now, so it will be nice and hot when the wings are done.

      Wings comign out of 'Puff the magic Smoker"
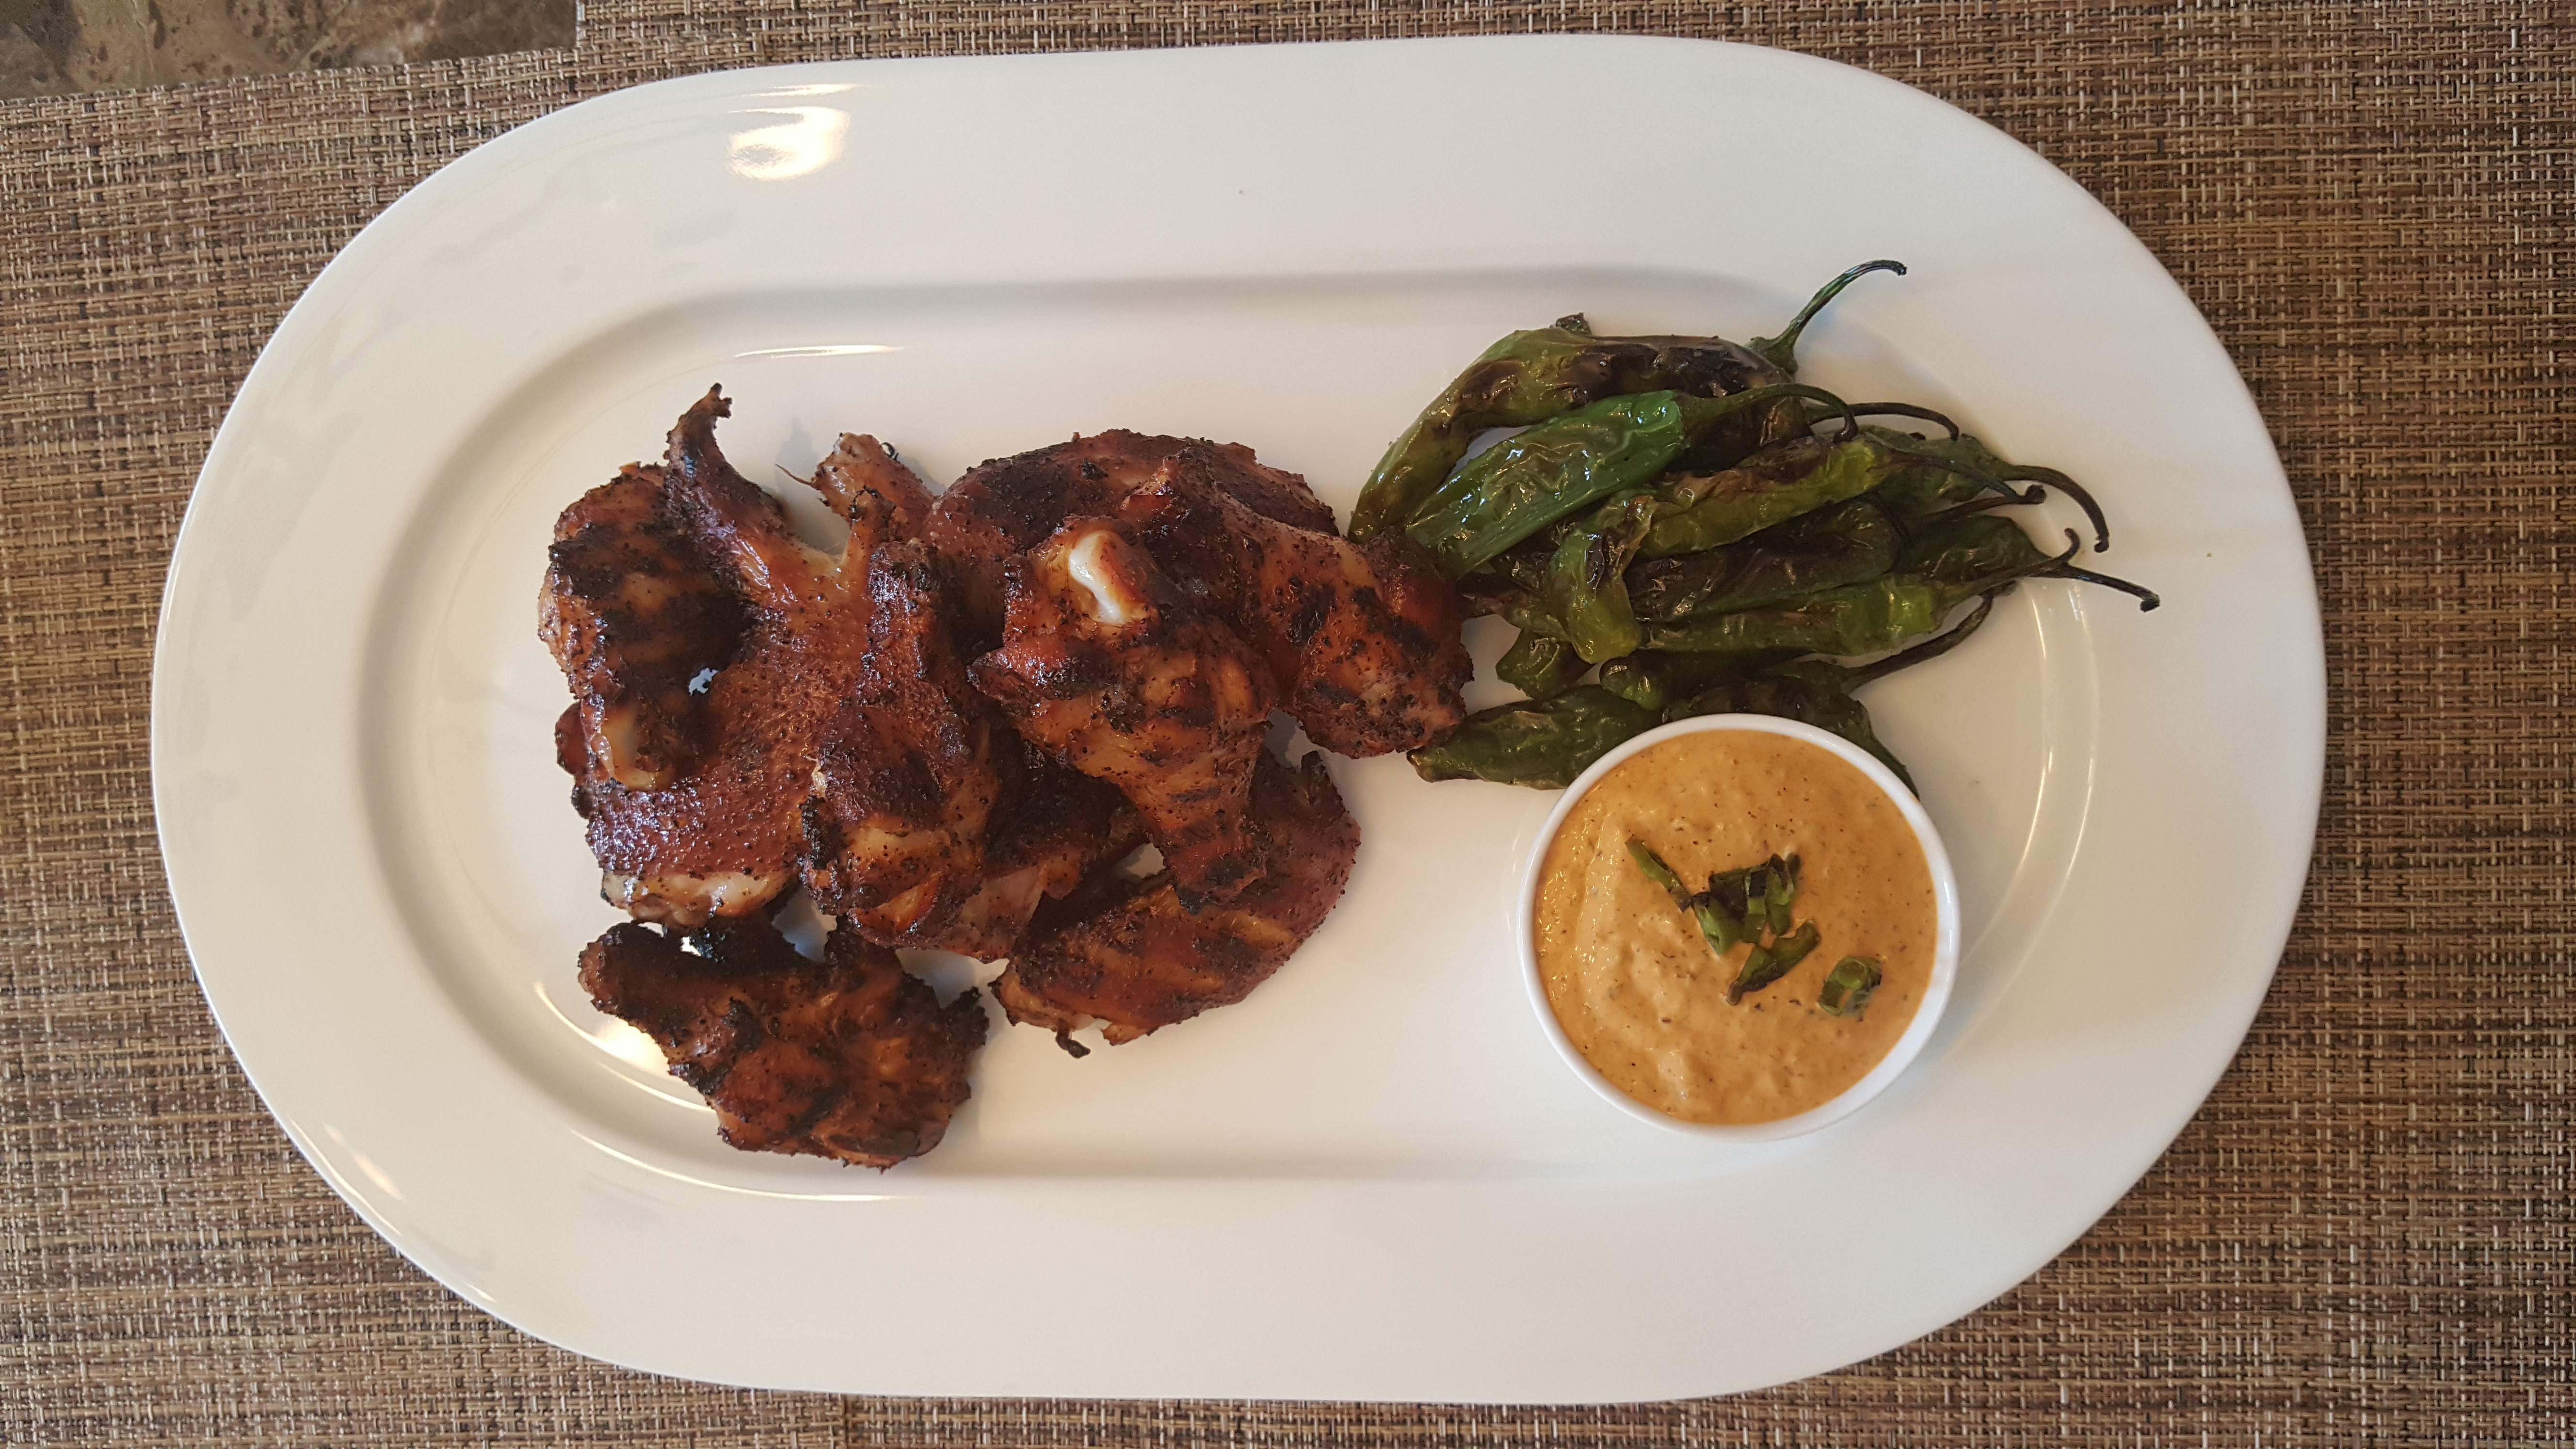
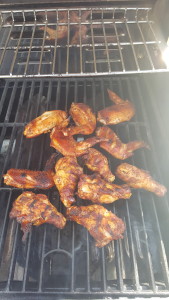
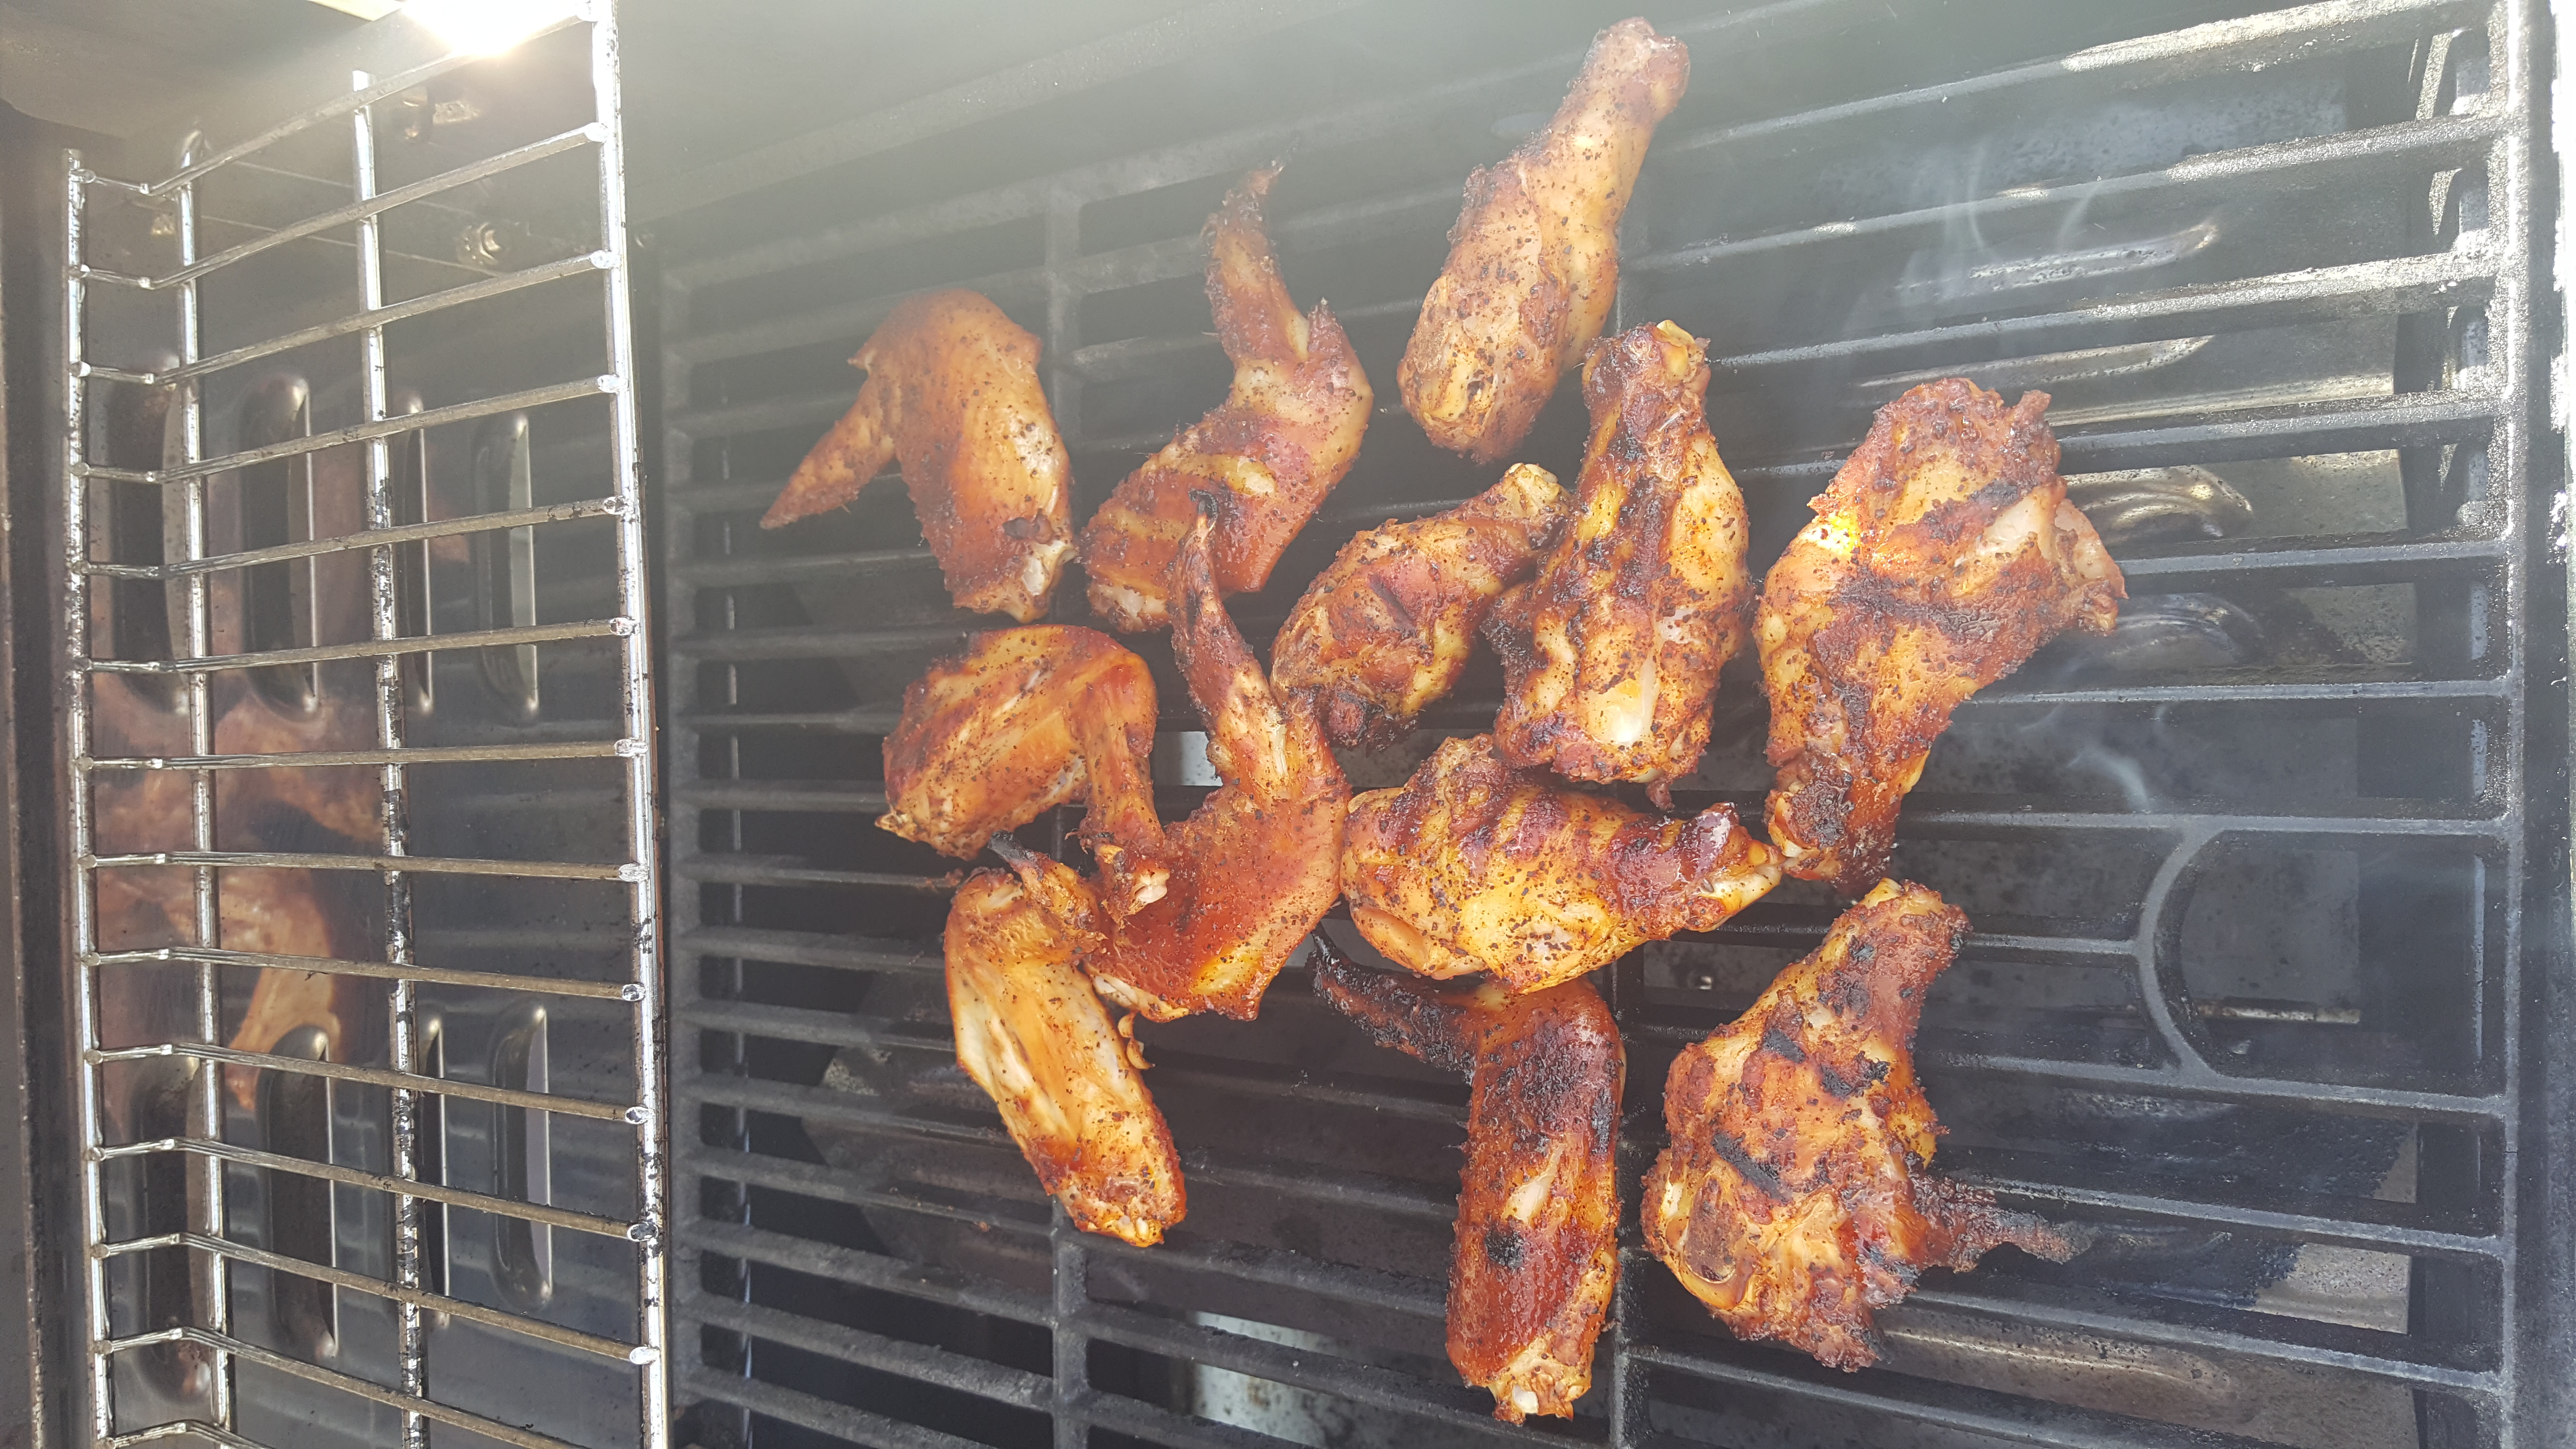
      Wings coming out of ‘Puff the magic Smoker”
    3. With your grill smoking hot, take those wings out of the smoker and throw them on those rippin’ hot cast iron (your have cast iron don’t you?) grates.  Let them go for about 2-3 minutes on each side.  You want a good char and to be sure they are cooked through.  When they’re done just hold them some where warm.  I like to use the top rack of the grill, if you have two racks.20160130_13453020160130_130229
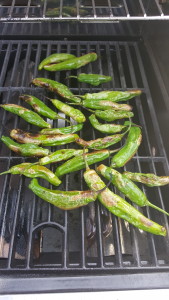
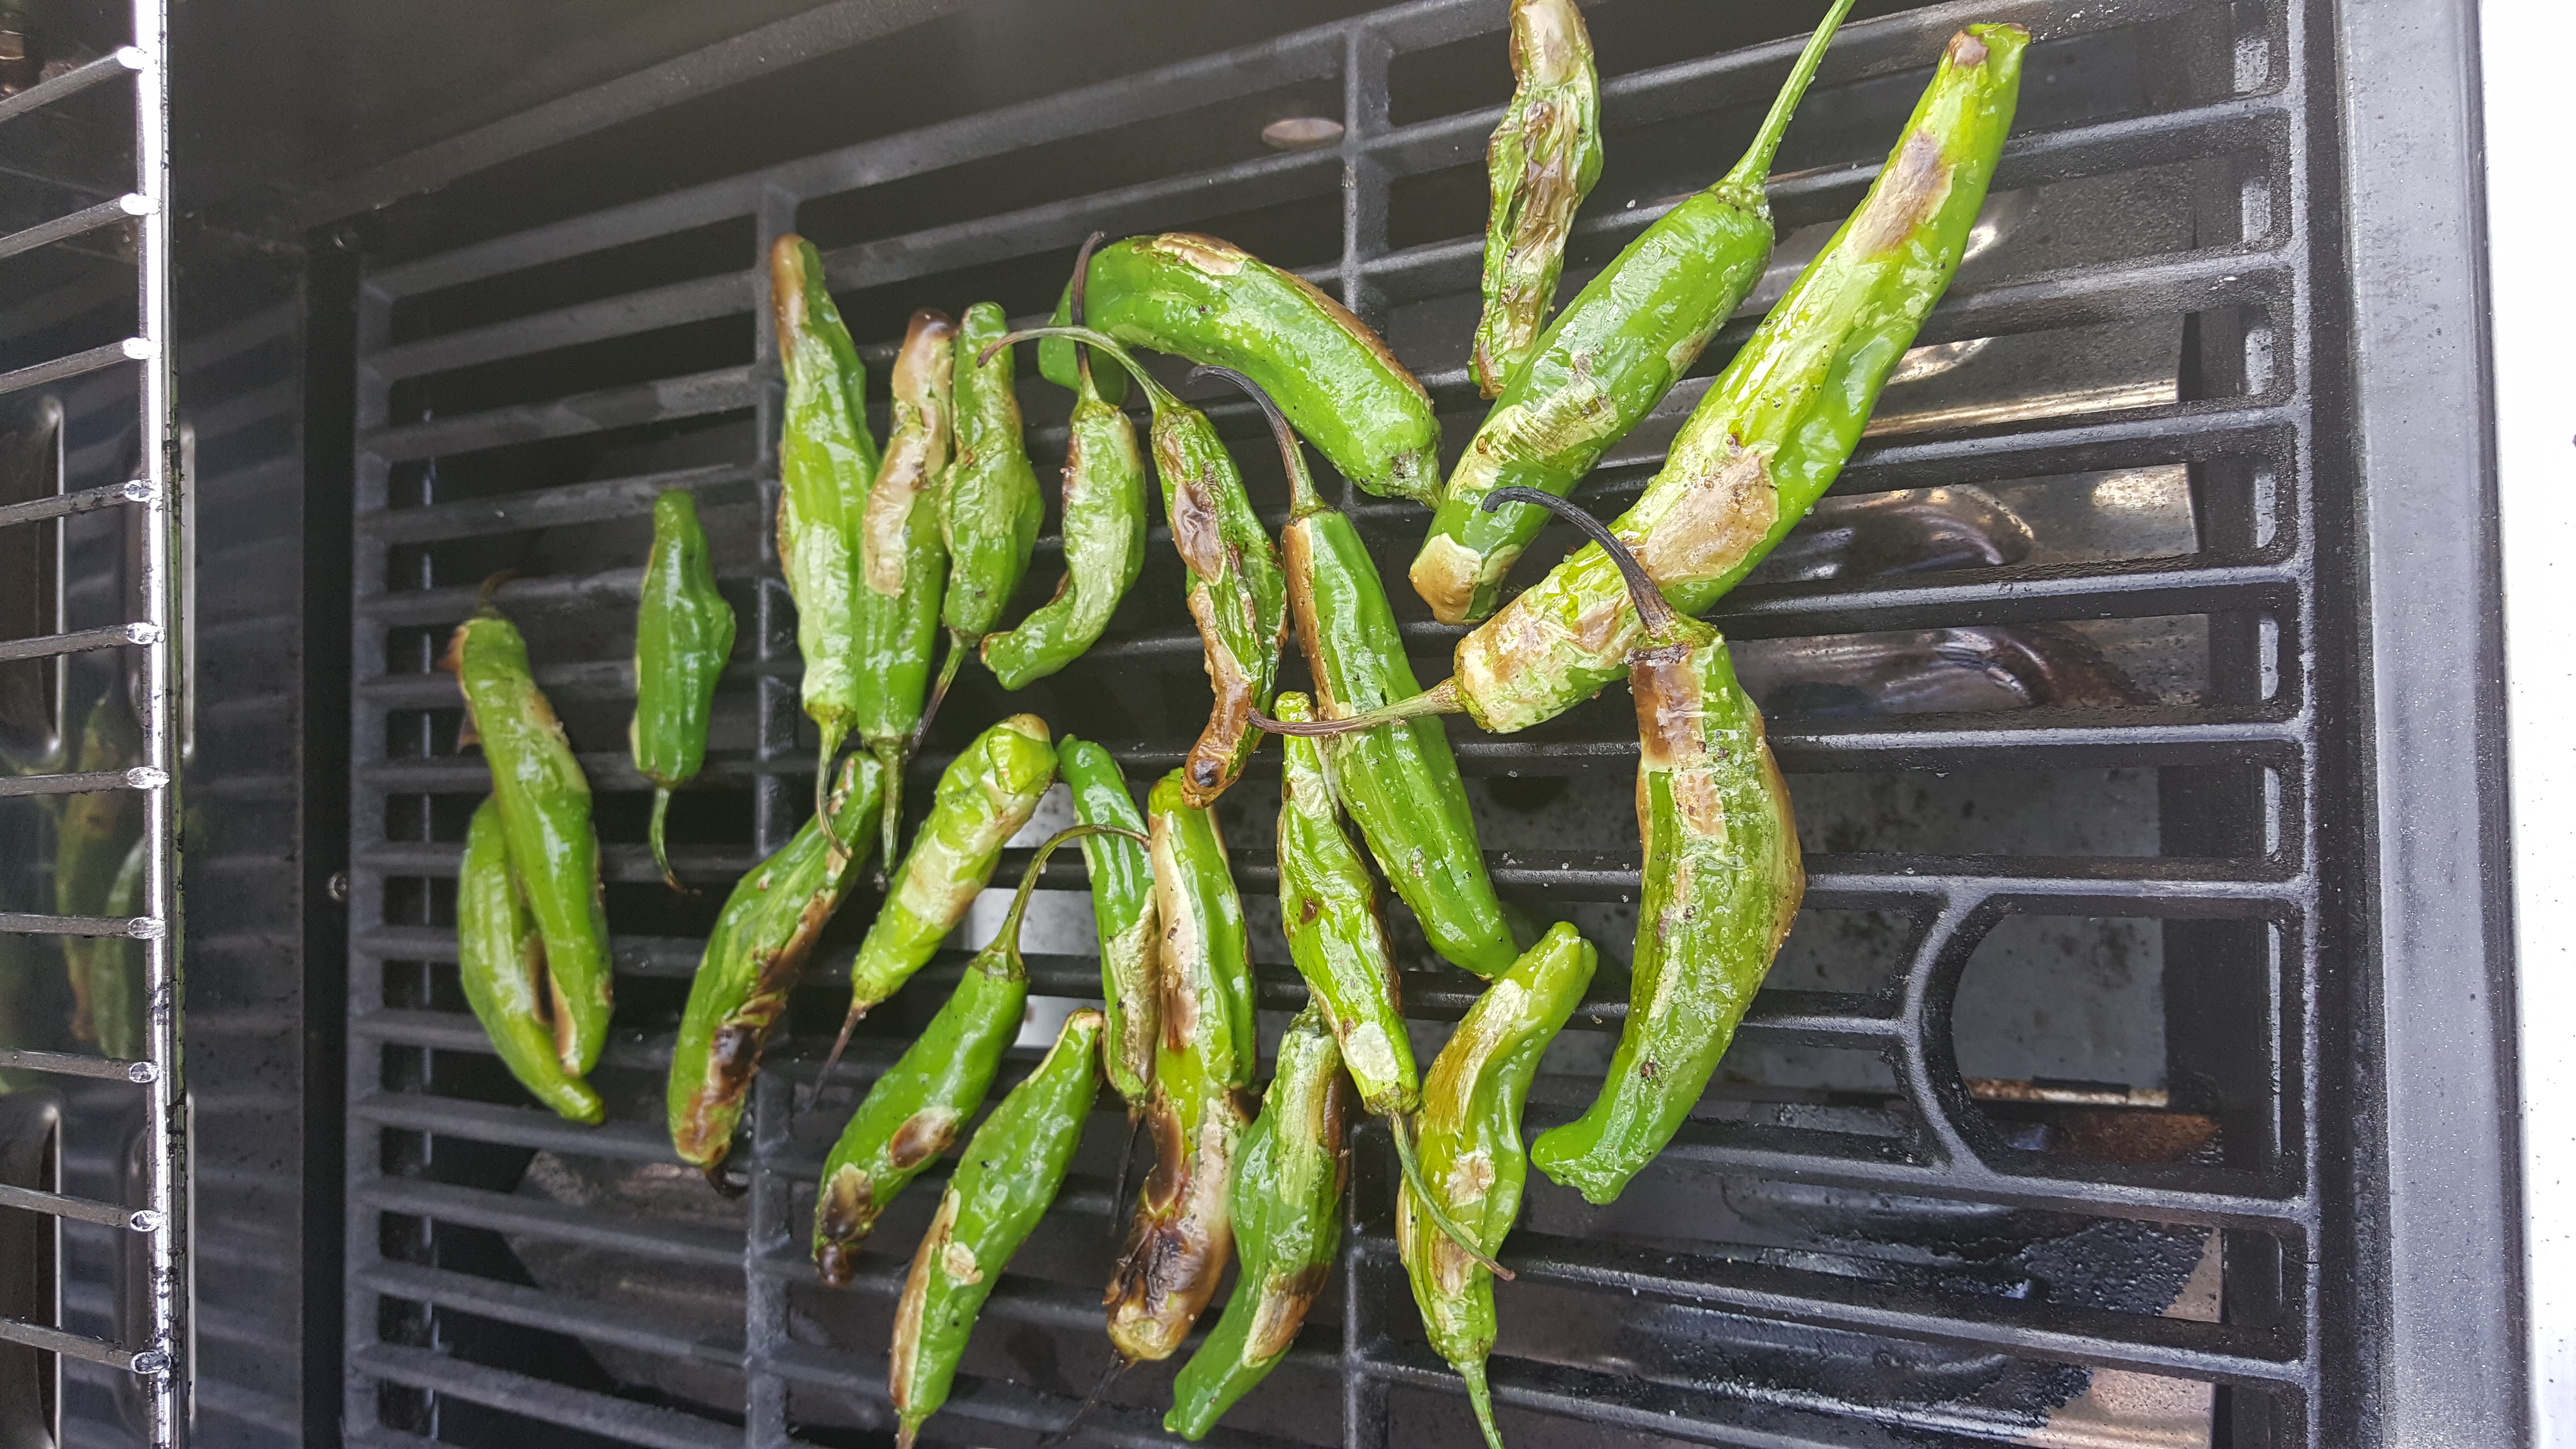
    4. While your wings are going, toss your shishito peppers in oil, salt and pepper and throw them down too.  Let these sit about 3-5 minutes on each side.  You want them to blister and char, ever though you’re not going to peel them.
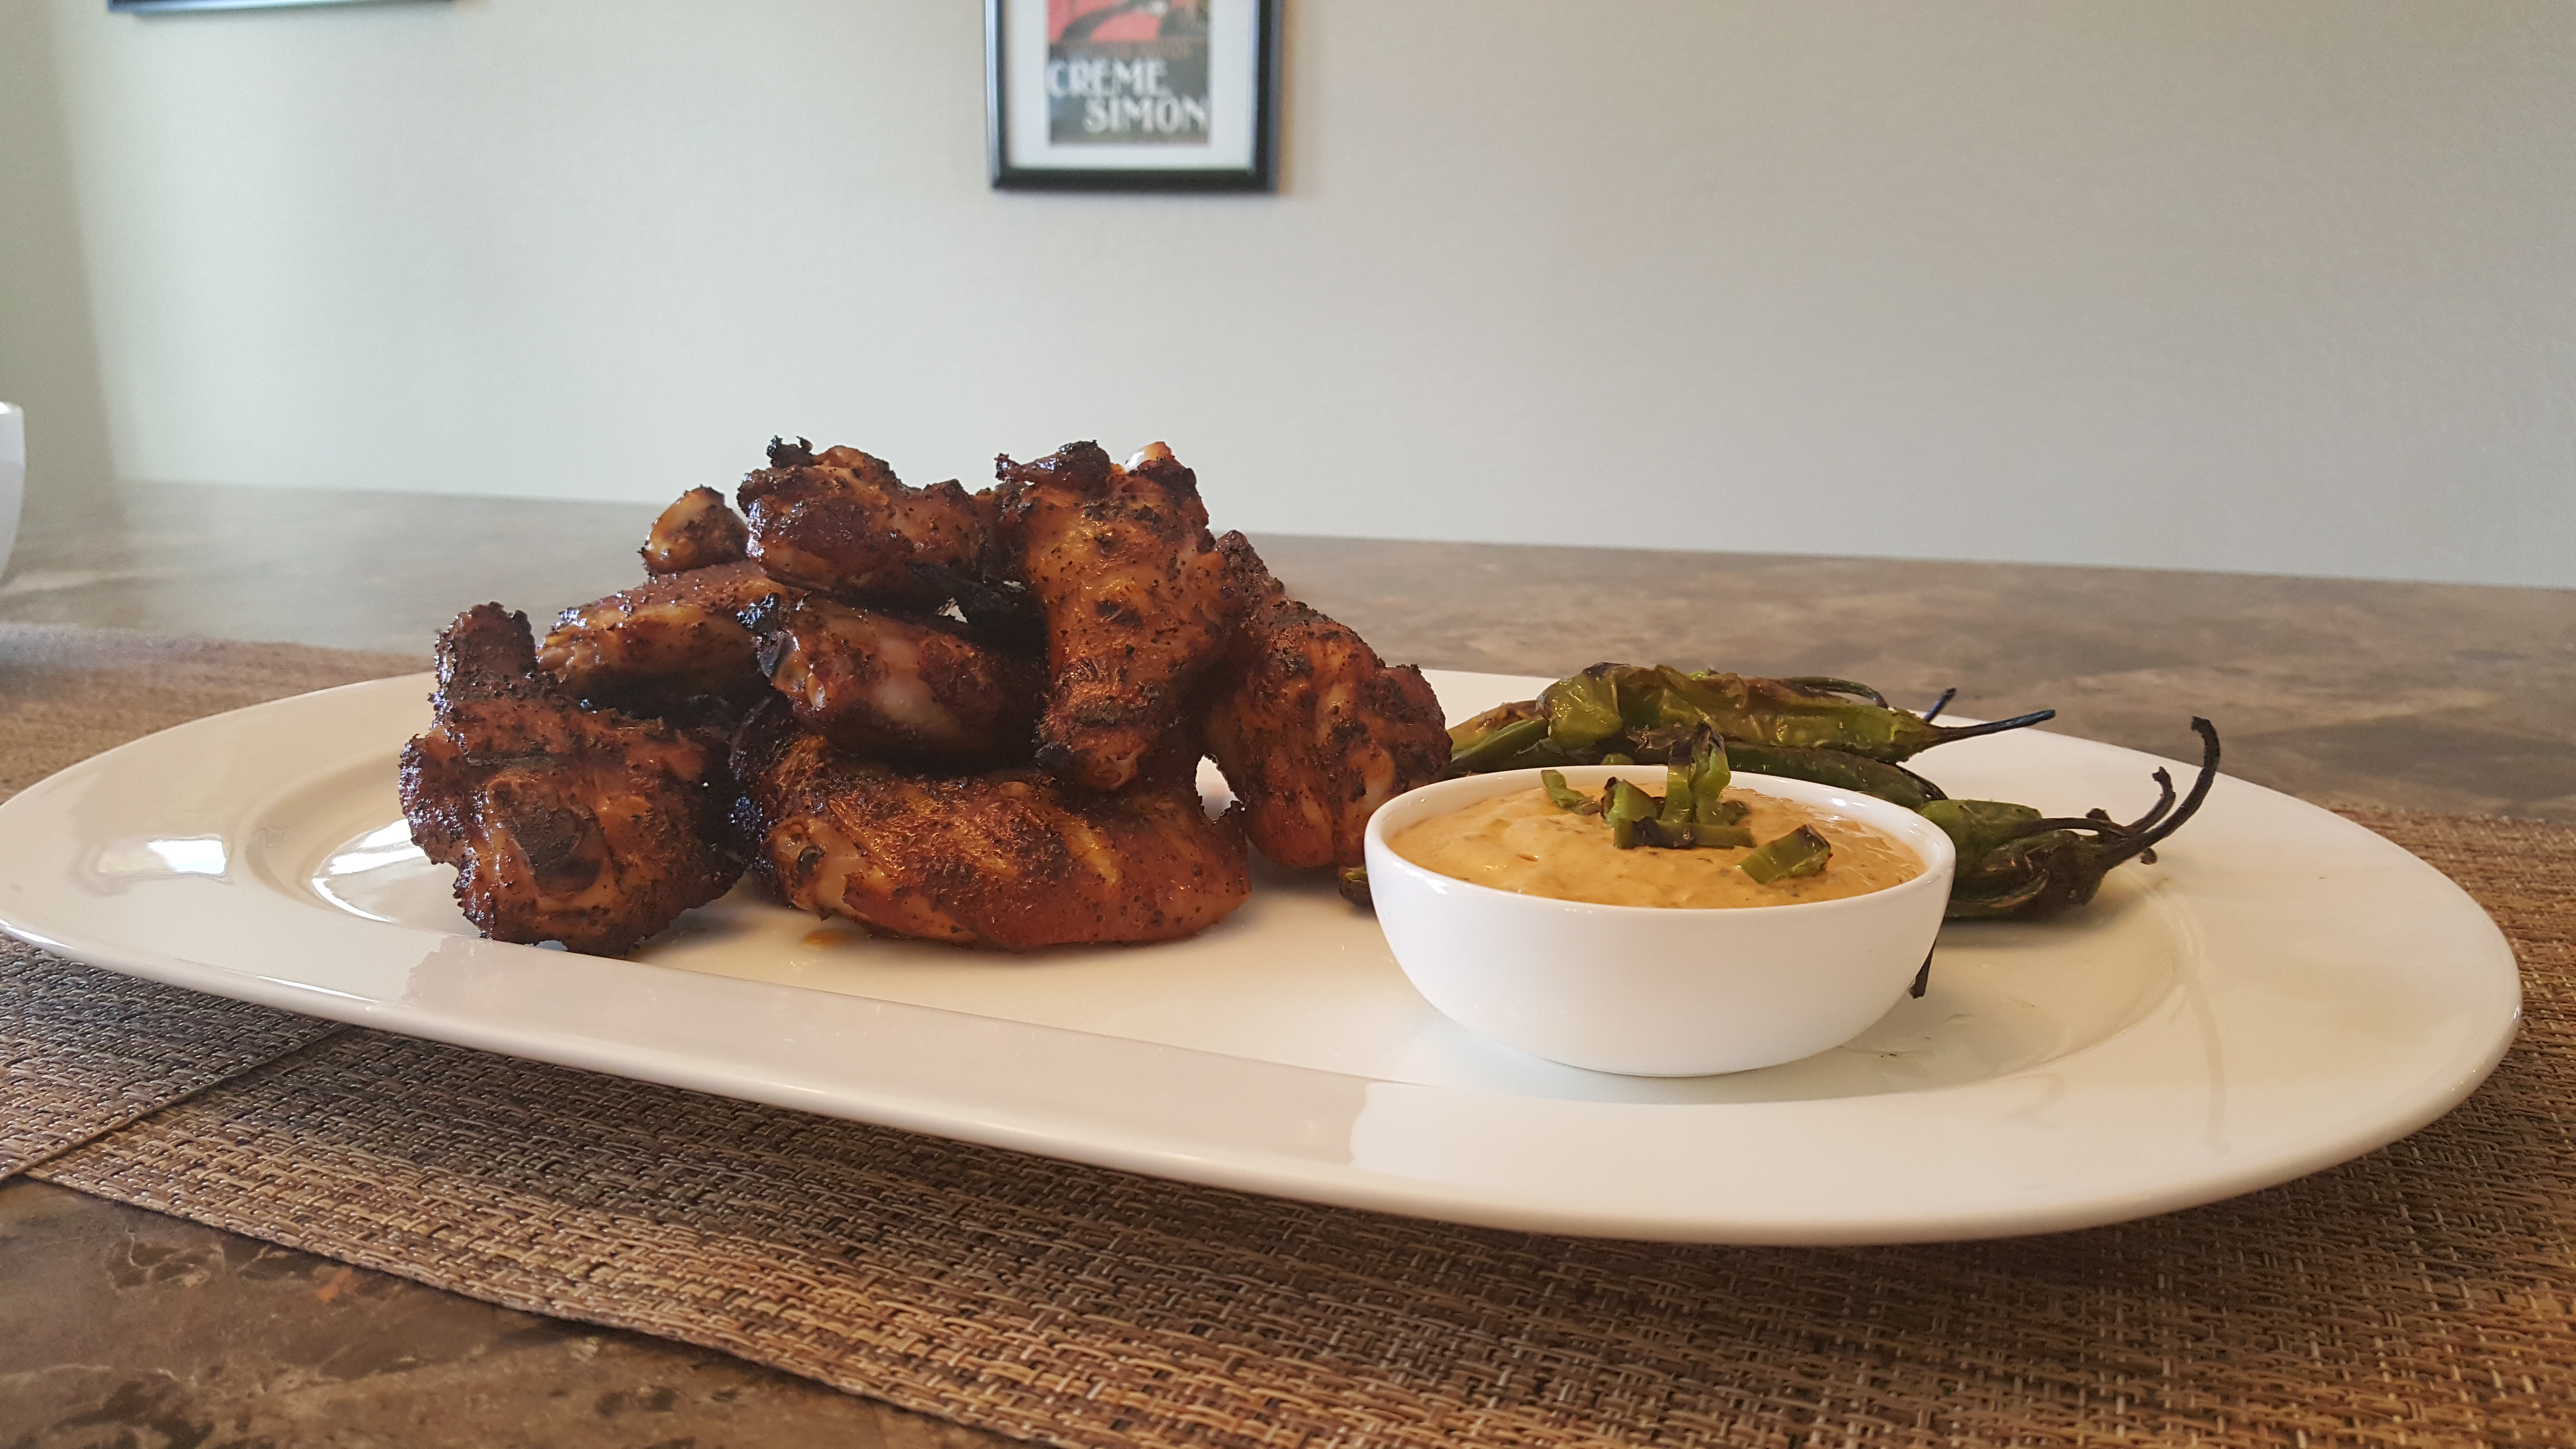
    5. Let the shishito peppers cool, just enough so you can handle them.  Take 2-3 oz. of the peppers, pull the stems, and give them a decent chop it doesn’t’ have to be perfect.  The rest are taking the place of celery and carrots on the wing plate.
    6. Throw these in a bender with the hot sauce and mayo and pulse it just enough to break down the peppers, leaving them a bit chunky.  Now you’re ready to serve.

    So, I know what you’re thinking…”What if I don’t haev a smoker?”  That’s easy.  you can still do them all on the grill, just add 1 tbsp. of liquid smoke to the rub, and let them sit about an hour.  No harm no foul.  “Isn’t’ liquid smoke a chemical?”  That depends.  Read the labels.  Liquid smoke SHOULD just literally be smoked water.  Some brands are chemical flavors, but the label will tell you what it in it.  WING UP!!!

    20160130_135523


  • Rosemary and Caramelized Onion Bison Meatballs

    BY POPULAR DEMAND!!!!!!…more meatballs.  All kidding aside, a few of you have been asking for some “out of the ordinary” meat ball recipes, so here, you go.  I used to serve these meatballs as little mini-meatballs in soup, but eventually they made it on the menu as an appetizer and a lunch sandwich as bison became more popular.   This recipe is really very basic and these are a great item to keep in your feezer in a pinch.  This recipe will make about 2 dozen meatballsDSC_0502

    • 2 lbs. ground bison
    • 1 medium onion, small diced
    • 1/2 c. red wine
    • 2 tbsp chopped fresh rosemary
    • 3 eggs
    • 1/2 c. Parmesan cheese
    • 1 c. panko, or unseasoned breadcrumbsDSC_0495
    1. Turn a skillet up to medium heat, and add about 1 tbsp of olive oil.  Add your onions and cook them slowly until they’re nice and caramelized.  You’ll need to stir them every few minutes or so.  Let these cool when they’re done and move on to mixing the meat balls.

      Caramelizing the onions
      Caramelizing the onions
    2. Combine everything in a bowl and add some salt and pepper.  Mix all of the ingredients together in a cold bowl.
    3. Let the meatballs rest for about an hour.  When you’re ready to form them get yourself a bowl of warm water.
    4. Dip your hands in the water and grab about a 2 oz chunk of the meatball mixture.  Form it into a ball and place it on a sheet tray.DSC_0501
    5. Throw these under the broiler in your oven for about 15 minutes, and let them rest for about 5.  They’ll be just perfectly done.

    These can be served just like tradiitional meatballs with pasta or in a soup.  I like to serve theese on their own in a smoked tomato sauce.  Sometimes I would throw a little risotto down on the plate and make a special for the night.  if you have any serving questions, just leave ’em below.

    Happy Eating

    -The Doctor


  • Irish Banger Sliders

    St. Paddy’s Day Part II!!!!  Who doesn’t love sliders with beer?  (Well, vegans, but they don’t count) These sliders are made with a traditional Irish Banger (pork sausage) recipe.  Bangers are traditionally served with mashed potatoes and onion gravy.  These kind of follow along these lines, but make them a fun finger food for your partying pleasure!!!  This recipe will make 8, enough for one guy on a bender…DSC_0501

    • 1 lb. ground pork
    • 1 tbsp. ground mace
    • 1 tbsp. granulated garlic
    • 8 party size potato rolls
    • 1 medium onion, julienne
    • 4 oz. Kerrygold cheddar (the REAL DEAL cheddar)DSC_0490
    1. Start up your broiler and set it to high.  We’re going ot use this to melt your cheese and toast your buns.  You might want to start a skillet on medium heat up too.
    2. Add some oil and a bit of butter to the skillet.  Let the butt melt and add the onions.  Cook these down slowly, stirring every few minutes.  While these are going, it’s time to start on the meat.

      mmm...onions...
      mmm…onions…
    3. Add the mace and garlic powder to the pork, along with some salt and pepper.  Mix this well and form the meat into 8, 2 oz. patties. Set these in the fridge for a few minutes to set up.
    4. Heat up a cast iron skillet for the bangers and sear them hard for about 2 minutes on each side.  As they finish searing, set them aside on a try and place about 1/2 inch slice of the kerrygold on top.
    5. Place the sliders and the buns under the broiler.  Just be sure to toast the buns, and melt the cheddar.
    6. Assemble you sandwiches!!!!!  Set the bottom down, slider on top, then onions and top of the bun.DSC_0496

    So what do you serve these with besides beer?  Potatoes, DUH!!!  Boiled potatoes with some butter on them or traditional fries.  Mashed potatoes work well too.   You want to get REAL crazy? Try some roasted parsnips or turnips.  But for this week, I’d keep it simple.


    Happy Eating

    -The Doctor


  • Pizza Cupcakes

    Well, not really cupcakes, but pizza none the less.  This is another fun little party idea that you can do with little kids or adult kids.  The hardest part of this whole recipe is making the dough (hyperlink to recipe), which isn’t that hard.  You can get as creative with this as you can with any other pizza.  this is really more of just showing you a technique and then having you run with it.  I recipe of dough will give you about 36-48 cupcakes, depending on how thick you want them.  Here’s what you’ll need:

    • 1 recipe Pizza dough
    • Marninara sauce (Optional, you can buy the garbage in a jar our you can make your own)
    • Fresh or shredded mozzarella (or any cheese you want for that matter)
    • ……Screw it, let’s just get to the instruction you get the idea.  It’s PIZZA!!!! Get nuts with it…DSC_0488


    1. Roll you pizza dough about 1/3 inch thick.  You can go thinner if you like, or thicket, ain’t no thang.
    2. Brush a muffin tin with some nice olive oil and get your oven heated to between 475-500 degrees
    3. Cut a small square for the dough and lay it around in the tin.  Press the edges lightly to make sure you get a good round shapeDSC_0480
    4. top with you favoite toppings
    5. Bake for about 10-15 minutes

    Now it’s time to eat.  This is more of a technique than a recipe but you get the idea.  This is actually favorite party activity of some of my friends.  they love coming over and getting creative. AND it’s in cupcake form so you can’t go wrong.  A favorite is BBQ chicken and  blue cheese.  We’ve also done classic veggie, Margherita, Buffalo wing, anchove and even white pizzas.  Don’t’ be afraid to get nuts.  Let know your flavors in the comments.


    Happy Eating

    -The Doctor


  • Taco Cupcakes

    Yes, you heard me, Taco Cupcakes.  This is something I came up with just searching for new ideas for party food.  With the rise in popularity of cupcakes, I thought this would be a smart idea, and I was right.  They’ve been a hit from day one.  Just like with any taco, you can use any filling you want.  I prefer to marinate and grill my meats as well for this.  The marinade in this link, also works well for stirring into any ground meat for extra flavor.  This should make you about a dozen.

    DSC_0025
    Little bites of Mexican goodness

    12 flour tortillas cut in quarters
    1/2 lb of your favorite taco filling (cooked)
    1/2 lb of your favorite shredded cheese

    1. Make sure you keep these tortillas under a moist paper towel while we’re assembling them.  We don’t want them to dry out.
    2. Start by brushing a muffin tin with some oil.  Lay down your first tortilla quarter and press it down into the pan gently.  It’s ok if it tears a bit, or if it doesn’t go all the way down it will all get fixed later. 
    3. Lay down some of your meat and cheese (as much as you want).
    4. Repeat this until you have all four layers ready .  You can make another layer if you want, I just like mine thinner.  (HINT: Don’t be afraid to play with this)
    5. Bake these off for about 12-15 minutes at 350.  Just enough to have the cheese melt inside and out.
    6. EAT!!!!!!!
    DSC_0022
    Pressing the tortilla into the tinDSC_0021
    Two layers

    I like to top these with some sour cream, pico de gallo, and avocados.  This Roasted Corn Guacamole Recipe is also really good on these.  Actually, anything you can put on a taco, you can put on these.  These are great for kids’s parties too (make your own taco cupcake, I know I would have loved that when I was a kid).  You can use this technique with other foods too. For example you can replace the beef with some pork  and the tortilla with wonton skin and have pot-sticker cupcake.  I’ll be doing some variation on these down the road, but definitely test-lab these.


    Happy Eating,


    -The Doctor


  • Roasted Wings with Blue Cheese Tabasco butter

    What another wing recipe???   Yup.  I can’t have a football party with just one type of wing.  That’s just plain wrong.  The technique we’re using for the sauce here is a bit more advanced than what you’ve seen so far; but it’s still a basic sauce, and a great technique to have in your arsenal.  We’ll be doing a Buerre  Blanc, which literally mean White Butter which is wine with butter melted into it very slowly so it doesn’t break.  It sounds complicated, but if you take your time, it comes out perfectly.  For 4 lbs. of wings you’ll need:

    New twist on classic flavors

    1/2 c. white wine1/2 shallot, chopped

    1/4 c. Heavy Cream

    1 tbsp. hot sauce (Like Frank’s Hot, Crystal, or Tabasco Buffalo.  These add a great pepper flavor)

    2 tbsp. tabasco (more if you like it hottter)

    4 oz. crumbled blue cheese

    1/2 lb. butter, cut up into even pieces

    1.  In a sauce pot, combine your shallots and wine.  Reduce them over medium high heat until the wine is almost dry like this:

    Wine and shallots reduced to “dry” or “au sec”
    2.  Add your cream and hot sauce and simmer for just 3-5 minutes.  You want them to reduce by about 1/4 or 1/3.  

    3.  When this mixture has been reduced down, lower the heat and start adding your butter piece by piece.  Use a whisk to move the butter around.  Wait about 30 seconds between adding each piece of butter and don’t stop whisking until all of the butter is melted.  

    4.  When the butter is all melted, cut the flame and add the blue cheese.  Let it melt just a little by beating it up with your whisk, but not too much.  Add your Tabasco.  Put the sauce off the side somewhere warm.

    Slowly whisking in your butter

    For the wings:

    1.  Pre-heat your oven to 450 or 500 hundred.  I say either or because some ovens can only go to 450, while some can hit 500.  Either is fine.  In some ovens a “Broil” may be more effective, so just make sure you know how your oven is calibrated

    2.  Toss the wings in oil salt and pepper and spread out evenly on a baking tray like this:

    Wings ready for the oven
    3.  Place the wings on the lowest rack in the oven.  Let them go for about 20-25 minutes.  You should start to hear them sizzle.

    4.  At this point turn them and finish them off on the other side, about another 20-25 minutes.  Drain off and SAVE and juice that may be in the pan. (Emergency chicken stock)

    5.  When the wings are ready, grab a bowl and put a few in there.  Toss them in the sauce and get a good coat.  Repeat until all of the wings are coated, then serve.  I like to just sprinkle a bt more blue cheese on them and throw a couple dashes of Tabasco on top just for visual.

    The cool part about this recipe is the sauce we’re doing.  I’ll be putting up a more basic and traditional version of the recipe in a few weeks, but how nice is it to have your hot sauce and blue cheese in the same sauce?  About the wings, you can fry these or grill them too (grilling is my favorite).  Feel free to play with them as much as you like.

    As always, if you have questions, leave them in the comments below.  

    Happy Eating

    -The Doctor


  • Spicy Thai-Style Peanut Wings

    How can you have a Super Bowl without wings???  You can’t, unless you’re a vegan.  If you are, then you’re probably doing tofu.  Anyway, these are one of my favorite ways to make wings.  The peanut sauce itself plays nicely against the crispy, charred wings.  I like to grill my wings, but you can fry them or roast them too. . .  you’ll like! I’ll be doing recipes using all three techniques, so feel free to mix and match. You will want to figure 5-6 wings per person.    This will do about 10-15 people, with other food around, of course.

    For the sauce:

    1/2 c. chunky peanut butter, room temperature

    1/2 c. chicken stock

    Always a party favorite

    1 tbsp. ginger (fresh), grated or chopped

    1 tbsp. garlic, crushed

    3 tbsp. chopped cilantro

    1 tbsp. chopped basil

    1 tbsp. chopped mint

    1 tbsp. fish sauce

    1 tbsp. Sriracha (chili Sauce)

    juice of 1 lime

    1 tbsp sesame oil.  

    2 tbsp roasted peanuts (optional for garnish)

    2 tbsp scallions, sliced thin bias.  (diagonal, if you’re not sure when bias means)

    1. I know what your’e thinking, this is a lot of ingredients…yes it is, but it’s not hard.  Start with sauce pot and the sesame oil on medium to medium high heat.  Add the ginger and garlic and cook out until you just start to small the garlic and ginger.  You don’t want to burn them, just sweat them a bit. 

    2.  Once the garlic and ginger are sweated, add the chicken stock, lime juice, fish sauce and peanut butter.  Whisk these together until the sauce is decently thin.  You really don’t want to reduce it at all, just warm it up.

    3. Once the peanut butter is melted into the stock and the ingredients have come together, Add most of the herbs, scallions, and the Sriracha (I like to add more, but it deppends on how hot you want them.  Just be careful because you don’t  want the heat to over power the peanut flavor).  Save just a little bit for garnish.  Keep this off to the side while you grill up your wings.

    For the wings:

    1.  This isn’t hard, but I’ll go over it anyway.  If I’m doing wings for this specific recipe, I’ll marinate them overnight in some sesame oil and 1 tsp. each of ginger, fish sauce, and garlic.  This is optional of course.

    2.  Get your grill hot, if you don’t have a grill, use a small indoor grill (like a Foreman), or a grill pan.  Don’t have those??  No problem, pop those wings in the oven for 15 minutes at 500.  Anyway, when the grill is hot, take an old cloth or towel, soak it in vegetable oil and rub the grill down.  This is called seasoning the grill, and it’s a key piece of not having your meat stick to the grill.  

    3.  Place your wings down on the grill evenly.  You’ll know when they’re ready to turn because the skin will release from the grill.  You’ll need 6-8 minutes on each side depending on your grill.  If you have a meat thermometer, which everyone should, then you want to pull the wings off at 160 degrees and let them come up to 165 off the grill.  

    4.  When the wings are done, put them in a nice big mixing bowl a few at a time and toss them in 2 oz of the wing sauce.  You want just a light coating of sauce, not too heavy.  Feel free to save some sauce for the side too in case some of your guests want extra.  

    5.  When you’re done tossing, place the wings onto a plate and garnish with your herbs and scallions.  

    Tasty right?   I thought so.  You can do anything with wings because they translate to almost every world culture.  If you have any wing recipes you want to see, let me know in the comments.   I’ll be putting up another nice wing recipe you can do for your Super Bowl party later in the week.

    Happy Eating,

    -The Doctor. 


  • Pulled Pork Chachos

    Chachos…Chachos??? What are Chachos???  That’s what you’re  thinking right?  Well, they’re like nachos, but with potato chips instead of tortilla chips.  Yeah, awesome!!!!  I used to eat these all the time back in Philly at a place called Finn McCool’s.  They used to do them the traditional nacho way with chili and cheese but once in a while we’d get a treat with Irish Cheddar and Bacon.  We’ll talk more about ideas later.  These are great, easy way to kick off your Super Bowl Pre-Game week. Here’s what you’ll need to feed about 10-15 people:

    1 bag Kettle cooked potato chips (any flavor you want, sweet potato works well with the pork too)

    1 onion, julienne

    Chachos…the other nacho…

    2 cups Mexican cheese blend (or cheddar and/or jack cheese)

    1/4 c. sour cream

    2 cups pulled or chopped pork (You can buy this from your favorite BBQ shop, or find the recipe here )

    2 tbsp. diced tomatoes,

    1 avocado sliced OR 1/2 c. guacamole

    1/2 c Jalapeno peppers

    1.  First things first, get out a sauté pan and turn the heat up to medium and crank that oven up to 350.  Add 1-2 tbsp. oil vegetable or olive oil to the pan and let it heat up.  We’re going to caramelize those onions. Throw the onions in and let them sit just a minute, then stir them, with a spatula or a wooden spoon.  Alternate resting and stirring every couple of minutes until they get a nice deep brown color.  They should look like this:

    2.  When the onions are done put them off to the side.  Now we get to build these things.  Get yourself a round, shallow cake pan (about an inch deep) and line it with either foil or parchment paper.  Lay down a thin layer of the chips, take a bit of that pork and lay it evenly over the chips.  Now the onions, then the cheese. Before you get to the next layer, lay down a few jalapenos.  Chachos and nachos are always matter of preference for layering, but I like to have my layers look like this: 

    3.  Repeat this until you’ve gotten all the chips piled high or you’ve filled the cake pan.  If you’ve filled the cake pan just get another pan, or do another round. Whatever you decide to do, when you’ve got a full pan, pop them in the oven for 8-10 minutes or until the cheese is melted.

    4.  Use the foil/parchment to transfer these to a plate, or just leave them in the pan.  Top them with your diced tomatoes, sour cream and avocado/guacamole, or put them off to the side.  Guess what???  You’re done.

    Of course, since these are potatoes you can do anything with them.  You can go as crazy are blue cheese and port wine reduction, or as down home and bacon and cheddar.  The sky is the limit with these.  I would also recommend playing with Terra chips, chicken and goat cheese as well.  If you want those recipes, just comment below.  

    Super Bowl week continues with a Grilled Spicy Peanut Wings next.

    Happy Eating,

    The Doctor


  • THE Dip. Not a dip, THE Dip.

    Since I moved to my current location from an unmentionable, Deep South, Bible beating location, I’ve been very well known around these here parts for a very popular party favor.  That favor is the bison taco dip.  Every party I’ve hosted or been to over the last seven years has had a request for this delicious, sloppy, cheesy mess (mess in a good way, like Waffle House hashbrowns good, but without the potatoes getting in the way of the good stuff).  This recipes is super easy, super fast, and I guarantee you’ll be a hit at the next New Year’s or Superbowl party…screw it, any party.  This recipe makes about 1 1/2 gallons


    THE Dip, picture provided by Jeremy Rhodes

    1 small onion, small diced

    1 Pablano pepper, small diced (it’s optional)

    1 small red bell pepper, small diced

    3/4 c. chopped Cilantro

    1 big brick (yes the big brick, about 1 lb) of Velveeta

    1 pint whipped cream cheese

    2 lbs ground bison

    1/4 c. chili powder

    1/4 c. cumin

    1 tbsp garlic powder


    1.  In a large pot, start browning your meat.  If your bison is real lean, add some butter to the pot before you start. I like to use a potato masher to break the meat up as it cooks.  This is a dip so I want all of that buffalo goodness all throughout.
    2. When the meat is half way done, add the vegetables.  Let those sweat in the meat fat.  (READ:  Don’t drain it, especially if you’re using beef, you want it trust me)
    3.  Add the chili powder, cumin, and cilantro now, let those sweat out for a good minute or two, now lower the heat.
    4.  Add your cream cheese too the mix and stir through.  Start cutting up your big ole’ block o’ Velveeta and slowly add it piece by piece to the dip.  this is an excellent time for me to advertise the potato masher again.  As it passes through and cuts the Velveeta, it makes it easier to melt.
    5.  When everything is melted, it’s ready to serve.  This dip is best slightly warm so it’s more like a fondue.
    You happy now haters?  You have my secret dip recipe, so now you can try to make it on your own.  Seriously, this stuff goes with just about anything.  I even use it for a macaroni and cheese sauce, or an omellete filling.  As for some easy variations, Veleveeta does make some different product flavors, so feel free to mix those in, personally, I like the pepper jack.  You can also change up the meat.  I like to mix different meats and sausages, like turkey and merguez.  You can even add BBQ pork shoulder (without the sauce) or smoked brisket.
    -The Doctor.