• Category Archives Entrees and Such
  • Mussels with Papaya and Coconut

    This is my favorite time of year.  The time of year when summer and fall start to mesh and you get great mussels from up North and you still have fantastic summer produce.  This recipe comes straight from a little old Filipino lady that worked in one of my kitchens in Atlanta.  It was part of our “family meal”  every week, and eventually became part of a bar menu every late summer when the papayas were at their best.  I know deep down she wanted to use the unripe green papayas she had back home, but mature papayas are good enough for us.  This will hook up a pound of mussels:DSC_0472

    • 1 lb mussels, cleaned and washed
    • 2/3 c. coconut milk
    • 2 tbs fish sauce
    • 1 tbsp sweet rice vinegar or fruit vinegar (optional)
    • 1 1/2 c. papaya medium dice
    • 3 cloves garlic, chopped
    • 1 tbsp grated ginger
    • 2 tbsp chopped lemongrass
    • 1/2 c. rough chopped cilantro
    • 1/4 c. rough chopped basil
    • 1/4 c. rough chopped mint

    DSC_0468

    1. First up, we need to make our coconut base.  Take 1/3 of the papaya, and puree it into the coconut milk.  Set this off the the side for the time being.
    2. Start up your sesame oil on a medium high flame.  Add you garlic, ginger, and lemongrass and sweat it out for just a little over a minute.
    3. Add half of your herbs and sweat for another minute.
    4. Add the vinegar and fish sauce.  Let that go for just a minute, then add your mussels.
    5. Add your coconut milk mixture and cover the pot.  Let these steam for about 8-10 minutes.  Give them a good stir, then add the rest of the herbs and papaya.

    Sweet and briney, just how I like ’em.  Mussels are incredibly versatile and lend themselves so well to the flavors in this recipe.  I’ll be putting up some more mussels recipe as the fall goes on.  You got requests?  Lemme know in the comments.

    Happy Eating,

    -The Doctor


  • Bourbon Peach Country Ribs

    Raise your hand if you’re into peaches!!!!  Raise the roof if you’re into PIG!!!!!!!  Crap, my roof just exploded…..

    Here’s one from Atlanta.  The “country rib” is a cut from the very top of the loin.  It’s tough, but full of flavor and  perfect for braising. Georgia is, of course, famous for peaches, so when I was asked to come up with a knock out dish for a restaurant out there, well this is what happened.  This recipe can feed four.

    DSC_0476

    4 x pork country ribs or short ribs (they’re usually cut 5-6 oz each)
    1/2 c sliced shallots
    3 clove garlic, sliced
    2 whole white peaches, cut into 1/2 inch thick wedges
    2 oz Bourbon
    2 tbsp grain or creole mustard
    1/4 c ketchup
    2 tbsp. Brown sugar
    1/2 c chicken stock

    The lineup...
    The lineup…
    1. Start by getting a pan hot with about 2 tbsp of olive oil and preheat your oven to 350.  When the pan starts to smoke, sear your meat.  It should look like this when you turn it:

      Perfect Pig Sear
      Perfect Pig Sear
    2. When the meat is nice and brown on all sides, take it out of the pan and add your peaches.  Let these sit for jut a minute, then toss them around.  Let them it just another minute, then add your brown sugar, garlic, and shallot.  Sweat these out for 5 minutes, stirring every 30 second or so.
    3. For safety’ sake, turn off the flame, then add your bourbon.  Turn the flame back on and let this reduce for two minutes.  When you don’t smell anymore alcohol,  add your mustard, ketchup, and chicken stock.  At this point, I like to pull out 3 or 4 pieces of peach jut to have a nice colorful garnish at the end.
    4. Now, transfer everything to a roasting pan and cover with foil.  Pop it in the over for 2 hours.  Yup.  Slow cookin’.
    5. When your 2 hours is up, and the meat is falling off the bone,  Take jut the meat out of your braising liquid.  Now you’re going to take 3/4 of your braising liquid and puree it.  Add the rest of the liquid and pour if over the ribs on a platter or any other serving vessel.

    So now what do you serve this with?  I say….’Tater Salad.  Not Ron White, just ‘Tater Salad, with lot of mayo, and crunchy vegetables.  You can do grilled corn, collared greens, or black-eyed peas too.  As for what you can do to play with the pork?  Well, keep it seasonal, when fall come around, replace the peaches with pomegranates.  Heck plums go nicely as well if your looking for something new.  Apple will do you wonders too.  Go ahead, play with it.


    Happy Eating,

    -The Doctor


  • Snapper Veracruz

    Chances are, if you’ve been to culinary school, you know this one.  It’s very simple, some sauteed onions and peppers, some olives, a little wine and tomato, really nothing super fancy.  But i have YET to have it made for me properly, the way it’s actually made in Veracruz, Mexico.  While I can’t do it over an open flame in side the lab (well I can but my assistants would get scared an quit, I mean really it’s just a flamethrower….), I can get you close to it.  the key to this dish is really remembering to under season (yes I said under season) it and get GOOD green olives,  not the garbage you get packed in salty chemicals, but the really good Spanish olives with herbs packed in oil. You can’t slack on this dish.  This makes about four portions.

    Yes yes, you too can have fancy plates/
    Yes yes, you too can have fancy plates/
    • 1 c. vidalia onion, julienne (you know strips)
    • 1/2 cup each, julienne read and green pepper
    • 2 cloves garlic sliced
    • 2 tbsp tomato paste
    • 16 green olives, packed in oil (quartered)
    • 1 whole tomato, diced
    • 1/2 c. white wine
    • 1/2 c. tomato juice
    • 4 each 6 oz snapper filets (or whatever size you want) take the skin off
    • 2 tbsp chopped cilantro
    • 1 tbsp chopped oregano (or marjoram, whichever)
    1. Set a saute pan on medium heat.  Add about 1 tbsp of olive oil, and about 1 tbsp of the oi from the green olives.  Let it come to a slight smoke.
    2. Add your vegetables, all at once.  Toss or stir them right away.  You just want a quick sweat.
    3. Add you tomato paste and toss again.
    4. Now add the wine and your herbs and let this reduce by half.
    5. Lower the heat to low and add your fish and cover.
    6. Simmer the fish until it’s done, this can be anywhere from 5-15 minutes depending on how thick the cuts are.  The rule of thumb is 10 minutes per inch.

      It's fish...IN A PAN!!!!
      It’s fish…IN A PAN!!!!

    I like to server this over quinoa or some other funky grain, but the traditional accompaniment for this dish is rice.  Black beans and pinto beans go well with this too.  You can also use pretty much and firm white fish you like.  Using something like sole is a little too delicate for this, but sub in anything you like.  I like to add a coupe of jalapenos or Serrano chiles  to this too for some heat.  Play with it a such as you like, just be careful not to season it too much.  there’s going to be a lot of salt coming out of those good olives.  Don’t forget to leave a comment.

    Happy Eating,

    -The Doctor.


  • Baked fish with Mushrooms and Leeks

    “Doc, are you on a leek and corn kick?”  Yes…yes I am.  Why?  Well, guess what I got from my co-op this week…leeks and corn (well ramps, but we’ll use leeks today).  This dish is based on the traditional French technique “En Pappillote” or “in paper”.  The protein, vegetables and starch are all cooked together in parchment paper, leaving the food perfectly moist and the flavors beautifully melded.  Now not everyone has parchment paper lying around in the kitchen (although you should), so I decided to make this a little more home kitchen friendly.  This makes enough for two.

    DSC_0474

    1 1/2 lbs leeks

    ¼ lb sliced mushrooms

    ¼ c frozen corn kernels                                                  .

    1/2 cup white wine

    ¼ c. heavy cream

    1 tbsp. Herbs de Provence  (dry..GASP..yes dry, they have their place)

    salt and pepper

    1 tablespoon Dijon mustard

    2 4 oz. fish filets (I used salmon, you can use whatever you want)

    DSC_0465
    All the major players
    1. You know the drill, turn that oven to 400 degrees.  While it’s heating up, lets do some knife work.
    2. Trim about 1/2 –inch from the root ends of the leeks, then trim off and discard all of the tough green leaves.
    3. Cut the rest in half lengthwise and chop; then wash well in a colander, being sure to rinse between all of the layers, just like so.
    4. Mix the vegetables thoroughly with the wine cream mustard salt pepper and Herbs de Provence.
    5. Top the vegetables with the fish and sprinkle with salt and pepper.  Top each piece of fish with a bit of the butter. Cover the pan and pop that bad boy in the oven for 25-35 minutes, or until the fish is a nice medium (or well done if you like saw dust).  A thin-bladed knife should meet little or no resistance when inserted into the thickest part of the fish.
    6. Now, uncover and serve with the leeks and pan juices spooned over the fish.  You can serve this right in the cooking vessel, or make it all fancy and go into bowls.  Whatever you want
    DSC_0471
    Fresh from the oven

     Like I said earlier, you can do this with any fish you like.  Fish that are higher in fat work best though.  I would recommend trout, cod, and seabass.  Just remember to adjust the cooking time based on the size of the fish.

    Happy Eating

    -The Doctor


  • Juicy Lucy Meat Cake

    There are times when alcohol induces inspiration.  This recipe is definitely from one of those times, although it came together to a better recipe after I sobered up.  Most people know the Juicy Lucy as a burger stuffed with cheese, so one night I in college (ok, let’s be real here, it was 3 AM) a few of us though it might be a good idea to try and make a big one, with 3 layers of cheese.  Well, this ended up being a bit overly ambitious, but I knew i was on to something.  About $50 and two attempts later, I had this gem of a recipe that ended up being a party favorite.  This recipe will serve 8-10 normal humans, or 1 drunk college student.

    DSC_0025
    If meatloaf, potatoes and ketchup doesn’t look good to you, you need learn…
    • 2 lbs. ground beef
    • 1 lb. loose Italian sausage
    • 12 slices Deli Style american cheese
    • 1/2 c. diced bread, toasted
    • 1/3 c. milk
    • 3 eggs
    • 1/2 c spicy Giardiniere, chopped (Please make sure it’s in oil)
    • 1/2 small white onion, minced
    1.   Preheat you oven to 375 degrees.  While your ovens heating,  combine your milke eggs and breadcrumbs and let the soak for about 20 minutes.
    2.  Take you giardinere and onions, and get them in a saute pan over medium heat.   Make sure to get all of the oil form the giradinere in the pan.  You want to sweat the onions and get them to permeate the oil.  You really only need about five minutes.  just make sure you keep everythign moving so nothing burns.  Let these cool for a minute and combine them with the bread mixture.
    3. In a large mixing bowl, combine the meats and and the breadcrumb mixture.  Season the mixture and taste.  (I’m not crazy, don’t taste it raw, just but a little bit in a pan, cook it, and make sure it tastes good.)
    4. Take a small 2 inch cake pan (I used 8 inches x 8 inches) and fill it a little under half way.  Layer your cheese over the  meat  and be sure leave about 1/2 inch around the edges to seal the meat cake.

      DSC_0020
      Fist layer of cheese awesome
    5. Add the rest of the meat over top and press down around the outside to create a seal  around the cheese.

      DSC_0021
      Second layer of meat awesome
    6. Place in the oven for about 45-55 minutes.  i like to make sure the inside hits 145, then let it come up to 155 after I take it out.  
    7. When it comes out, let it rest 10-15 minutes, then cut.
    DSC_0026
    #Drool


  • Bahn Mi Style Pork

    Yeah, yeah , yeah, I know  Bahn Mi is a sandwich.  Actually, Bahn Mi is the Vietnamese term for bread.  The Bahn Mi sandwich as we’ve come to know it is actually filled with all kinds of pork products from meatballs, to belly (my favorite), to pate.  The whole thing started during the French colonization of Indo-china. (Damn Doc, you done dropped some knowledge).  The French brought baguettes, which the natives called Bahn Mi.  The word just eventually expanded to mean all bread.  Anyway, this recipe was originally an appetizer in a little Vietnamese restaurant in the town I live in.  The chef was a good friend of mine whom I met during my time as a menu consultant with a certain hippy grocery chain, who shall remain nameless.  (Hey look man, those hippies will sue!!!!).  The salad itself is very simple, and can be used with anything, so it’s another good one to keep in your back pocket.  Here’s what you’ll need to do one whole pork tenderloin, or enough for 3-4 people (1 if you’re in my house).
    DSC_0034
    1/2c. cilantro stems and leaves for the marinade:
    1/4c.  mint leaves
    1/4 c. basil leaves
    2 cloves garlic, peeled
    1 inch knob of ginger, peeled.
    2 tbsp. sesame oil
    1 tbsp. unsweetend rice vinegar
    2 tbsp. coconut milk
    1 tbsp Sambal (Garlic chili paste)
    1 tbsp fish sauce.


    1.  This is pretty easy.  All you have to do is find a good blender or a small food processor and puree everything at once until it’s smooth.

    2.  Take half of this mixture and rub it on the pork tenderloin.  I like to do this in a zip lock bag.  (It’s a lot less messy)  Just put your pork in, pour the marinade over it, and get rubbing.
    3.  Let the pork marinate at least 24 hours, and no longer than 36.  The acid starts to break down the meat after this.
    4.  When you’re ready to cook the tenderloin, just fire up your grill and cook it until it’s 145 degrees inside.  Let it carry off heat to 150 degrees.  Slice when you’re ready to serve.


    Now for the salad.

    1 large carrot, julienne or shredded1 cucumber sliced thin
    1 small daikon radish (optional, the can be hard to find), julienne or shredded
    1/2. cup cilantro leaves


    1.  Combine all of your ingredients in a large bowl and add the rest of the marinade that you didn’t use from the pork.  Add a few more sprinkles of fish sauce to taste.  Let this sit for about 5 minutes before serving.


    As if the flavor on this wasn’t out of this world enough, you want more?  YOU GOT IT.  I like to serve this with my spicy mayo, which is 1 tbsp of Sriracha to 1/2 c. mayo.  (of course this is optional).  You can replace the pork loin with ground pork or chicken if you want to do the same thing with meat patties.  As always, if you got questions, let me know below.


    Happy Eating,
    -The Doctor


  • Greek Style Lamb Shoulder Chops

    Lamb and Easter go perfect together  but who wants that plain old leg all the time? There’s plenty of other lamb cuts that are way underutilized AND that you can find for a great price at your local butcher.  My favorite of these cuts is the shoulder chop.  On most animals, the should is very tough, but not lamb.  It’s tender flavorful meat that is great for grilling and broiling.  This is a variation on a recipe I used to use during one of my stints at a high class hotel in Philadelphia.  This roast lamb shoulder this recipe is based on was on every Easter buffet menu, and it was always the first item to go.  This recipe serves 4.

    DSC_0015
    Who needs a rack when you have this flavorful cut?!?!?!

    4 lamb shoulder chops

    2 sprigs rosemary, leaves only

    Juice and zest  of 1 lemon
    1/2 c. plain greek yogurt
    2 tbsp honey
    Water as needed

    WHAT!!!!!?????!?!?!?  Nothing else??  Nope.  Simple as can be.  I like to do the marinating a day before so the lamb gets even more tender than it already is3 cloves garlic, peeled

    1.  Simply enough, take your lamb, honey, lemon juice, rosemary, and yogurt and stick it all in the blender.  Pulse until everything is smooth.  Some Greek yogurts can be pretty thick, so if you need to add a couple tablespoons of water to thin it out, go ahead.

    2.  Drop you marinade into a ziplock bag and then add the meat.  Let this marinate for 8-24 hours.

    3.  When your ready to cook, just turn on your broiler or grill and cook to medium rare (135 internal)

    Even though this marinade is being used for lamb, it’s great for anything.  I used it on chicken, fish, pork, and in burgers well.  I like to serve these chops with some nice fresh arugula dressed with just touch of Olive Oil and black pepper.  If you want some starch, a nice soft polenta is a perfect match.  (Oh wait, I guess you guys will want that recipe too)  Don’t forget to subscribe, and leave comments below.  Yes, a basic polenta recipe is coming soon

    Happy Eating,

    The Doctor


  • Ropa Vieja

    Anyone who can speak Spanish knows what this means.  Yup, “Old Clothes”.  Ropa Vieja originated in the Canary Islands, but it’s the national dish of Cuba.  It was originally just a stew made from leftovers, but almost every Hispanic country has developed it’s own version.  This version here comes from a little old Cuban lady named Maritza, who was my cafeteria cook in Mexico.  This recipe was so good and became so popular with the hotel Executives we had to put it on our banquet menu, and finagle a fine dining version to keep on the restaurant menu in the hotel where I was working.  

    Ropa “Not Ganghnam Style” Vieja
    3 lbs. flank steak, or skirt steak

    2 tbsp. whole butter

    1/2 c. tomato paste

    1 medium onion, split and julienne

    1 each green and red bell pepper julienne

    1 c. beef stock, or beer ( I like to use Negra Modelo for this)

    3 cloves garlic, chopped

    1/2 ketchup

    1 14 oz. can diced tomatoes with chipotle (or whatever diced tomatoes you like)

    1/2 c rough chopped cilantro

    1/4 rough chopped Epazote

    1.  Start by melting your butter in a heavy pot.  Add the onions, garlic and peppers and sweat down for about 5 minutes.  We’re not going to sweat these all the way out, but just get them started.  They should look like this:

    2.  After about 5 minutes, add your tomato paste and stir that around for just under a minute.  Add your beer and diced tomatoes.

    3.  Let this come up to a simmer, then add your meat.  I leave the meat whole, but you don’t have to if you don’t want to.  Cover this and let it simmer for about an hour.

    4.  When an hour is up, add your herbs and ketchup.  Cover again and simmer for another 90 minutes, or until the meat is falling apart.  

    5.  When the meat is nice and tender, pull it out, and let it cool down until you can handle it.  Keep the sauce simmering and let it reduce a bit, about  1/4.  

    6.  Shred the beef by hand and add back to the sauce.  Stir until everything is combined evenly and serve.

    Traditionally, this is served with rice and black beans.  We always served it with tortillas as well, but I’m pretty sure that was because we had some really great tortillas in the part of Mexico I was in.  I’ve seen it served with fried ripe plantains (maduros) and crispy unripe plantain chips as well.  In the Canary Islands, they’re still serving this with potatoes, so you can see how versatile this is.  You got questions?  I’ve got the answer,  just let me know in the comments.

    Happy Eating

    -The Doctor


  • Classic Turkey Meat Balls

    Why turkey meatballs?  Well, ground turkey was on sale at the grocery store, so that’s why.  Besides, it’s something you can make with your fresh pasta recipe that I gave you earlier this week.  You can do this recipe with any meat you want.  Traditionally, Italians do meatballs with a mix of beef, pork, and veal, but I’ve used, chicken, lamb, and venison as well.  I’ve found this recipe to be the most versatile, but I’ll also be putting up different style meatball recipes through the blog.  I like to make these in big batches and freeze them to keep on hand.  You never now when a party’s going to break out around here.  This makes about 40 1 oz. meatballs.

    3 lb Ground turkey ( or whatever meat you like)

    2 eggs

    1/3 c diced white bread, toasted

    1/3 c milk

    1/4 c. parmesan

    1 tbsp. chopped fresh oregano

    1 tbsp. chopped fresh thyme

    1 tbsp. garlic powder

    1.  The first step is to make a panada.  Toasting the bread removes more moisture allowing it to pick up more milk, and, therefore, more flavor.  Mix the diced bread and milk, and let it sit in the fridge for an hour.  

    2.  After an hour, add the eggs, Parmesan and herbs to the panada and start smushing it all together with your hands.  (Yes, “smushing” is a word, look it up in the New Jersey Dictionary).  Make sure everything is mixed well, then go back into the fridge for another hour. 

    3.  Now it’s time to get all of this good stuff mixed together!!  Put the meat into a nice mixing bowl and mix in your panada by hand. Before you get all messy, season the meat with salt and pepper.  You can always go back and add more.  If you want to taste test these, all you need to do is heat up a pan with some oil, then fry up a small patty.  Don’t be afraid to do this a few times until you get the seasoning right.  

    4. When the mix is nice and homogeneous (big word right?), take a one ounce s ice cream/cookie scoop, and a bowl of warm water.  Dip the scoop in the warm water then scoop out 4 or five meatballs.  After that you’ll see the meat start to stick to the scoop.   Just simply re-dip and clean.  Keep doing this until you’ve scooped all of the meat.

    5.  Now get a saute pan hot with some oil.  When you see a slight bit of smoke in the pan, start searing your meat balls.  We’re going to cook them all the way here, only because we’re going to freeze them, and they’re so small.  

    So that’s it, they’re ready to freeze or serve.  If you want to make these bigger, go ahead,  just make sure you finish them off in the oven. These will keep in the freezer a good couple of months, if you wrap them correctly.  As always, if you have question, just ask below.

    Happy Eating

    -The Doctor


  • Bourbon Brined Turkey

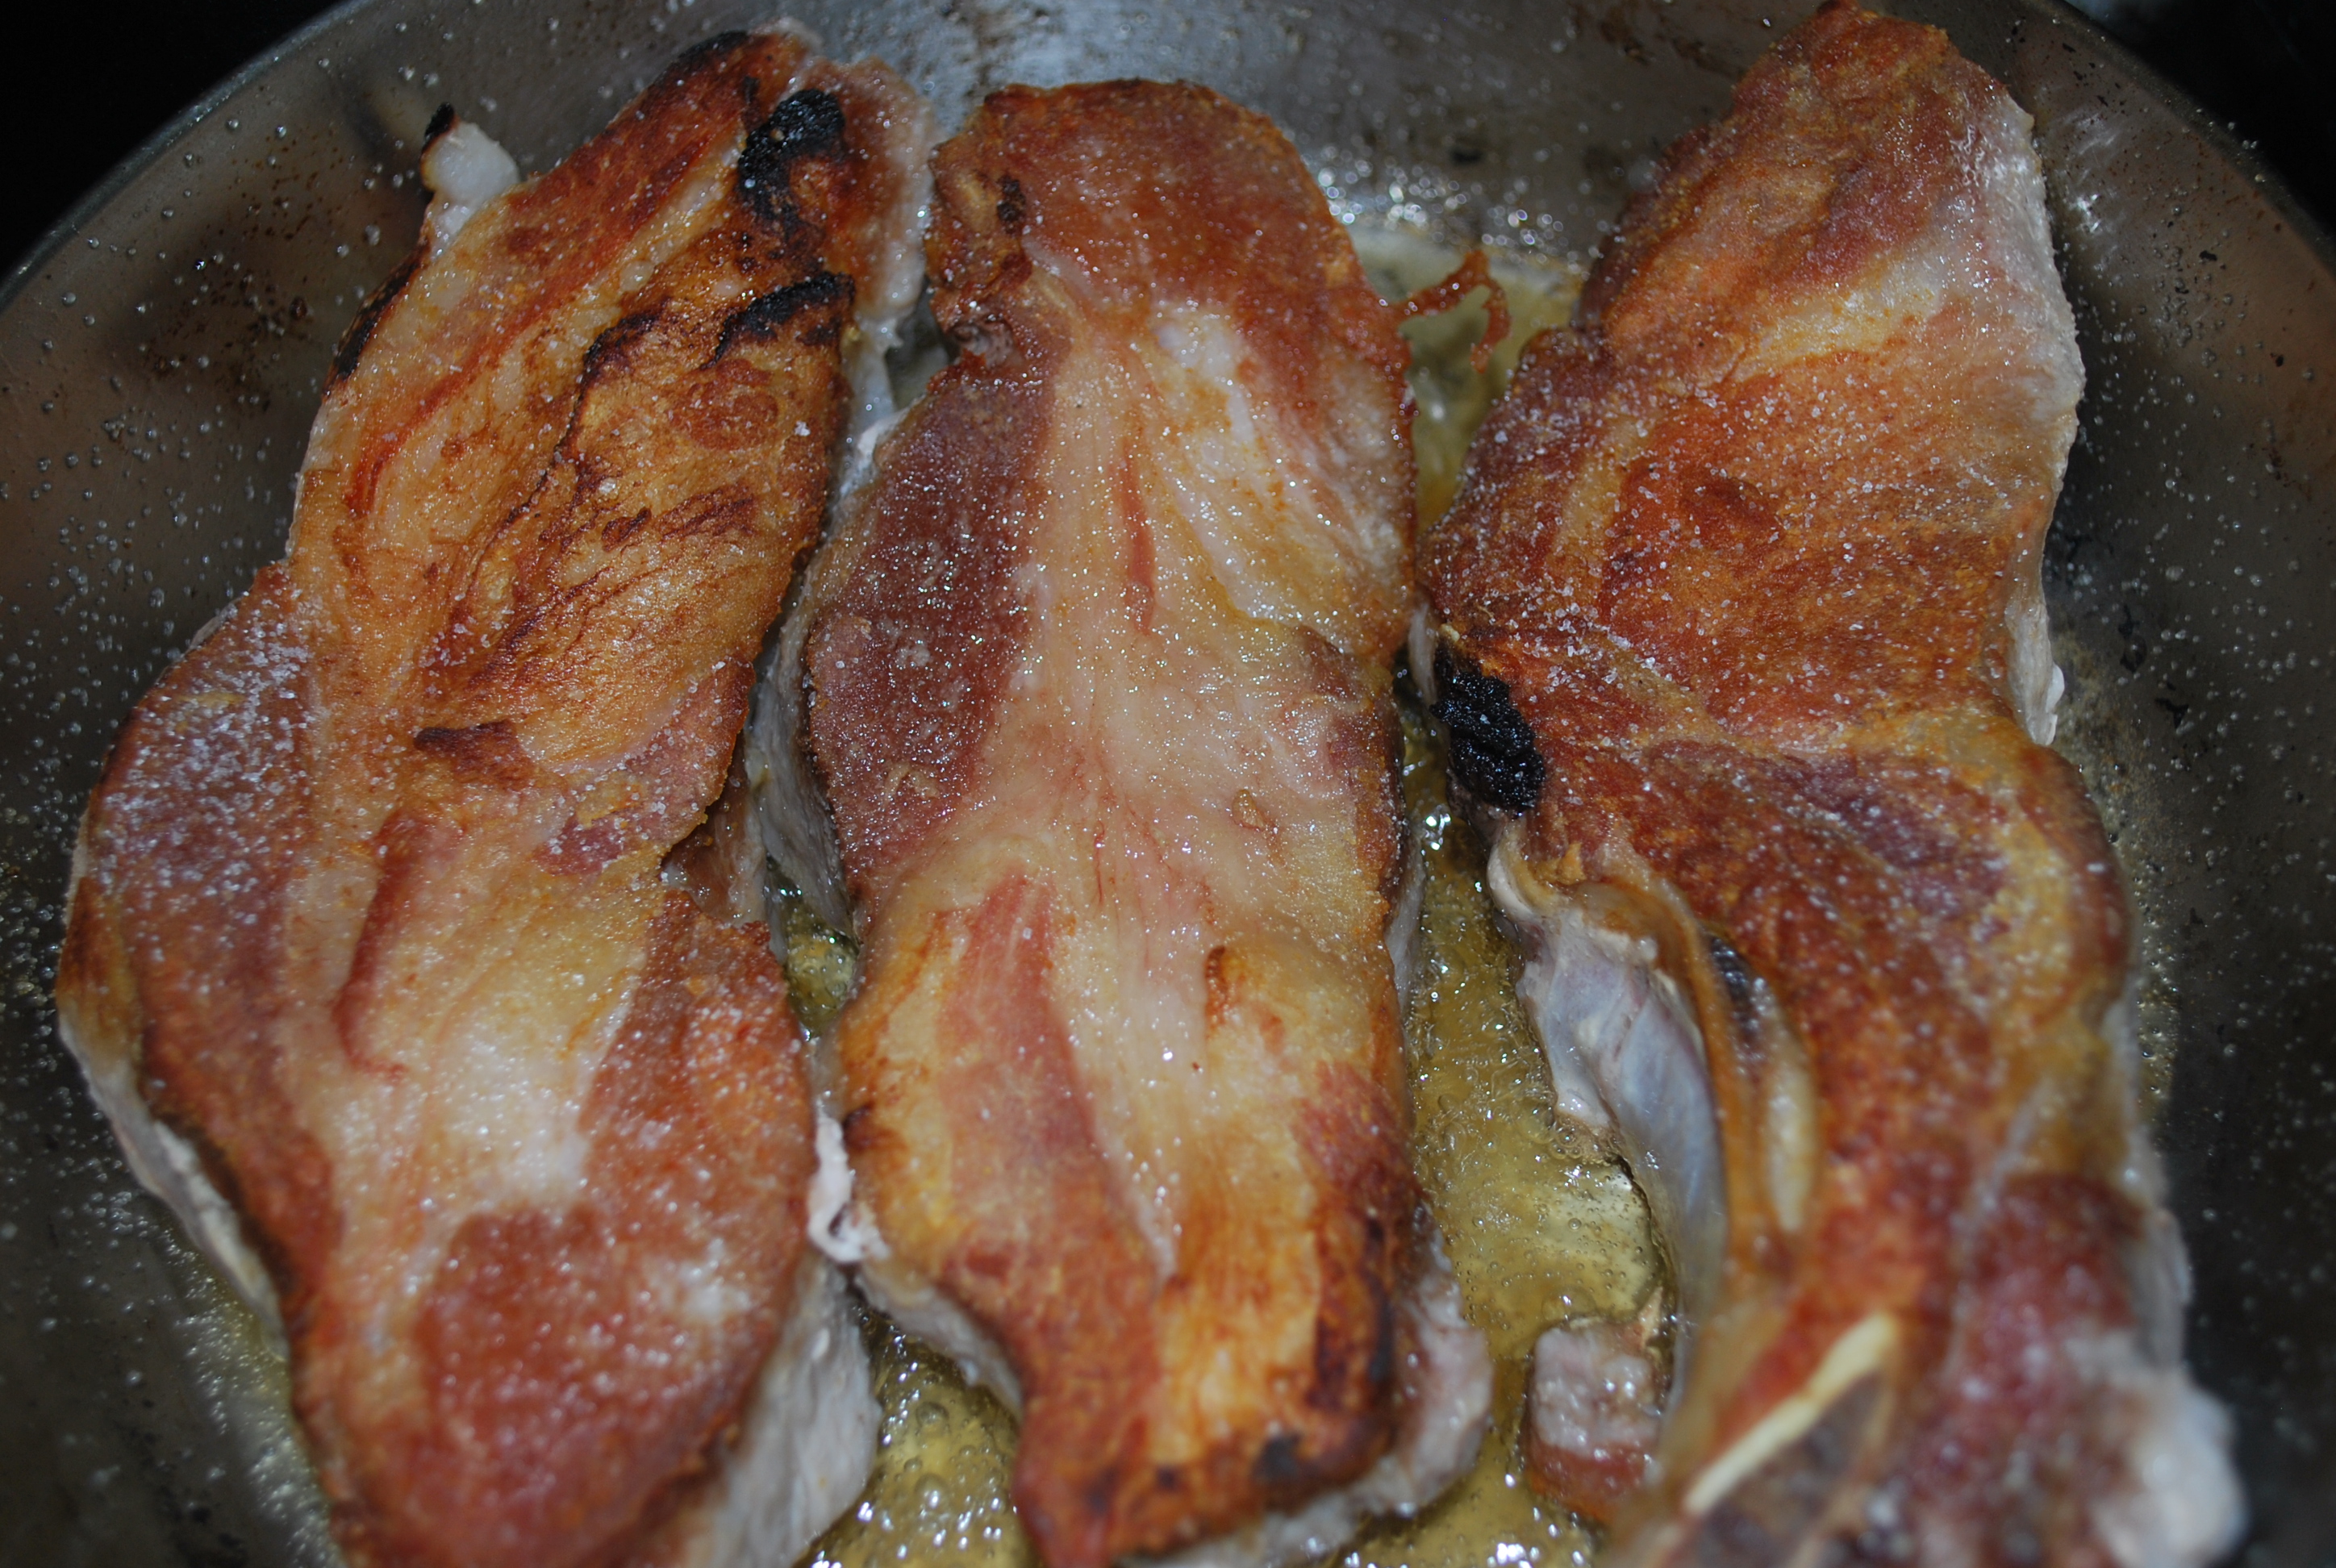
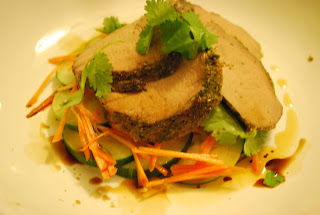
    I’ve been getting asked all week, “Doc, waht’d ya make for NewYears?”  Well the first answer is no resolutions.  They fail, we all know it. If you’re smart, you make an un-resolution.  Because it’s not a resolutions it doesn’t fail right?  My un-resolution was to make some wicked turkey for my guests.  I like to buy my turkey breasts whole on the bone, and roast them on the bone to get all that great flavor.  I’ll either make a gravy from the bones, or hack them up and save for them stock.  This brine is so flavorful and juicy you really don’t need any sauce (but you can make one if you want, that recipe will be up tomorrow)  this recipe will do  about an 6-8 lb. turkey front with the bone on. If you don’t  have a pot or another vessel big enough to hold both breasts with the bone on, no big deal, look for some brining bags or ask your butcher to de-bone it.  If he won’t email me and I’ll help you out.  (If there are enough comments I’ll do some articles on butchery too)  I let the turkey sit for 24 hours in the brine,then let it come up to room temp before it was roasted at 300 for 80-90 minutes and 450 for 15-20 minutes to get the skin nice and brown.  Cooking times may very for your oven, they’re all calibrated differently, so if you don’t have a meat thermometer, get one.  I cook to 155, then let it carry to 165, so it doesn’t dry out.  You can do this recipe however you want.  I take the turkey off the bone and grill it in the summer, roast it in the winter, and sometime in the spring, I use this recipe as a base for corned turkey and corned beef (more on that in another episode) Here’s your brine:

    1 c. Your favorite Bourbon.  I can’t officially make recommendation because, well….I like all of them…
    Mmmm…..Turkey
    1/3c.  kosher salt
    1/4 c. honey
    2 tbsp pickling spice
    1/4 c. brown sugar
    4 qt water
    1-1.5 qt ice
    1/2 bunch sage
    1/2 bunch parsley
    1. First step, we need to cook the alcohol out of the bourbon (SACRILEGE….) not really sacrilege, the meat will come out tasting funny, we just want to flavor from all of those wonderful smokey, cured grains.  Be careful not to set anything on fire, just put it in a pot, turn the heat on medium high and reduce it by half.  
    2. This is easy right? Add the rest of the ingredients, except the ice, and bring them to a boil in a pot.  You need to stir every few minutes so the sugar and honey don’t sit on the bottom and burn. You’re only working with half of the liquid you need to chemically make a proper solution.  Why you ask?  Because you’re going to add the rest of the liquid as ice to cool the brine down nice and fast (Smart huh?, I’m not an Evil Doctor for nothing….)
    3.  After you’ve put the ice in the brine (please turn off the heat first….) put the turkey in the brine.  Use a plate or something to weigh the turkey down so it’s completely submerged.  If you have a brine bag, turn the turkey every 4-6 hours so that brine gets distributed evenly.
    4.  The next day, pop that bird in the oven, I like to baste it, even though there is s brine.  Baste about every 15-20 minutes.  If you need to add water to the  bottom of the roasting pan after 30-40 minuets or so, go ahead, sometimes you need to, to make sure you got enough of that beautiful turkey juice to baste with. When that turkey’s done don’t go hacking it up right away, although i know you wanna.  let that puppy rest for 10-15 minutes, then slice into it. that muscle tissue needs to relax a bit so those juices you worked so hard basting that turkey with stay in the meat.  (Don’t throw that juicy bird flavored goodness away, it makes an excellent base for a gravy, or a great addition to a stock.)  As a general rule of thumb regarding the cooking times I talked about earlier, once your bird hits about 140-145, crank that oven up to the 450 degree temperature.  I will crisp that skin up quite nicely, especially with all of the sugar and salt it absorbed from that brine. 
    As always, share out my blog on Facebook, Twitter, and Google+.
    Happy Eating
    -The Doctah